Suzuki Grand Vitara JB627. Service manual — part 387
9E-1 Glass / Windows / Mirrors:
Body, Cab and Accessories
Glass / Windows / Mirrors
General Description
Rear End Door Window Defogger System Description
S6JB0B9501001
The rear end door window defogger is controlled by BCM. For the BCM description refer to “BCM General Description
in Section 10B”.
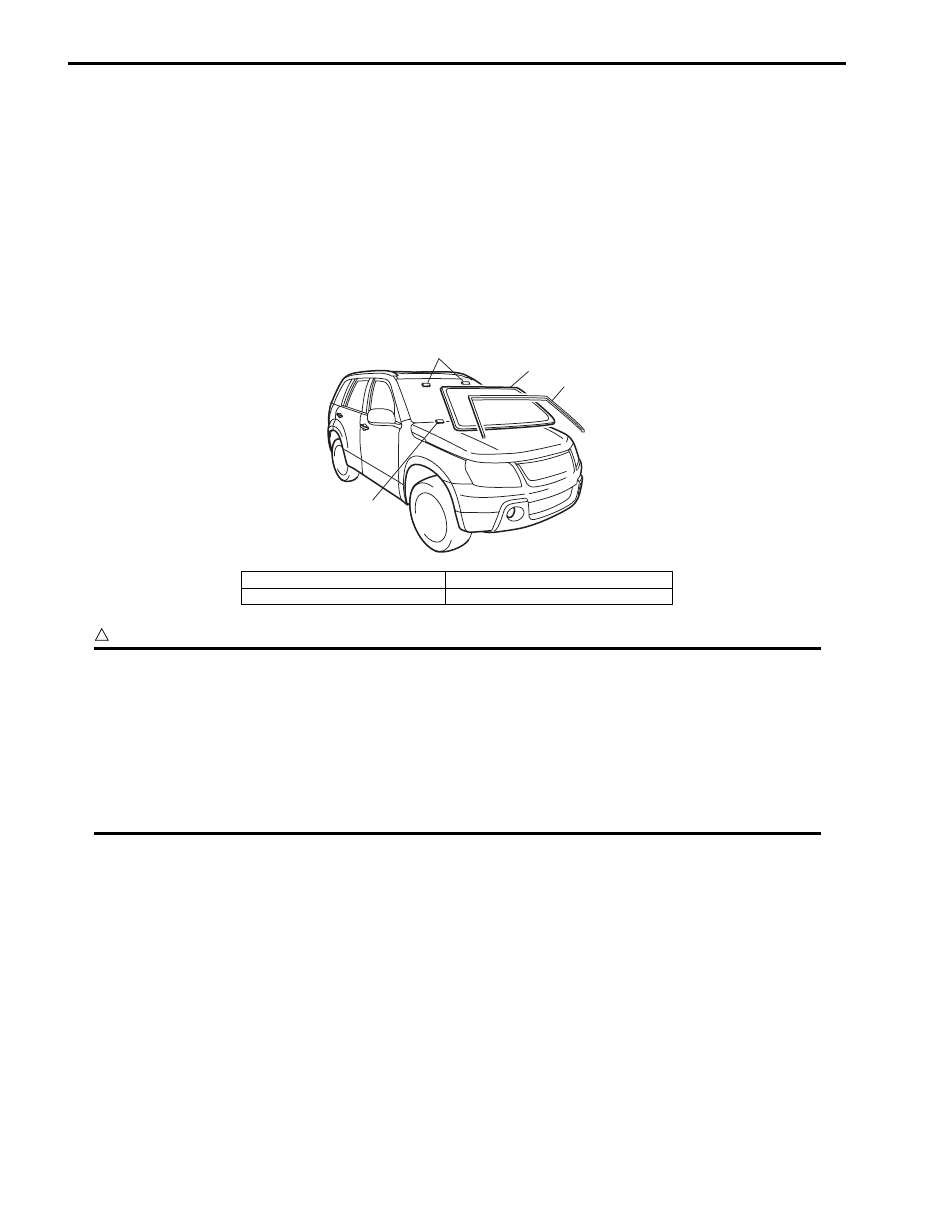
Windshield Construction
S6JB0B9501002
The windshield is installed by using a special type of adhesive (that is, one component urethane adhesive used with
primer). For the windshield replacement, it is important to use an adhesive which provides sufficient adhesion strength
and follow the proper procedure.
CAUTION
!
• Described is the glass replacement by using 3 types of primers and 1 type of adhesive made by
YOKOHAMA (one component urethane adhesive to be used with primer in combination). When
using primer and adhesive made by other manufacturers, be sure to refer to handling instructions
supplied with them. Negligence in following such procedure or misuse of the adhesive in any way
hinders its inherent adhesive property. Therefore, before the work, make sure to read carefully the
instruction and description given by the maker of the adhesive to be used and be sure to follow the
procedure and observe each precaution throughout the work.
• Should coated surface be scratched or otherwise damaged, be sure to repair damaged part, or
corrosion may start from there.
1. Windshield glass
3. Fastener
2. Windshield molding
3
3
1
2
I5JB0A950001-01

Glass / Windows / Mirrors: 9E-2
Use the specific adhesive which has the following property.
Glass adhesive shearing strength
40 kg/cm
2
(569 lb/in
2
) or more
Adhesive materials and tools required for removal and installation.
• One component urethane adhesive and primers used in combination (For one sheet of windshield).
– Adhesive (470 g (15.7 oz.))
– Primer for glass (30 g (1.0 oz.))
– Primer for body (30 g (1.0 oz.))
– Primer for molding (30 g (1.0 oz.))
• Eyeleteer
• Piano string
• Windshield knife
• Brush for primer application (2 pcs)
• Knife
• Rubber sucker grip
• Sealant gun (for filling adhesive)
• Putty spatula (for correcting adhered parts)
Rear Quarter Window Construction
S6JB0B9501003
The rear quarter window is installed by using a special type of adhesive (that is, one component urethane adhesive
used with primer). For the rear quarter window replacement, it is important to use an adhesive which provides
sufficient adhesion strength and follow the proper procedure.
CAUTION
!
• Described is the glass replacement by using 3 types of primers and 1 type of adhesive made by
YOKOHAMA (one component urethane adhesive to be used with primer in combination). When
using primer and adhesive made by other manufacturers, be sure to refer to handling instructions
supplied with them. Negligence in following such procedure or misuse of the adhesive in any way
hinders its inherent adhesive property. Therefore, before the work, make sure to read carefully the
instruction and description given by the maker of the adhesive to be used and be sure to follow the
procedure and observe each precaution throughout the work.
• Should coated surface be scratched or otherwise damaged, be sure to repair damaged part, or
corrosion may start from there.
I5JB0A950002-01
[A]: 3 door model
1. Rear quarter window glass
3. Fastener
[B]: 5 door model
2. Rear quarter window glass clip
: Do not reuse.
9E-3 Glass / Windows / Mirrors:
Use the specific adhesive which has the following property.
Glass adhesive shearing strength
40 kg/cm
2
(569 lb/in
2
) or more
Adhesive materials and tools required for removal and installation.
• One component urethane adhesive and primers used in combination (For one sheet of rear quarter window).
– Adhesive (470 g (15.7 oz.))
– Primer for glass (30 g (1.0 oz.))
– Primer for body (30 g (1.0 oz.))
– Primer for molding (30 g (1.0 oz.))
• Eyeleteer
• Piano string
• Windshield knife
• Brush for primer application (2 pcs)
• Knife
• Rubber sucker grip
• Sealant gun (for filling adhesive)
• Putty spatula (for correcting adhered parts)
Diagnostic Information and Procedures
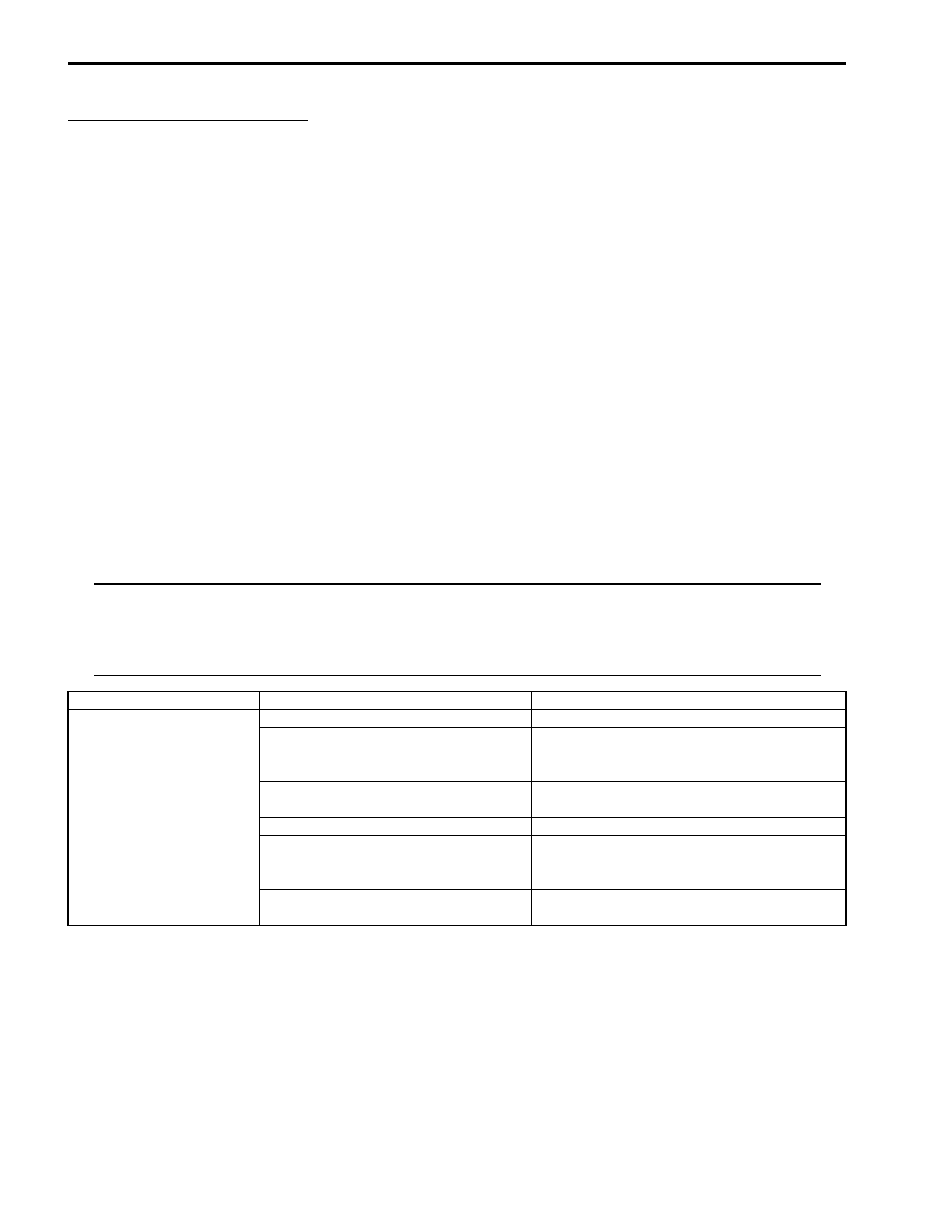
Rear End door Window Defogger Symptom Diagnosis
S6JB0B9504001
NOTE
• Use of SUZUKI scan tool makes it easy to check whether a faulty condition is on the input side or
output side of BCM. For checking procedure, refer to “Diagnosis Using Output Test Function of
SUZUKI Scan Tool” under “Scan Tool Data in Section 10B”.
• Check each part in the order from the top of the following list.
Condition
Possible cause
Correction / Reference Item
Rear end door window
defogger does not
operate
Circuit fuse blown
Replace fuse and check for short circuit.
Rear end door window defogger relay
faulty
Check rear end door window defogger relay
referring to “Rear End Door Window Defogger
Relay Inspection”.
Defogger wire faulty
Check defogger wire referring to “Rear End
Door Window Defogger Wire Inspection”.
Wiring or grounding faulty
Repair circuit.
HVAC control module faulty
Check HVAC control module referring to
“HVAC Control Module and Its Circuits
Inspection in Section 7B”.
BCM faulty
Replace after making sure that none of above
parts is faulty.

Glass / Windows / Mirrors: 9E-4
Power Window Control System Symptom Diagnosis
S6JB0B9504002
Power Door Mirror Control System Symptom Diagnosis
S6JB0B9504003
Door Mirror Heater Symptom Diagnosis (If Equipped)
S6JB0B9504004
NOTE
• Use of SUZUKI scan tool makes it easy to check whether a faulty condition is on the input side or
output side of BCM. For checking procedure, refer to “Diagnosis Using Output Test Function of
SUZUKI Scan Tool” under “Scan Tool Data in Section 10B”.
• Check each part in the order from the top of the following list.
Condition
Possible cause
Correction / Reference Item
All power windows do not
operate
Circuit fuse blown
Replace fuse and check for short circuit.
Power window main switch faulty
Check power window main switch referring to
“Power Window Main Switch Inspection”.
Ignition switch faulty
Check ignition switch referring to “Ignition
Switch Inspection in Section 9C”.
Wiring or grounding faulty
Repair circuit.
Only one power window
does not operate
Power window main switch faulty
Check power window main switch referring to
“Power Window Main Switch Inspection”.
Power window sub switch faulty
Check power window sub switch referring to
“Power Window Sub Switch Inspection”.
Wiring and/or coupler faulty
Check wiring and/or coupler.
Power window regulator faulty
Check window regulator.
Power window motor faulty
Check power window motor.
Wiring or grounding faulty
Repair circuit.
Condition
Possible cause
Correction / Reference Item
All power mirrors do not
operate
Circuit fuse blown
Replace fuse and check for short circuit.
Power door mirror switch faulty
Check power door mirror switch referring to
“Power Door Mirror Switch Inspection”.
Wiring or grounding faulty
Repair circuit.
One power mirror does
not operate
Power door mirror switch faulty
Check power door mirror switch referring to
“Power Door Mirror Switch Inspection”.
Power door mirror actuator faulty
Check actuator refraining to “Power Door
Mirror Actuator Inspection”.
Wiring or grounding faulty
Repair circuit.
Condition
Possible cause
Correction / Reference Item
All door mirror heaters
does not operate
Circuit fuse blown
Replace fuse and check for short circuit.
Mirror heater relay faulty
Check mirror heater relay referring to “Door
Mirror Heater Relay Inspection (If Equipped)”.
Wiring or grounding faulty
Repair circuit.
HVAC control module faulty
Check HVAC control module referring to
“HVAC Control Module and Its Circuits
Inspection in Section 7B”.
BCM faulty
Replace after making sure that none of above
parts is faulty.
Only one door mirror
heater does not operate
Door mirror heater faulty
Check door mirror heater referring to “Door
Mirror Heater Inspection (If Equipped)”.
Wiring or grounding faulty
Repair circuit.
Нет комментариевНе стесняйтесь поделиться с нами вашим ценным мнением.
Текст