Suzuki Grand Vitara JB627. Service manual — part 135

2D-2 Wheels and Tires:
Replacement Tires
When replacement is necessary, the original equipment
type tire should be used. Refer to the “Tire Placard”.
Replacement tires should be of the same size, load
range and construction as those originally on the vehicle.
Use of any other size or type tire may affect ride,
handling, speedometer / odometer calibration, vehicle
ground clearance and tire or snow chain clearance to the
body and chassis.
It is recommended that new tires be installed in pairs on
the same axle. If necessary to replace only one tire, it
should be paired with the tire having the most tread, to
equalize braking traction.
WARNING
!
Do not mix different types of tires on the
same vehicle such as radial, bias and bias-
belted tires except in emergencies, because
handling may be seriously affected and may
result in loss of control.
The metric term for tire inflation pressure is the kilo
pascal (kPa). Tire pressures is usually printed in both
kPa and kgf/cm
2
on the “Tire Placard”.
Metric tire gauges are available from tool suppliers.
The chart, shown the table, converts commonly used
inflation pressures from kPa to kgf/cm
2
and psi.
Wheels Description
S6JB0B2401002
Wheel Maintenance
Wheel repairs that use welding, heating, or peening are
not approved. All damaged wheels should be replaced.
Replacement Wheels
Wheels must be replaced if they are bent, dented, have
excessive lateral or radial runout, air leak through welds,
have elongated bolt holes, if lug nuts won’t stay tight, or
if they are heavily rusted. Wheels with greater runout
than shown in the following may cause objectional
vibrations.
Replacement wheels must be equivalent to the original
equipment wheels in load capacity, diameter, rim with
offset and mounting configuration. A wheel of improper
size or type may affect wheel and bearing life, brake
cooling, speedometer / odometer calibration, vehicle
ground clearance and tire clearance to body and
chassis.
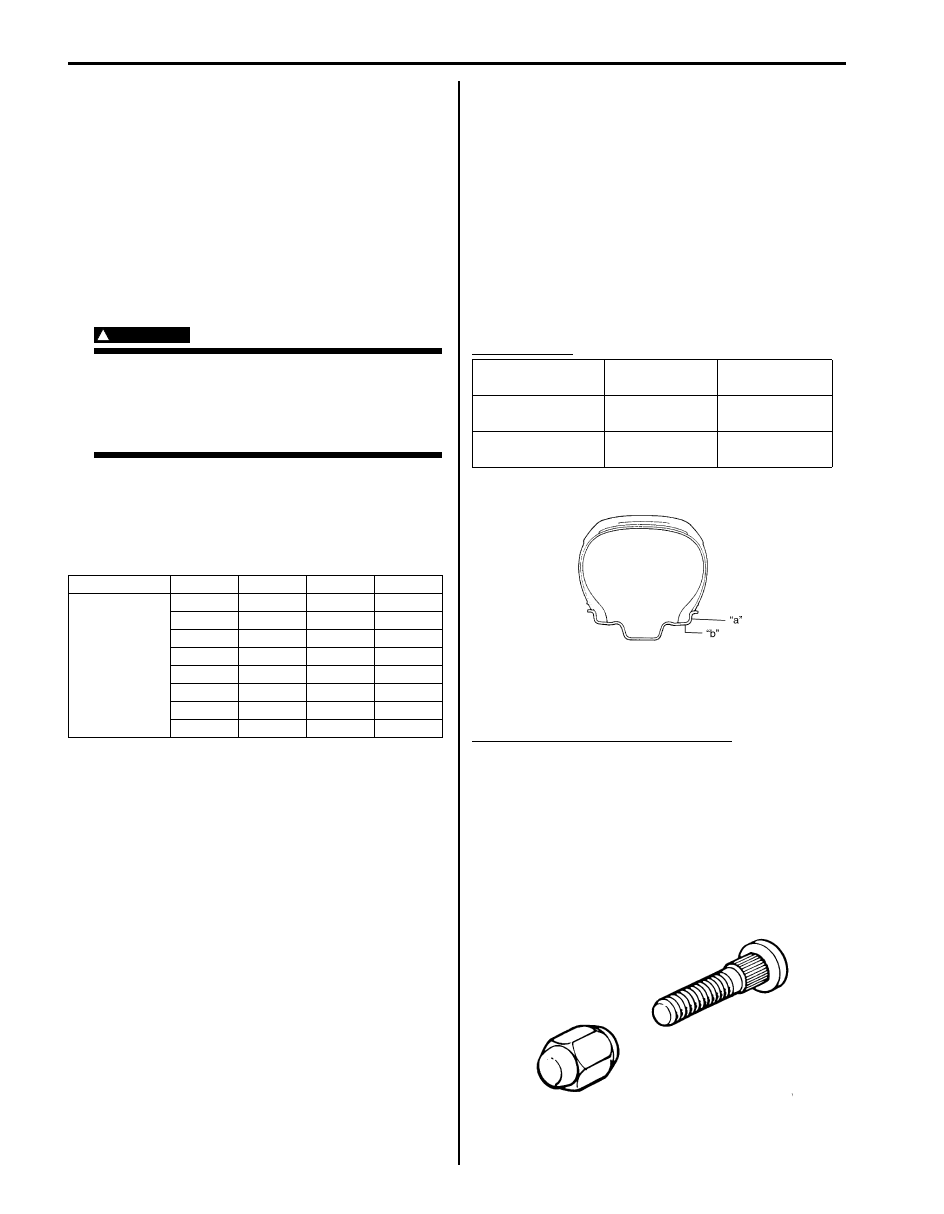
How to Measure Wheel Runout
To measure the wheel runout, it is necessary to use an
accurate dial indicator. The tire may be on or off the
wheel. The wheel should be installed to the wheel
balancer of the like for proper measurement.
Take measurements of both lateral runout “a” and radial
runout “b” at both inside and outside of the rim flange.
With the dial indicator set in place securely, turn the
wheel one full revolution slowly and record every reading
of the indicator.
When the measured runout exceeds the specification
and correction by the balancer adjustment is impossible,
replace the wheel. If the reading is affected by welding,
paint or scratch, it should be ignored.
Wheel Runout
Metric Lug Nuts and Wheel Studs
All models use metric lug nuts and wheel studs.
Metric lug nuts and wheel studs size
M12 x 1.25
If a broken stud is found, see “Front Wheel Hub, Disc,
Nut and Bearing Check in Section 2B”, “Rear Wheel
Disc, Nut and Bearing Check in Section 2C”, “Front
Wheel Hub Assembly Removal and Installation in
Section 2B” and/or “Rear Wheel Hub Assembly Removal
and Installation in Section 2C”, for Note and
Replacement procedure.
kPa
kgf/cm
2
psi
bar
Conversion:
1 psi =
6.895 kPa
1 kgf/cm
2
=
98.066 kPa
1bar =
100 kpa
160
1.6
23
1.6
180
1.8
26
1.8
200
2.0
29
2.0
220
2.2
32
2.2
240
2.4
35
2.4
260
2.6
38
2.6
280
2.8
41
2.8
300
3.0
44
3.0
Lateral runout
limit
Radial runout
limit
Steel wheel
1.20 mm
(0.047 in.)
0.70 mm
(0.027 in.)
Aluminum wheel
0.30 mm
(0.011 in.)
0.30 mm
(0.011 in.)
I4RS0A240001-01
I2RH01240003-01

Wheels and Tires: 2D-3
Irregular and/or Premature Wear Description
S6JB0B2401003
Irregular and premature wear has many causes. Some
of them are as follows: incorrect inflation pressures, lack
of tire rotation, driving habits, improper alignment.
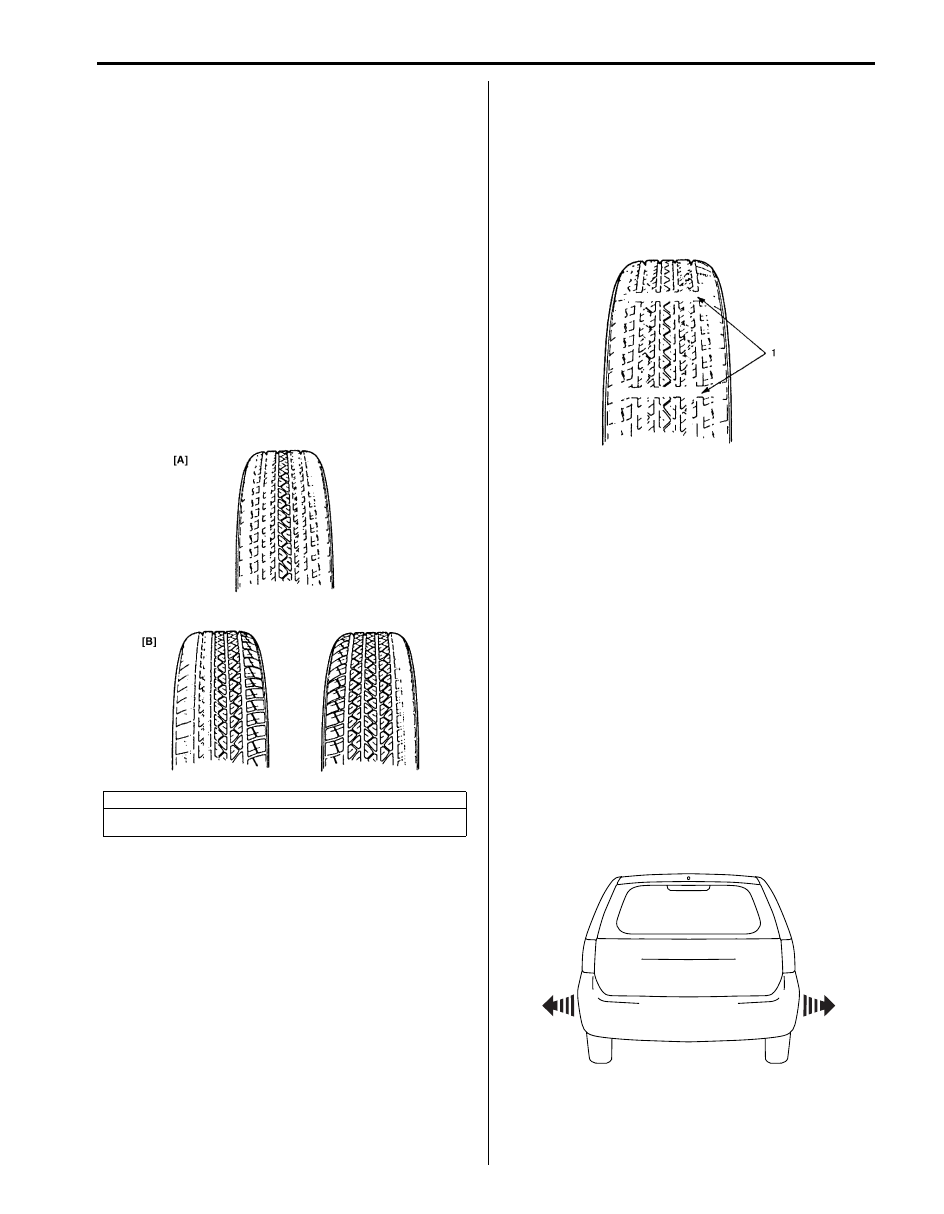
If the following conditions are noted, rotation is
necessary:
• Front tire wear is different from rear.
• Uneven wear exists across the tread of any tire.
• Both side of front tire wears are not even.
• Both side of rear tire wears are not even.
• There is cupping, flat spotting, etc.
A wheel alignment check is necessary if following
conditions are noted:
• Both side of front tire wears are not even.
• Wear is uneven across the tread of any front tire.
• Front tire treads have scuffed appearance with
“feather” edges on one side of tread ribs or blocks.
Wear Indicators Description
S6JB0B2401004
Original equipment tires have built-in tread wear
indicators (1) to show when they need replacement.
These indicators (1) will appear as 12 mm (0.47 in) wide
bands when the tire tread depth becomes 1.6 mm (0.063
in).
When the indicators (1) appear in 3 or more grooves at 6
locations, tire replacement is recommended.
Radial Tire Waddle Description
S6JB0B2401005
Waddle is side to side movement at the front and/or rear
of the vehicle. It is caused by the steel belt not being
straight within the tire. It is most noticeable at a low
speed, 8 to 48 kph (5 to 30 mph).
It is possible to locate the faulty tire by road testing the
vehicle. If it is on the rear, the rear end of the vehicle
shakes from side to side or “waddles”. To the driver in
the seat, it feels as though someone is pushing on the
side of vehicle.
If the faulty tire is on the front, waddling is more visual.
The front sheet metal appears to be moving back and
forth and the driver feels as though he is at the pivot
point in vehicle.
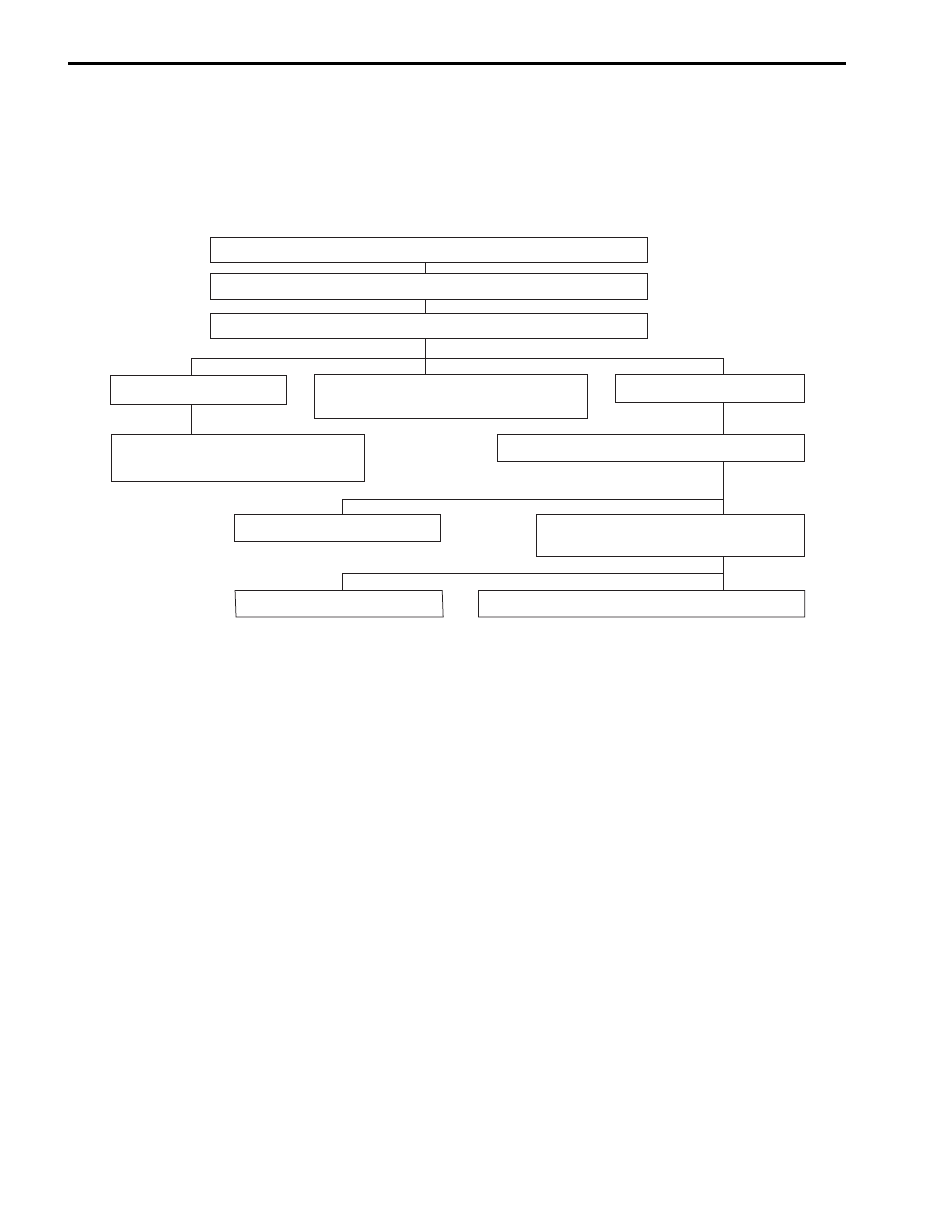
Waddle can be quickly diagnosed by using Tire Problem
Detector (TPD) and following the equipment
manufacture’s recommendations.
If TPD is not available, an alternative method of
substituting known-good tire / wheel assemblies can be
used as follows, although it takes a longer time.
[A]: Hard Cornering, under inflation or lack of tire rotation
[B]: Incorrect wheel alignment, tire construction not uniform or wheel
heavy acceleration
I3RH0A240002-01
I2RH01240005-01
I2RH01240006-01

2D-4 Wheels and Tires:
1) Ride vehicle to determine whether the front or rear waddles.
2) Install tires and wheels that are known to be good (on similar vehicle) in place of those on waddling end of vehicle.
If waddling end cannot be identified, substitute rear ones.
3) Road test again. If improvement is noted, reinstall originals one at a time till waddle causal tire is found. If no
improvement is noted, install known-good tires in place of all four. Then reinstall originals in the same manner.
Equipment manufacture’s recommendations
Inflate tires to recommended pressure
Road test vehicle on level unrouned road in both directions
Switch front tires side to side and road test again
Lead corrected,
if roughness results, replace tires
Leads in same direction
Leads reverses direction
Put tires back in original position
and check alignment
Install a known-good tire on one front side
Lead remains install a known-good
tire in place of other front tire
Lead remains known-good tires are not good
Lead corrected replace tire
Lead corrected replace tire
I2RH01240007-01

Wheels and Tires: 2D-5
Radial Tire Lead / Pull Description
S6JB0B2401006
“Lead / Pull” is the deviation of the vehicle from a straight
path on a level road even with no pressure on the
steering wheel.
Lead is usually caused by the following conditions.
• Improper tire and wheel alignment.
• Uneven brake assemblies.
• Tire construction.
The way in which a tire is built can produce lead in a
vehicle. An example of this is placement of the belt. Off
center belts on radial tires can cause the tire to develop
a side force while rolling straight down the road. If one
side of the tire has a little larger diameter than the other,
the tire will tend to roll to one side. This will develop a
side force which can produce vehicle lead.
The procedure in the figure (Lead Diagnosis) should be
used to make sure that wheel alignment is not mistaken
for tire lead.
• Part of the lead diagnosis procedure is different from
the proper tire rotation pattern currently in the owner
and manuals. If a medium to high mileage tire
is moved to the other side of the vehicle, be sure to
check that ride roughness has not developed
• Rear tires will not cause lead.
Balancing Wheels Description
S6JB0B2401007
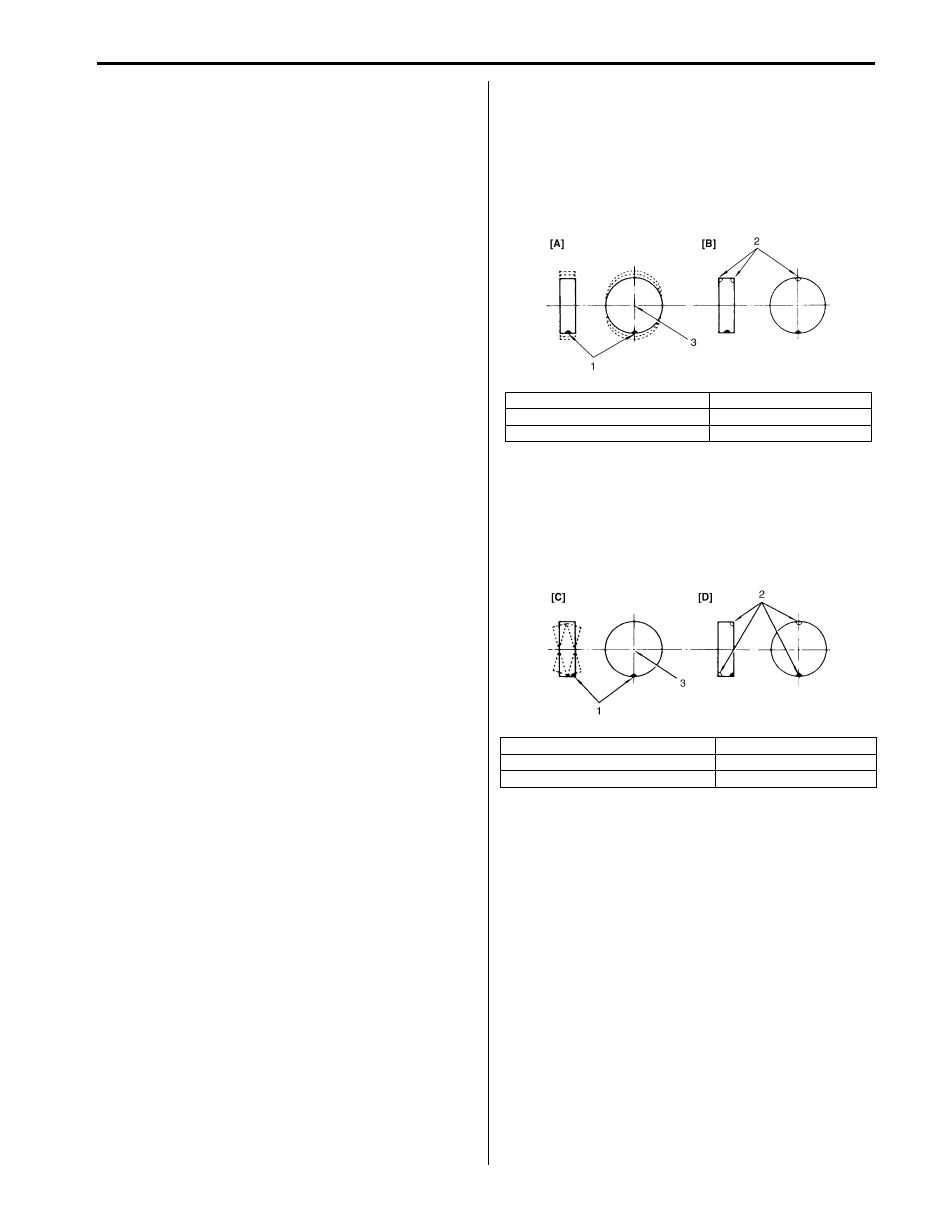
There are two types of wheel and tire balance: static and
dynamic. Static balance, as shown in figure, is the equal
distribution of weight around the wheel. Wheels that are
statically unbalanced cause a bouncing action called
tramp. This condition will eventually cause uneven tire
wear.
Dynamic balance, as shown in figure, is the equal
distribution of weight on each side of the wheel
centerline so that when the tire spins there is no
tendency for the assembly to move from side to side.
Wheels that are dynamically unbalanced may cause
shimmy.
1. Heavy spot wheel tramp
[A]: Before correction
2. Balance weights addition point
[B]: Corrective weights
3. C/L of spindle
1. Heavy spot wheel shimmy
[C]: Before correction
2. Balance weights addition point
[D]: Corrective weights
3. C/L of spindle
I2RH01240008-01
I2RH01240009-01

Нет комментариевНе стесняйтесь поделиться с нами вашим ценным мнением.
Текст