Opel Astra GTC (2018 year). Instruction — part 13
198
Driving and operating
Attach breakaway stopping cable to
eye.
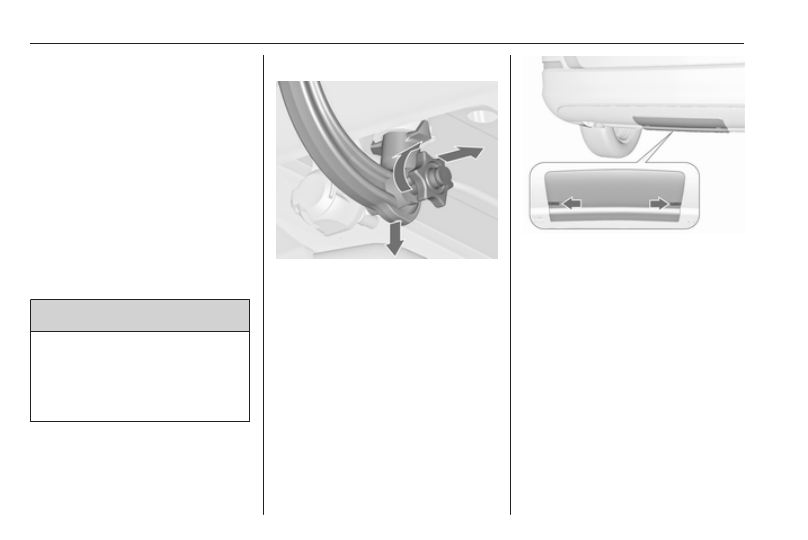
Check that the coupling ball bar is
correctly installed
● Green marking on rotary knob
must point towards green
marking on coupling ball bar.
● There must be no gap between
the rotary handle and the
coupling ball bar.
● The coupling ball bar must be
firmly engaged in the opening.
● The coupling ball bar must be
locked and the key removed.
9 Warning
Towing a trailer is permitted only
when a coupling ball bar is fitted
correctly. If the coupling ball bar
does not engage correctly, seek
the assistance of a workshop.
Dismounting the coupling ball bar
Open the protective flap and turn the
key to position c to unlock the
coupling ball bar.
Pull out rotary handle and turn
clockwise as far as it will go. Pull out
coupling ball bar downwards.
Insert sealing plug in opening. Fold
away socket.
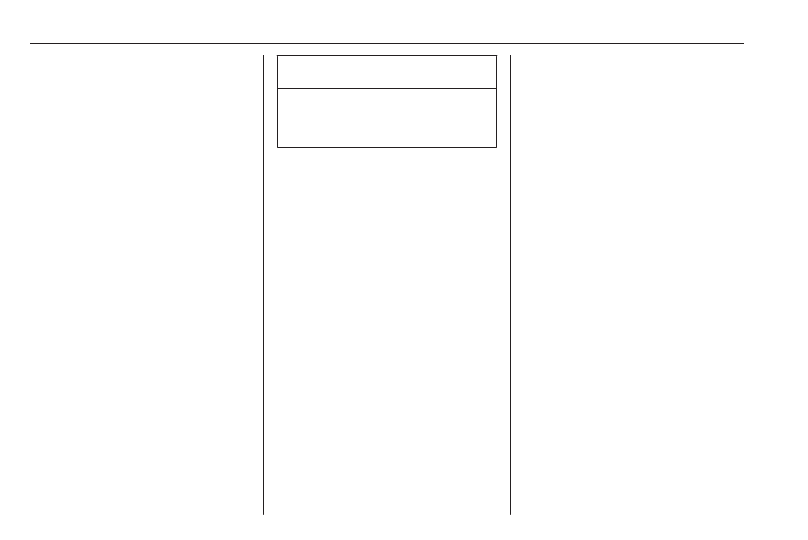
All versions except 3-door hatchback:
Attach the rear side of the cover into
the recess of the bumper and fold the
front side upward.
Press fastenings outward.
Trailer stability assist
If the system detects snaking
movements, engine power is reduced
and the vehicle/trailer combination is
selectively braked until the snaking
ceases. While system is working keep
steering wheel as still as possible.
Trailer stability assist (TSA) is a
function of the Electronic Stability
Control 3 155.
-------------------------------------------------------------------------------------------------------------------------------------------------------------
Vehicle care
199
Vehicle care
General Information . . . . ... 200
Accessories and vehicle
modifications . . . . . . .. 200
Vehicle storage . . . . . . 200
End-of-life vehicle recovery . . 201
Vehicle checks . . . . . . ... 201
Performing work . . . . . .. 201
Bonnet . . . . . . . . . . 201
Engine oil . . . . . . . . . 202
Engine coolant . . . . . . . 203
Power steering fluid . . . . . 204
Washer fluid . . . . . . . 204
Brakes . . . . . . . . . . 205
Brake fluid . . . . . . . ... 205
Vehicle battery . . . . . . . 205
Diesel fuel system bleeding . . 207
Wiper blade replacement . . 207
Bulb replacement . . . . . ... 208
Halogen headlights . . . . .. 208
Adaptive forward lighting . . . 211
Fog lights . . . . . . . . . 212
Front turn signal lights . . . . 214
Tail lights . . . . . . . . . 216
Side turn signal lights . . . .. 219
Number plate light . . . . ... 221
Interior lights . . . . . . . 221
Instrument panel illumination ... 221
Electrical system . . . . . . 222
Fuses . . . . . . . . . ... 222
Engine compartment fuse box . 223
Instrument panel fuse box . ... 225
Load compartment fuse box . 226
Vehicle tools . . . . . . . .. 227
Tools . . . . . . . . . . 227
Wheels and tyres . . . . . ... 229
Winter tyres . . . . . . . . 229
Tyre designations . . . . . 229
Tyre pressure . . . . . . .. 229
Tyre pressure monitoring
system . . . . . . . . . 231
Tread depth . . . . . . . . 234
Changing tyre and wheel size . 234
Wheel covers . . . . . . ... 235
Tyre chains . . . . . . . .. 235
Tyre repair kit . . . . . . .. 235
Wheel changing . . . . . ... 238
Spare wheel . . . . . . . 242
Jump starting . . . . . . . . 246
Towing . . . . . . . . . ... 247
Towing the vehicle . . . . ... 247
Towing another vehicle . . ... 248
Appearance care . . . . . ... 249
Exterior care . . . . . . . 249
Interior care . . . . . . . . 252
-------------------------------------------------------------------------------------------------------------------------------------------------------------
200
Vehicle care
General Information
Accessories and vehicle
modifications
We recommend the use of genuine
parts and accessories and factory
approved parts specific for your
vehicle type. We cannot assess or
guarantee reliability of other products
- even if they have a regulatory or
otherwise granted approval.
Any modification, conversion or other
changes made to standard vehicle
specifications (including, without
limitation, software modifications,
modifications of the electronic control
units) may invalidate the warranty
offered by Opel. Furthermore, such
changes may affect driver assistance
systems, may impact fuel
consumption, CO
2
emissions and
other emissions of the vehicle and
cause the vehicle to no longer
conform to the operating permit,
impacting the validity of your vehicle
registration.
Caution
When transporting the vehicle on
a train or on a recovery vehicle, the
mud flaps might be damaged.
Vehicle storage
Storage for a long period of time
If the vehicle is to be stored for several
months:
● Wash and wax the vehicle.
● Have the wax in the engine
compartment and underbody
checked.
● Clean and preserve the rubber
seals.
● Fill up fuel tank completely.
● Change the engine oil.
● Drain the washer fluid reservoir.
● Check the coolant antifreeze and
corrosion protection.
● Adjust tyre pressure to the value
specified for full load.
● Park the vehicle in a dry, well
ventilated place. Engage first or
reverse gear or set selector lever
to P. Prevent the vehicle from
rolling.
● Do not apply the parking brake.
● Open the bonnet, close all doors
and lock the vehicle.
● Disconnect the clamp from the
negative terminal of the vehicle
battery. Beware that all systems
are not functional, e.g. anti-theft
alarm system.
Putting back into operation
When the vehicle is to be put back into
operation:
● Connect the clamp to the
negative terminal of the vehicle
battery. Activate the electronics
of the power windows.
● Check tyre pressure.
● Fill up the washer fluid reservoir.
● Check the engine oil level.
● Check the coolant level.
● Fit the number plate if necessary.
-------------------------------------------------------------------------------------------------------------------------------------------------------------
Vehicle care
201
End-of-life vehicle recovery
Information on end-of-life vehicle
recovery centres and the recycling of
end-of-life vehicles is available on our
website, where legally required. Only
entrust this work to an authorised
recycling centre.
Gas vehicles must be recycled by a
service centre authorised for gas
vehicles.
Vehicle checks
Performing work
9 Warning
Only perform engine compartment
checks when the ignition is off.
The cooling fan may start
operating even if the ignition is off.
9 Danger
The ignition system and Xenon
headlights use extremely high
voltage. Do not touch.
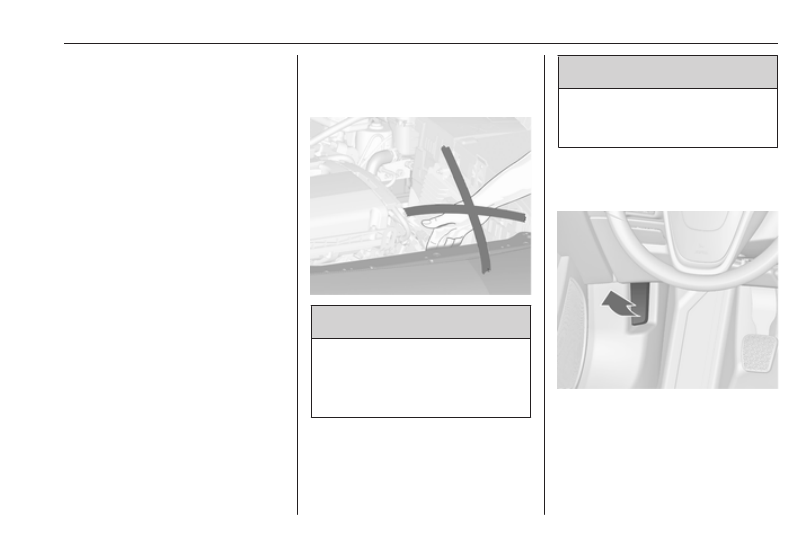
Bonnet
Opening
Pull the release lever and return it to
its original position.
-------------------------------------------------------------------------------------------------------------------------------------------------------------
202
Vehicle care
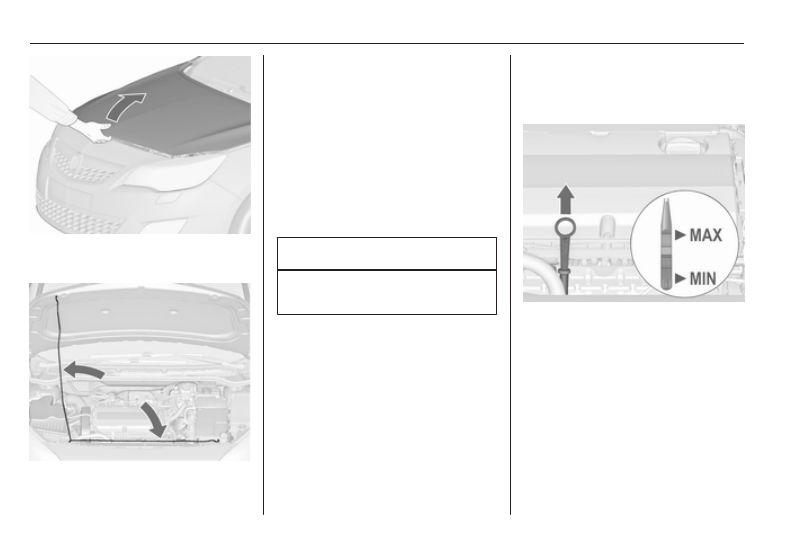
Move the safety catch sideways to the
left vehicle side and open the bonnet.
Secure the bonnet support.
If the bonnet is opened during an
Autostop, the engine will be restarted
automatically for safety reasons.
Closing
Before closing the bonnet, press the
support into the holder.
Lower the bonnet and allow it to fall
into the latch from a low height
(20-25 cm). Check that the bonnet is
engaged.
Caution
Do not press the bonnet into the
latch, to avoid dents.
Engine oil
Check the engine oil level instructionly
on a regular basis to prevent damage
to the engine. Ensure that the correct
specification of oil is used.
Recommended fluids and lubricants
The maximum engine oil
consumption is 0.6 l per 1000 km.
Check with the vehicle on a level
surface. The engine must be at
operating temperature and switched
off for at least five minutes.
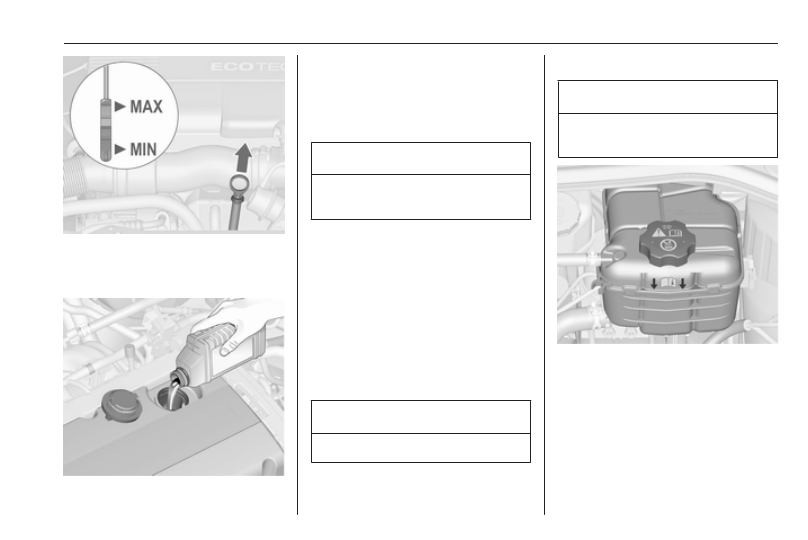
Pull out the dipstick, wipe it clean,
reinsert it fully, pull out and read the
engine oil level.
Different dipsticks are used
depending on engine variant.
-------------------------------------------------------------------------------------------------------------------------------------------------------------
Vehicle care
203
When the engine oil level has
dropped to the MIN mark, top up
engine oil.
We recommend the use of the same
grade of engine oil that was used at
last change.
The engine oil level must not exceed
the MAX mark on the dipstick.
Caution
Overfilled engine oil must be
drained or suctioned out.
Capacities 3 270.
Fit the cap on straight and tighten it.
Engine coolant
The coolant provides freeze
protection down to approx. -28 °C. In
cold regions with very low
temperatures, the factory filled
coolant provides frost protection
down to approx. -37 °C.
Caution
Only use approved antifreeze.
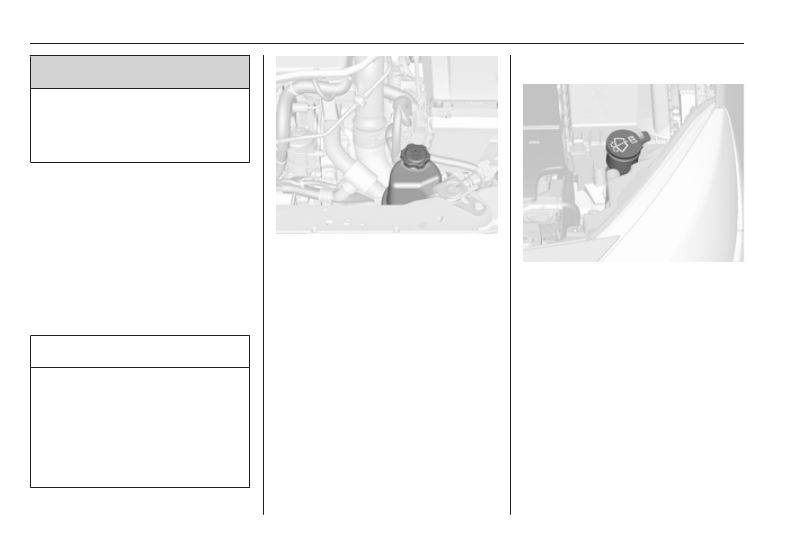
Coolant level
Caution
Too low a coolant level can cause
engine damage.
If the cooling system is cold, the
coolant level should be above the
filling line mark. Top up if the level is
low.
-------------------------------------------------------------------------------------------------------------------------------------------------------------
204
Vehicle care
9 Warning
Allow the engine to cool before
opening the cap. Carefully open
the cap, relieving the pressure
slowly.
To top up, use a 1:1 mixture of
approved coolant concentrate mixed
with clean tap water. If no coolant
concentrate is available, use clean
tap water. Install the cap tightly. Have
the coolant concentration checked
and have the cause of the coolant
loss remedied by a workshop.
Power steering fluid
Caution
Extremely small amounts of
contamination can cause steering
system damage and cause it to not
work properly. Do not allow
contaminates to contact the fluid
side of the reservoir cap/dipstick or
from entering the reservoir.
Power steering fluid level normally
does not have to be checked. If an
unusual noise sounds during steering
or the power steering reacts
unusually, seek the assistance of a
workshop.
Washer fluid
Fill with clean water mixed with a
suitable quantity of approved
windscreen washer fluid which
contains antifreeze.
-------------------------------------------------------------------------------------------------------------------------------------------------------------
Vehicle care
205
Caution
Only washer fluid with a sufficient
antifreeze concentration provides
protection at low temperatures or
after a sudden drop in
temperature.
Use of washer fluid containing
isopropanol can damage exterior
lamps.
Washer fluid 3 254.
Brakes
In the event of minimum thickness of
the brake lining, a squealing noise
sounds during braking.
Continued driving is possible but
have the brake lining replaced as
soon as possible.
Once new brake linings are installed,
do not brake unnecessarily hard for
the first few journeys.
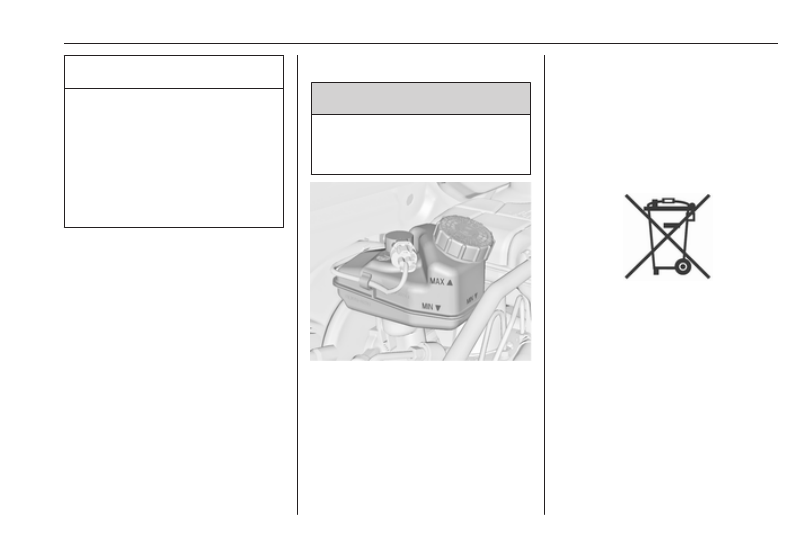
Brake fluid
9 Warning
Brake fluid is poisonous and
corrosive. Avoid contact with eyes,
skin, fabrics and painted surfaces.
The brake fluid level must be between
the MIN and MAX marks.
If fluid level is below MIN seek the
assistance of a workshop.
Brake and clutch fluid 3 254.
Vehicle battery
The vehicle battery is maintenance-
free provided that the driving profile
allows sufficient charging of the
battery. Short-distance-driving and
frequent engine starts can discharge
the battery. Avoid the use of
unnecessary electrical consumers.
Batteries do not belong in household
waste. They must be disposed of at
an appropriate recycling collection
point.
Laying up the vehicle for more than
four weeks can lead to battery
discharge. Disconnect the clamp from
the negative terminal of the vehicle
battery.
Ensure the ignition is switched off
before connecting or disconnecting
the vehicle battery.
-------------------------------------------------------------------------------------------------------------------------------------------------------------
206
Vehicle care
Vehicle battery discharge protection
128.
Disconnecting the battery
If the vehicle's battery is to be
disconnected (e.g. for maintenance
work), the alarm siren must be
deactivated as follows: Switch the
ignition on then off, then disconnect
the vehicle's battery within
15 seconds.
Replacing the vehicle battery
Note
Any deviation from the instructions
given in this section may lead to
temporary deactivation or
disturbance of the stop-start system.
When the vehicle battery is being
replaced, please ensure that there
are no open ventilation holes in the
vicinity of the positive terminal. If a
ventilation hole is open in this area, it
must be closed off with a dummy cap,
and the ventilation in the vicinity of the
negative terminal must be opened.
Only use vehicle batteries that allow
the fuse box to be mounted above the
vehicle battery.
Ensure that the battery is always
replaced by the same type of battery.
We recommend that you have the
vehicle battery replaced by a
workshop.
Stop-start system 3 142.
Charging the vehicle battery
9 Warning
On vehicles with stop-start
system, ensure that the charging
potential does not exceed
14.6 volts when using a battery
charger. Otherwise the vehicle
battery might be damaged.
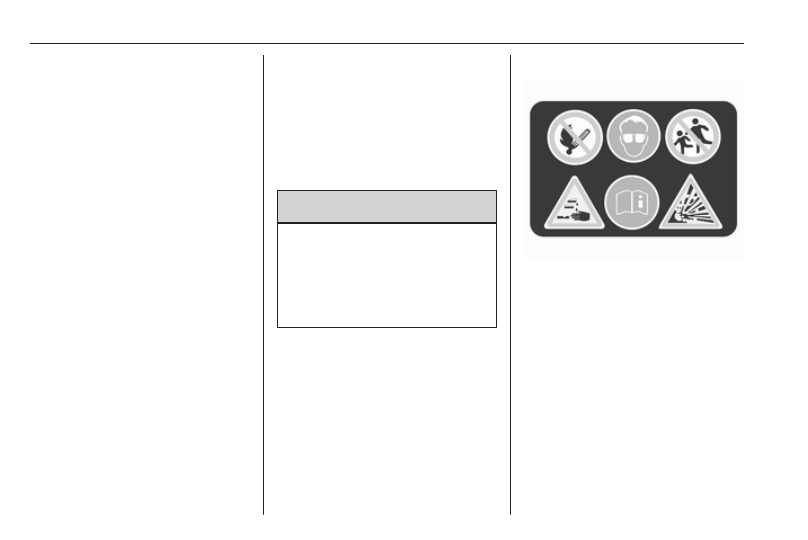
Warning label
Meaning of symbols:
● No sparks, naked flames or
smoking.
● Always shield eyes. Explosive
gases can cause blindness or
injury.
● Keep the vehicle battery out of
reach of children.
● The vehicle battery contains
sulphuric acid which could cause
blindness or serious burn
injuries.
-------------------------------------------------------------------------------------------------------------------------------------------------------------
Vehicle care
207
● See the Owner's Instruction for
further information.
● Explosive gas may be present in
the vicinity of the vehicle battery.
Diesel fuel system bleeding
If the tank has been run dry, the diesel
fuel system must be bled. Switch on
the ignition three times for
15 seconds at a time. Then crank the
engine for a maximum of
40 seconds. Repeat this process after
no less than five seconds. If the
engine fails to start, seek the
assistance of a workshop.
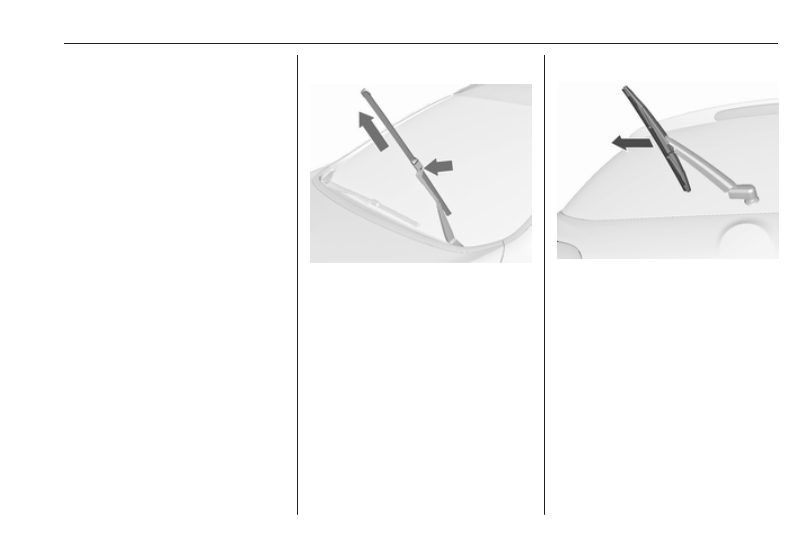
Wiper blade replacement
Lift the wiper arm until it stays in the
raised position, press button to
disengage the wiper blade and
remove.
Attach the wiper blade slightly angled
to the wiper arm and push until it
engages.
Lower wiper arm carefully.
Wiper blade on the rear window
Lift wiper arm. Disengage wiper blade
as shown in illustration and remove.
Attach the wiper blade slightly angled
to the wiper arm and push until it
engages.
Lower wiper arm carefully.
-------------------------------------------------------------------------------------------------------------------------------------------------------------
208
Vehicle care
Bulb replacement
Switch off the ignition and switch off
the relevant switch or close the doors.
Only hold a new bulb at the base. Do
not touch the bulb glass with bare
hands.
Use only the same bulb type for
replacement.
Replace headlight bulbs from within
the engine compartment.
Bulb check
After a bulb replacement switch on
the ignition, operate and check the
lights.
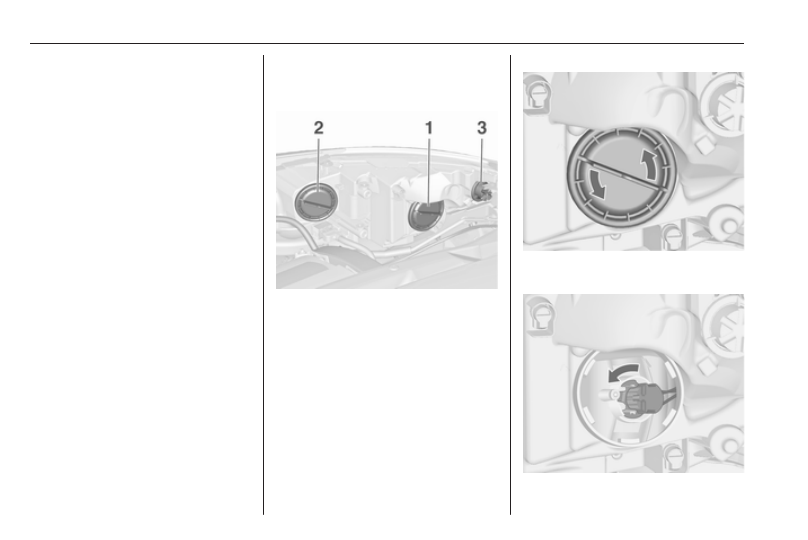
Halogen headlights
4-door notchback
Halogen headlights with separate
bulbs for low beam and high beam.
Low beam (1) outer bulb.
High beam (2) inner bulb.
Sidelight/Daytime running light (3).
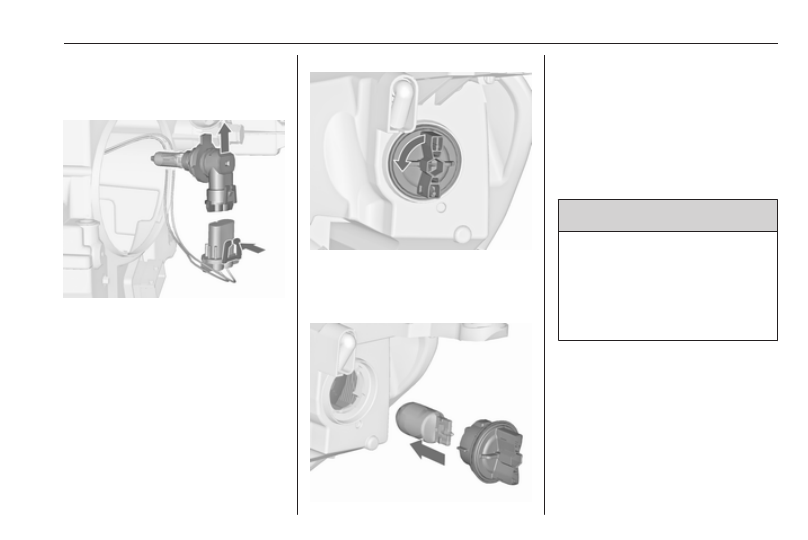
Low beam (1)
1. Rotate the cap (1) anticlockwise
and remove it.
-------------------------------------------------------------------------------------------------------------------------------------------------------------
Vehicle care
209
2. Rotate the bulb holder
anticlockwise to disengage.
Withdraw the bulb holder from the
reflector.
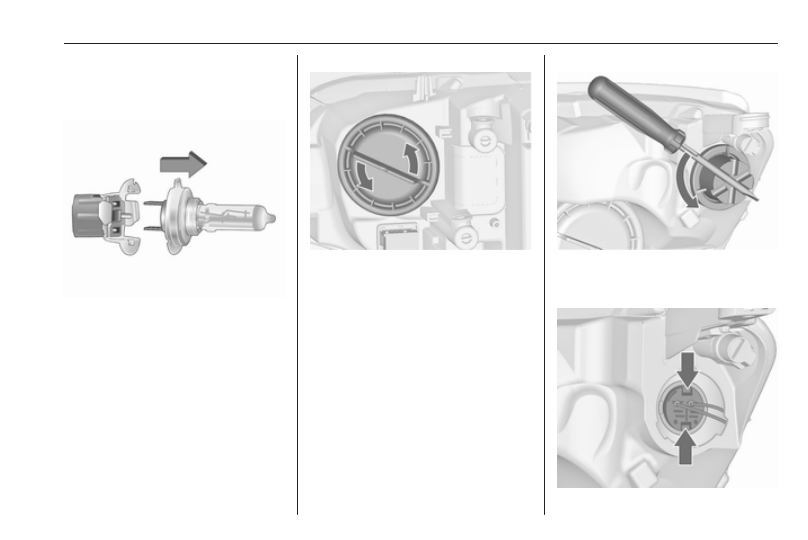
3. Detach the bulb from the bulb
holder and replace the bulb.
4. Insert the bulb holder, engaging
the two lugs into the reflector and
rotate clockwise to secure.
5. Fit the cap and rotate clockwise.
High beam (2)
1. Rotate the cap (2) anticlockwise
and remove it.
2. Rotate the bulb holder
anticlockwise to disengage.
Withdraw the bulb holder from the
reflector.
3. Detach the bulb from the bulb
holder and replace the bulb.
4. Insert the bulb holder, engaging
the two lugs into the reflector and
rotate clockwise to secure.
5. Fit the cap and rotate clockwise.
Sidelights/Daytime running light (3)
1. Rotate the cap (3) anticlockwise
and remove it. Use the
screwdriver to rotate the cap.
-------------------------------------------------------------------------------------------------------------------------------------------------------------
210
Vehicle care
2. Press latches together and
withdraw the bulb holder from the
reflector.
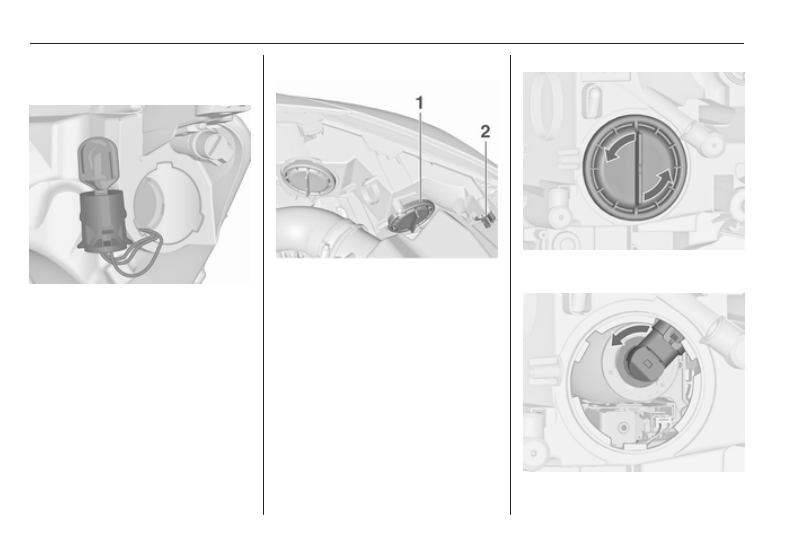
3. Remove the bulb from the socket
and replace the bulb.
4. Insert the bulb holder into the
reflector. Fit the cap and rotate
clockwise.
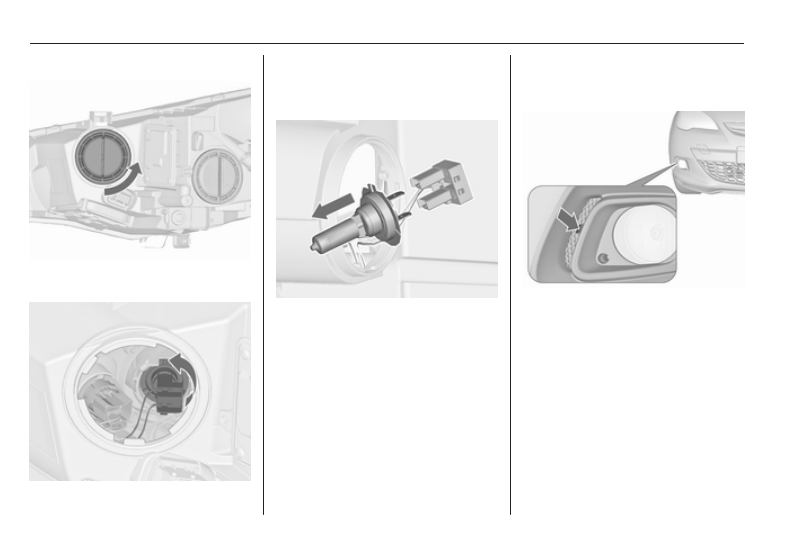
3-door hatchback
Bi-Halogen Headlight (1) with one
bulb for low and high beam.
Sidelight/Daytime running light (2).
Low/High beam (1)
1. Rotate the cap (1) anticlockwise
and remove it.
-------------------------------------------------------------------------------------------------------------------------------------------------------------
Vehicle care
211
2. Rotate the bulb holder
anticlockwise to disengage.
Withdraw the bulb holder from the
reflector.
3. Disengage the bulb holder from
the plug connector by pressing
the retaining lug.
4. Replace the bulb and connect
bulb holder with the plug
connector.
5. Insert the bulb holder, engaging
the two lugs into the reflector and
rotate clockwise to secure.
6. Fit the cap and rotate clockwise.
Sidelight/Daytime running light (2)
1. Rotate bulb socket (2)
anticlockwise to disengage.
Withdraw the bulb socket from the
reflector.
2. Remove the bulb from the socket
by pulling.
3. Replace and insert new bulb into
socket.
4. Insert the bulb socket into the
reflector and turn clockwise.
Adaptive forward lighting
9 Danger
Adaptive forward lighting system
uses Xenon headlights.
Xenon headlights work under
extremely high electrical voltage.
Do not touch. Have bulbs replaced
by a workshop.
Sidelight/Daytime running lights are
designed as Light Emitting Diodes
(LEDs) and cannot be changed.
Bulbs for corner lighting can be
changed.
-------------------------------------------------------------------------------------------------------------------------------------------------------------
212
Vehicle care
Corner lighting
1. Rotate the cap anticlockwise and
remove it.
2. Rotate the bulb holder
anticlockwise to disengage.
Withdraw the bulb holder from the
reflector.
3. Disengage the bulb from the plug
connector by pulling.
4. Replace the bulb and connect
bulb holder with the plug
connector.
5. Insert the bulb holder, engaging
the two lugs into the reflector and
rotate clockwise to secure.
6. Fit the cap and rotate clockwise.
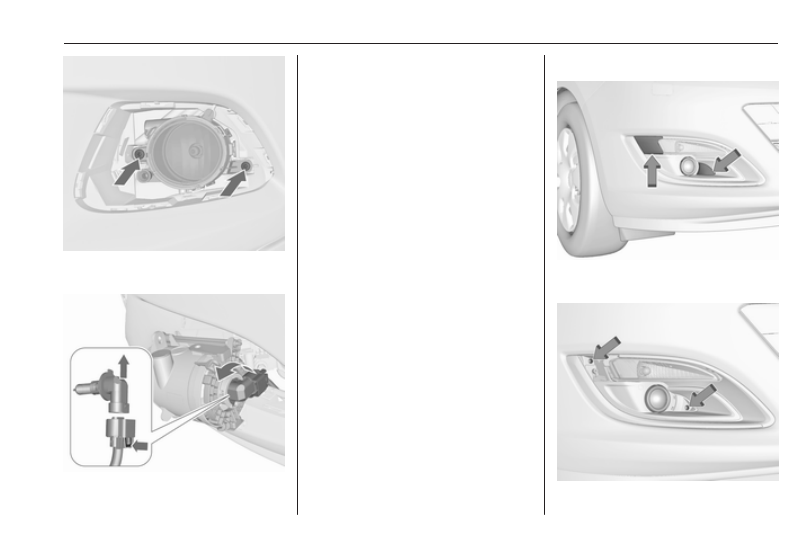
Fog lights
3-door hatchback
1. Disengage the cover with a
screwdriver in the recess and
remove the cover.
-------------------------------------------------------------------------------------------------------------------------------------------------------------
Vehicle care
213
2. Unscrew both screws and remove
light assembly from the bumper.
3. Turn the bulb socket
anticlockwise and remove it from
the reflector housing.
4. Disengage the bulb socket from
the plug connector by pressing
the retaining lug.
5. Remove and replace the bulb
socket with bulb and attach the
plug connector.
6. Insert the bulb socket into the
reflector housing by turning
clockwise and engage.
7. Mount the light assembly by
tightening both screws.
8. Assemble and engage the cover.
4-door notchback
1. Release both caps with a
screwdriver at the marked area.
-------------------------------------------------------------------------------------------------------------------------------------------------------------
Нет комментариевНе стесняйтесь поделиться с нами вашим ценным мнением.
Текст