Opel Frontera UBS. Service manual — part 2894

8H–28 SECURITY AND LOCKS
Programming Anti-Theft Warning
When the anti-theft and keyless entry control unit is
replaced, the security code must be programmed after
installation.
1. Insert the Isuzu system PCMCIA card into the Tech 2.
2. Connect the SAE 16/19 adaptor to the data link
connector (DLC) cable.
3. Connect the DLC cable to the Tech 2.
4. Confirm that the starter switch is off.
5. Connect the Tech 2 SAE 16/19 adaptor to the vehicle
DLC.
6. Verify the Tech 2 power up display.
060RW009
7. Press the enter key.
8. Select “F0 : Diagnostics” and press the enter key.
9. Select the model year and press the enter key.
10. Select the vehicle type and press the enter key.
11. Select “F2 : Body” and press the enter key.
12. Select “Anti Theft Warning” and press the enter key.
13. Turn the starter switch on and press the confirm key
(soft key).
14. Confirm “Partnumber” , “Country Code” and
“Production Date” and press the confirm key (soft
key).
15. Select “F4 : Programming” and press the enter key.
16. Select “F2 : Program Anti Theft Warning” and press
the enter key.
17. Press the confirm key (soft key).
18. Press the confirm key (soft key).
19. Enter the security code and press the enter key.
20. Press the okey key (soft key).
21. Enter the security code and press the enter key.
22. Press the okey key (soft key).
23. Press the soft key to select “Remote Key”.
24. Select country code and press the enter key.
25. Press the confirm key (soft key).
Programming Remote Key
When the anti-theft and keyless entry control unit is
replaced and/or the new transmitter (remote key) is
supplied, the ID code of the transmitter must be
programmed by the following procedure.
1. Perform the step 1. to 15. of “Programming Anti Theft
Warning”.
2. Select “F1: Program Remote Key” and press the
enter key.
3. Press the confirm key (soft key).
4. Press the lock button of the transmitter until the
display changes.
5. Press the confirm key (soft key).
6. Press the Yes or No key (soft key).
Erasing Remote Keys
All the ID code stored in the control unit can be erased by
the following procedure.
1. Perform the step 1. to 15. of “Programming Anti Theft
Warning”.
2. Select “F0: Erase Remote Keys” and press the enter
key.
3. Press the confirm key (soft key).
4. Press the confirm key (soft key).
5. Press the confirm key (soft key).

SECURITY AND LOCKS
8H–29
Main Data and Specifications
Torque Specifications
Application
N·m
Kg·m
Lb Ft
Lb In
Front Door Lock Assembly Fixing Screws
7
0.7
—
61
Front Outside Handle and Key Switch Fixing Bolts
9
0.9
—
78
Rear Door Lock Assembly Fixing Screws
7
0.7
—
61
Rear Outside Handle Fixing Bolts
9
0.9
—
78
Tailgate Lock Assembly (LH) Fixing Screws
7
0.7
—
61
Tailgate Lock Assembly (RH) Fixing Bolts
11
1.1
—
95
Tailgate Outside Handle and Key Cylinder Fixing Bolts
9
0.9
—
78
SUN ROOF/CONVERTIBLE TOP
8I–1
BODY AND ACCESSORIES
SUN ROOF/CONVERTIBLE TOP
CONTENTS
Service Precaution
8I–1
. . . . . . . . . . . . . . . . . . . . . .
Sun Roof Glass
8I–2
. . . . . . . . . . . . . . . . . . . . . . . . .
Sun Roof Glass and Associated Parts
8I–2
. . . .
Removal
8I–2
. . . . . . . . . . . . . . . . . . . . . . . . . . . . .
Installation
8I–3
. . . . . . . . . . . . . . . . . . . . . . . . . . . .
Sun Roof Deflector
8I–4
. . . . . . . . . . . . . . . . . . . . . .
Removal
8I–4
. . . . . . . . . . . . . . . . . . . . . . . . . . . . .
Installation
8I–4
. . . . . . . . . . . . . . . . . . . . . . . . . . . .
Sunshade
8I–4
. . . . . . . . . . . . . . . . . . . . . . . . . . . . . .
Disassembled View
8I–4
. . . . . . . . . . . . . . . . . . . .
Removal
8I–5
. . . . . . . . . . . . . . . . . . . . . . . . . . . . .
Installation
8I–5
. . . . . . . . . . . . . . . . . . . . . . . . . . . .
Sun Roof Frame Complete Assembly
8I–6
. . . . . .
Sun Roof Frame Complete Assembly and
Associated Parts
8I–6
. . . . . . . . . . . . . . . . . . . . . .
Removal
8I–6
. . . . . . . . . . . . . . . . . . . . . . . . . . . . .
Installation
8I–7
. . . . . . . . . . . . . . . . . . . . . . . . . . . .
Disassembled View
8I–7
. . . . . . . . . . . . . . . . . . . .
Disassembly
8I–7
. . . . . . . . . . . . . . . . . . . . . . . . . .
Reassembly
8I–8
. . . . . . . . . . . . . . . . . . . . . . . . . .
Sun Roof Drain Hose (Front Side)
8I–9
. . . . . . . . .
Sun Roof Drain Hose (Front Side) and
Associated Parts
8I–9
. . . . . . . . . . . . . . . . . . . . . .
Removal
8I–9
. . . . . . . . . . . . . . . . . . . . . . . . . . . . .
Installation
8I–9
. . . . . . . . . . . . . . . . . . . . . . . . . . . .
Sun Roof Drain Hose (Rear Side)
8I–10
. . . . . . . . .
Sun Roof Drain Hose (Rear Side) and
Associated Parts
8I–10
. . . . . . . . . . . . . . . . . . . . . .
Removal
8I–10
. . . . . . . . . . . . . . . . . . . . . . . . . . . . .
Installation
8I–10
. . . . . . . . . . . . . . . . . . . . . . . . . . . .
Sun Roof Switch
8I–11
. . . . . . . . . . . . . . . . . . . . . . . .
General Description
8I–11
. . . . . . . . . . . . . . . . . . . . .
Removal
8I–11
. . . . . . . . . . . . . . . . . . . . . . . . . . . . .
Installation
8I–11
. . . . . . . . . . . . . . . . . . . . . . . . . . . .
Sun Roof Motor
8I–12
. . . . . . . . . . . . . . . . . . . . . . . . .
Removal
8I–12
. . . . . . . . . . . . . . . . . . . . . . . . . . . . .
Installation
8I–12
. . . . . . . . . . . . . . . . . . . . . . . . . . . .
Main Data and Specifications
8I–12
. . . . . . . . . . . . .
Service Precaution
WARNING: IF SO EQUIPPED WITH A
SUPPLEMENTAL RESTRAINT SYSTEM (SRS),
REFER TO THE SRS COMPONENT AND WIRING
LOCATION VIEW IN ORDER TO DETERMINE
WHETHER YOU ARE PERFORMING SERVICE ON OR
NEAR THE SRS COMPONENTS OR THE SRS
WIRING. WHEN YOU ARE PERFORMING SERVICE
ON OR NEAR THE SRS COMPONENTS OR THE SRS
WIRING, REFER TO THE SRS SERVICE
INFORMATION. FAILURE TO FOLLOW WARNINGS
COULD RESULT IN POSSIBLE AIR BAG
DEPLOYMENT, PERSONAL INJURY, OR
OTHERWISE UNNEEDED SRS SYSTEM REPAIRS.
CAUTION: Always use the correct fastener in the
proper location. When you replace a fastener, use
ONLY the exact part number for that application.
ISUZU will call out those fasteners that require a
replacement after removal. ISUZU will also call out
the fasteners that require thread lockers or thread
sealant. UNLESS OTHERWISE SPECIFIED, do not
use supplemental coatings (Paints, greases, or other
corrosion inhibitors) on threaded fasteners or
fastener joint interfaces. Generally, such coatings
adversely affect the fastener torque and the joint
clamping force, and may damage the fastener. When
you install fasteners, use the correct tightening
sequence and specifications. Following these
instructions can help you avoid damage to parts and
systems.
8I–2
SUN ROOF/CONVERTIBLE TOP
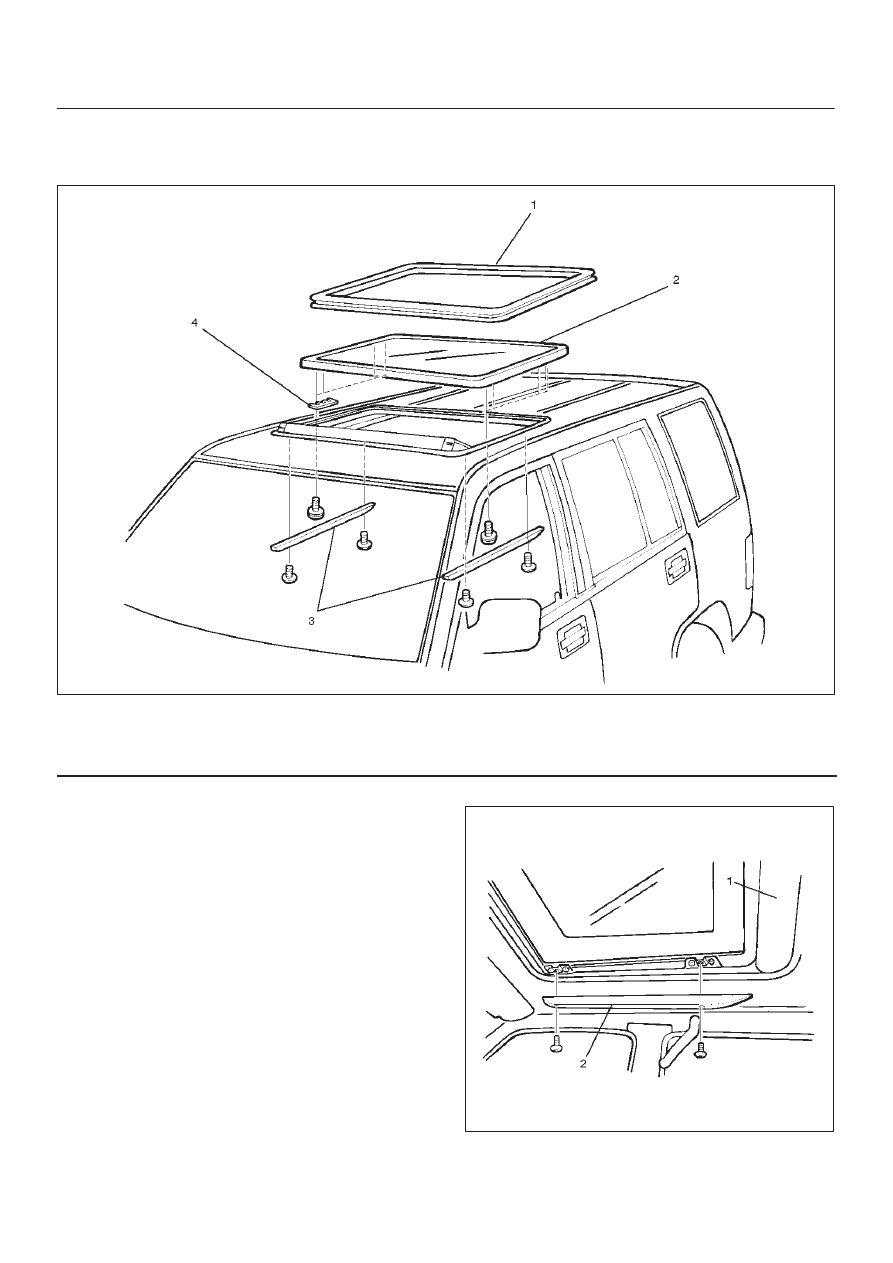
Sun Roof Glass
Sun Roof Glass and Associated Parts
665RS002
Legend
(1) Sun Roof Weatherstrip
(2) Sun Roof Glass
(3) Decoration Cover
(4) Sun Roof Shim
Removal
1. Open the sun roof and pull the sun roof weatherstrip
out from the roof panel.
2. Close the sun roof and open the sunshade(1). Then,
remove the decoration cover fixing screws and
decoration cover(2).
665RS003
Нет комментариевНе стесняйтесь поделиться с нами вашим ценным мнением.
Текст