Opel Frontera UBS. Service manual — part 1385
6E–134
4JX1–TC ENGINE DRIVEABILITY AND EMISSIONS
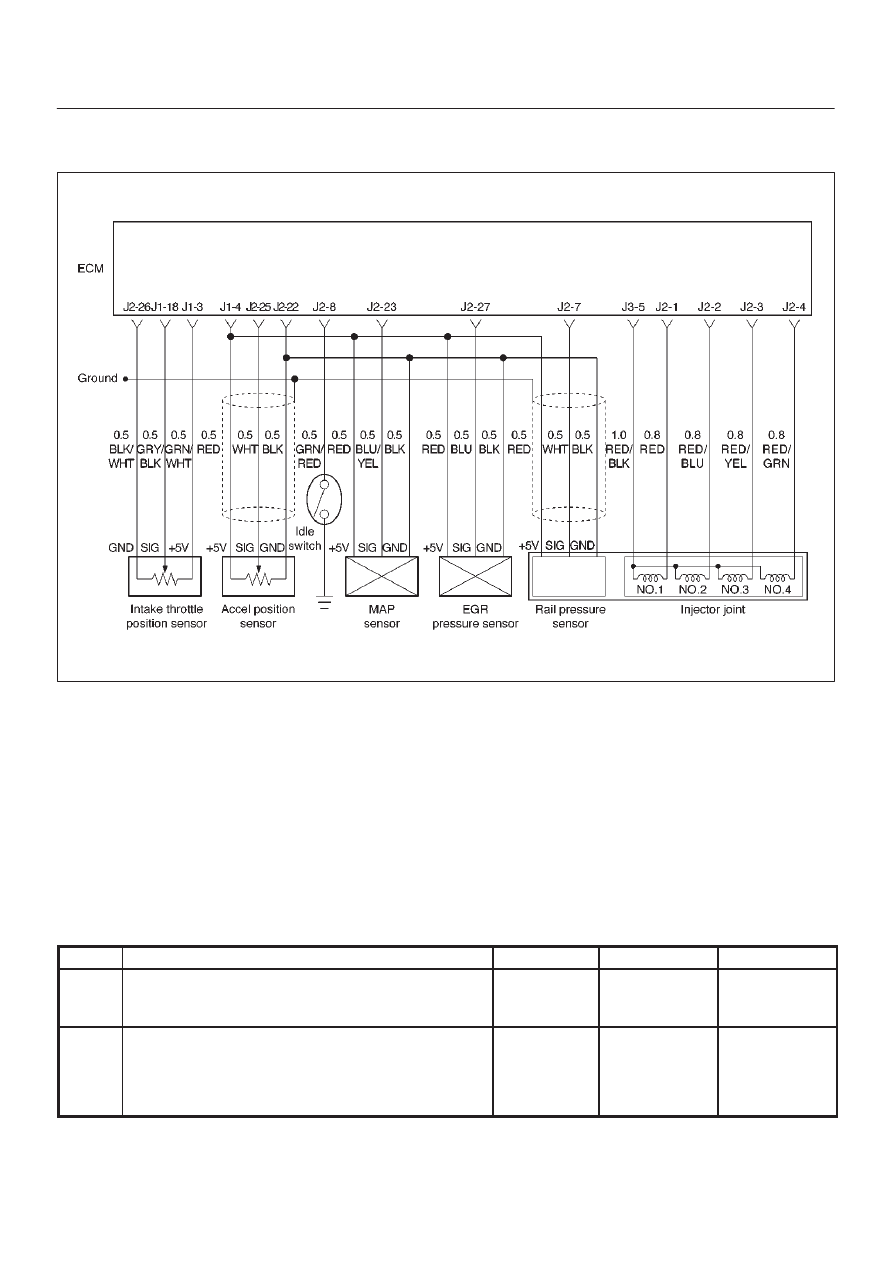
Diagnostic Trouble Code (DTC) P0405 (Flash DTC 26)
EGR Pressure Sensor Low Voltage
060RW134
Action Taken When the DTC Sets
D
The ECM will illuminate the malfunction indicator lamp
(MIL) as soon as failure detected.
D
The ECM will store conditions which were present
when the DTC was set as Freeze Frame and in Failure
Records data.
Conditions for Clearing the MIL/DTC
D
DTC P0405 can be cleared by using the scan tool
“Clear Info” function or by disconnecting the ECM
battery feed.
Diagnostic Aids
Check for the following conditions:
D
Poor connection or damaged harness – Inspect the
wiring harness for damage.
DTC P0405 – EGR Pressure Sensor Low Voltage
Step
Action
Value(s)
Yes
No
1
Was the “On-Board Diagnostic (OBD) System Check”
performed?
—
Go to
Step 2
Go to
OBD
System
Check
2
Put the engine into an idling status.
Is the EGR pressure sensor voltage value displayed on
the Tech 2 below the specified value?
0.25 V
Go to
Step 3
Refer to
Diagnostic
AidsandSymp
tom
Diagnosis

6E–135
4JX1–TC ENGINE DRIVEABILITY AND EMISSIONS
DTC P0405 – EGR Pressure Sensor Low Voltage
(Cont'd)
Step
No
Yes
Value(s)
Action
3
1. Turn off the ignition switch.
2. Remove the sensor connector connection.
3. Jumper between harness pins “red” and “blue”
wires.
4. Turn on the ignition switch “ON”.
Is the EGR pressure sensor voltage reading above the
specified value?
4 V
Go to
Step 5
Go to
Step 4
4
1. Turn off the ignition switch.
2. Remove the jumper wire.
3. Connect the relay & solenoid checker
(5-8840-0386-0) to the battery voltage, then check
the EGR pressure sensor signal circuit (blue wire).
4. Turn on the ignition switch.
Is the value displayed on the Tech 2 above the specified
value?
4 V
Go to
Step 6
Go to
Step 7
5
Check the terminal connection at the EGR pressure
sensor and repair or replace terminal if necessary.
Is the action complete?
—
Verify repair
—
6
Repair the 5V power circuit (red) harness or Replace
the ECM (Refer to the Data Programming in Case of
ECM change).
Is the action complete?
—
Verify repair
—
7
Repair the signal circuit (blue) harness or Replace the
ECM (Refer to the Data Programming in Case of ECM
change).
Is the action complete?
—
Verify repair
—
6E–136
4JX1–TC ENGINE DRIVEABILITY AND EMISSIONS
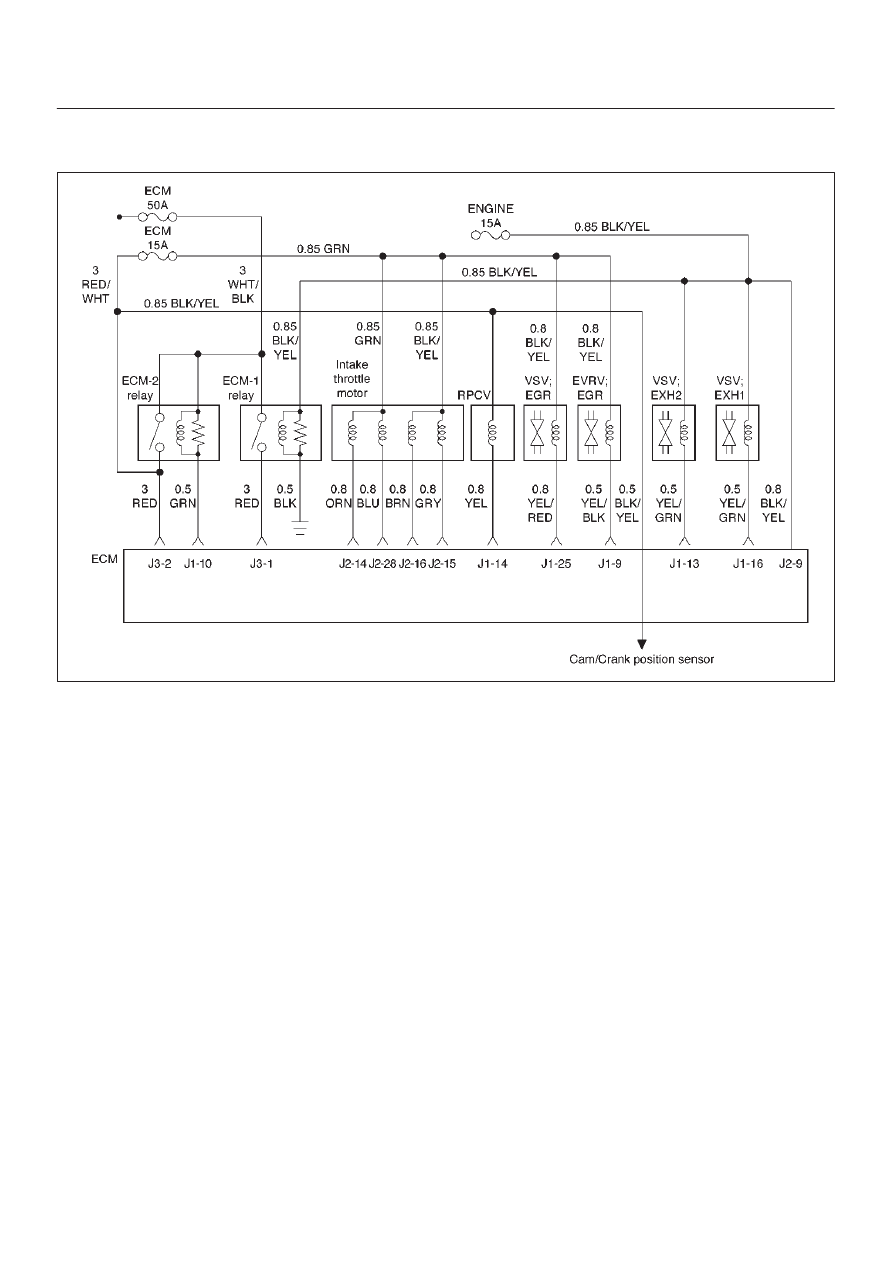
Diagnostic Trouble Code (DTC) P1405 (Flash DTC 37)
EGR EVRV Circuit Open/Short
060RW135
Circuit Description
EGR EVRV Circuit has a common power source in
parallel with EGR, VSV, RPCV, and Intake Throttle Motor.
This may cause multiple DTCs. On such occasion, refer
to “Multiple ECM Information Sensor DTCs Set”.
Action Taken When the DTC Sets
D
The ECM will store conditions which were present
when the DTC was set as Freeze Frame and in the
Failure Records data.
Conditions for Clearing the MIL/DTC
D
DTC P1405 can be cleared by using the Tech 2 “Clear
Info” function or by disconnecting the ECM battery
feed.
Diagnostic Aids
An intermittent may be caused by a poor connection,
rubbed-through wire insulation or a wire broken inside the
insulation. Check for:
D
Poor connection – Inspect the ECM harness and
connectors for improper mating, broken locks,
improperly formed or damaged terminals, and poor
terminal-to-wire connection.
D
Damaged harness – Inspect the wiring harness for
damage.

6E–137
4JX1–TC ENGINE DRIVEABILITY AND EMISSIONS
DTC P1405 – EGR EVRV Circuit Open/Short
Step
Action
Value(s)
Yes
No
1
Was the “On-Board Diagnostic (OBD) System Check”
performed?
—
Go to
Step 2
Go to
OBD
System
Check
2
1. Review and record Failure Records information.
2. Clear DTC P1405.
3. Start the engine and idle for 1 minute.
4. Observe DTCs.
Is DTC P1405 set?
—
Go to
Step 3
Refer to
Diagnostic
Aid
3
1. Ignition “OFF.”
2. Disconnect the EVRV.
3. Check for an open or a short to ground in the EVRV
circuit between the EVRV connector and the ECM
harness connector.
4. If a problem is found, repair as necessary.
Was a problem found?
—
Verify repair
Go to
Step 4
4
Check the connections at the EVRV and replace the
terminals if necessary.
Did any terminals require replacement?
—
Verify repair
Go to
Step 5
5
Check the connections at the ECM and replace the
terminals if necessary.
Did any terminals require replacement?
—
Verify repair
Go to
Step 6
6
Replace the EVRV.
Is the action complete?
—
Verify repair
Go to
Step 7
7
Replace the ECM (Refer to the Data Programming in
Case of ECM change).
Is the action complete?
—
Verify repair
—
Нет комментариевНе стесняйтесь поделиться с нами вашим ценным мнением.
Текст