Opel Frontera UBS. Service manual — part 447
6A – 78 ENGINE MECHANICAL
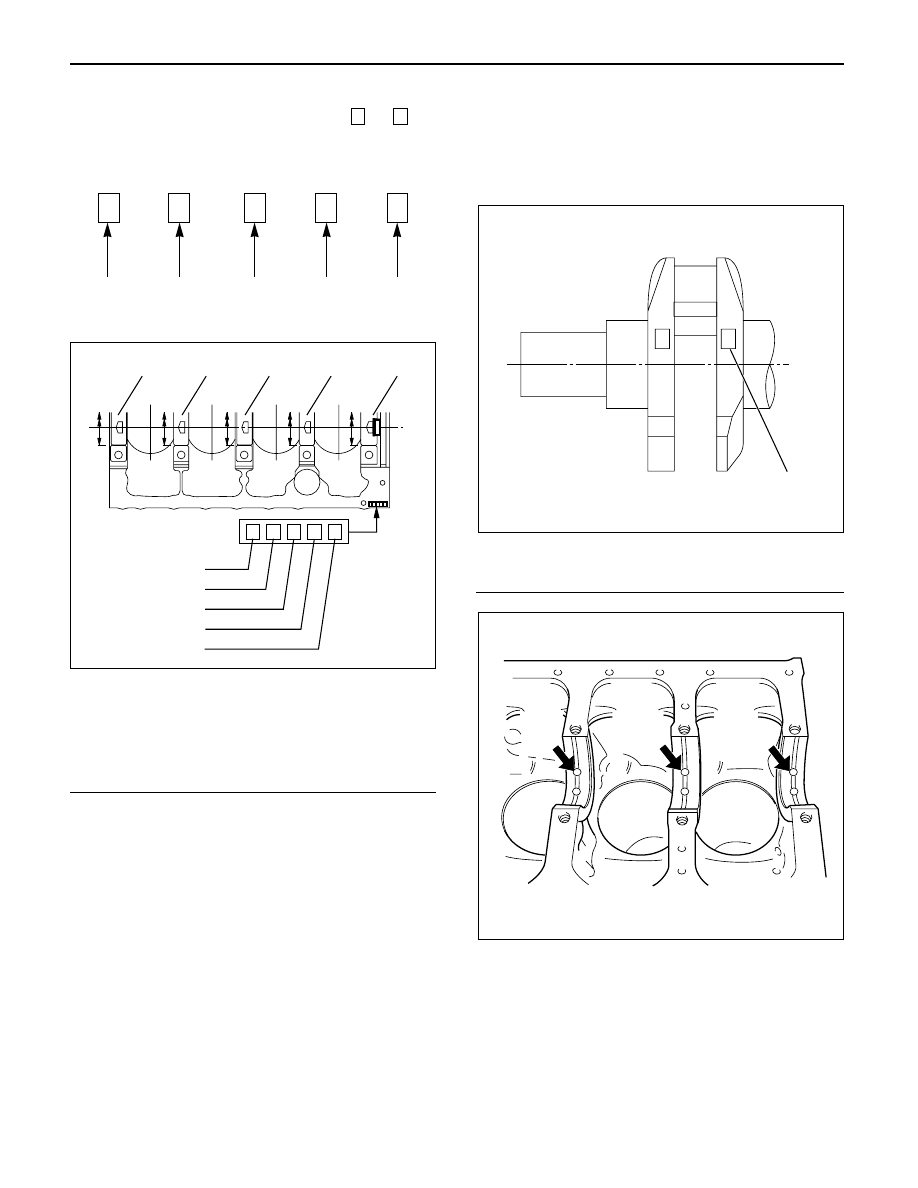
Crankshaft Bearing Bore Grade Mark Position
Crankshaft bearing bore grade marks
1
or
2
are
stamped on the rear right hand side of the cylinder
body.
Example:
No. 1 Bearing No. 2 Bearing No. 3 Bearing No. 4 Bearing No. 5 Bearing
Housing
Housing
Housing
Housing
Housing
Legend
(1) No. 1 Main bearing bore grade
(2) No. 2 Main bearing bore grade
(3) No. 3 Main bearing bore grade
(4) No. 4 Main bearing bore grade
(5) No. 5 Main bearing bore grade
Crankshaft Journal Grade Mark Position
The crankshaft journal grade marks (1 or –) are
stamped on each crankshaft journal wave.
The crankshaft journal and bearing clearance must be
the same for each position after installation of the
crankshaft and the crankshaft bearings.
Legend
(1) Crankshaft journal outside diameter grade
1
2
1
1
2
1
1
1
1
2
2
2
3
4
5
1
2
3
4
5
012RW114
1
015RW078
012RW069
ENGINE MECHANICAL 6A – 79
Main Bearing
Crankshaft
Bore Diameter mm(in)
Main Journal Diameter mm(in)
Crankshaft
Oil Clearance
Grade
Inside Diameter
Grade
Outside Diameter
Bearing
mm(in)
1 or -
69.927 – 69.932
4
0.045 – 0.061
(2.7530 – 2.7532)
(0.0018 – 0.0024)
1
73.992 – 74.000
2 or - -
69.922 – 69.927
4
0.050 – 0.066
(2.9131 – 2.9134)
(2.7528 – 2.7530)
(0.0020 – 0.0026)
3 or - - -
69.917 – 69.922
5
0.052 – 0.068
(2.7526 – 2.7528)
(0.0020 – 0.0027)
1 or -
69.927 – 69.932
2
0.042 – 0.059
(2.7530 – 2.7532)
(0.0017 – 0.0023)
2
73.983 – 73.992
2 or - -
69.922 – 69.927
3
0.044 – 0.061
(2.9127 – 2.9131)
(2.7528 – 2.7530)
(0.0017 – 0.0024)
3 or - - -
69.917 – 69.922
4
0.046 – 0.063
(2.7526 – 2.7528)
(0.0018 – 0.0025)
1 or -
69.927 – 69.932
1
0.037 – 0.053
(2.7530 – 2.7532)
(0.0015 – 0.0021)
3
73.975 – 73.983
2 or - -
69.922 – 69.927
2
0.039 – 0.055
(2.9124 – 2.9127)
(2.7528 – 2.7530)
(0.0015 – 0.0022)
3 or - - -
69.917 – 69.922
2
0.044 – 0.060
(2.7526 – 2.7528)
(0.0017 – 0.0024)
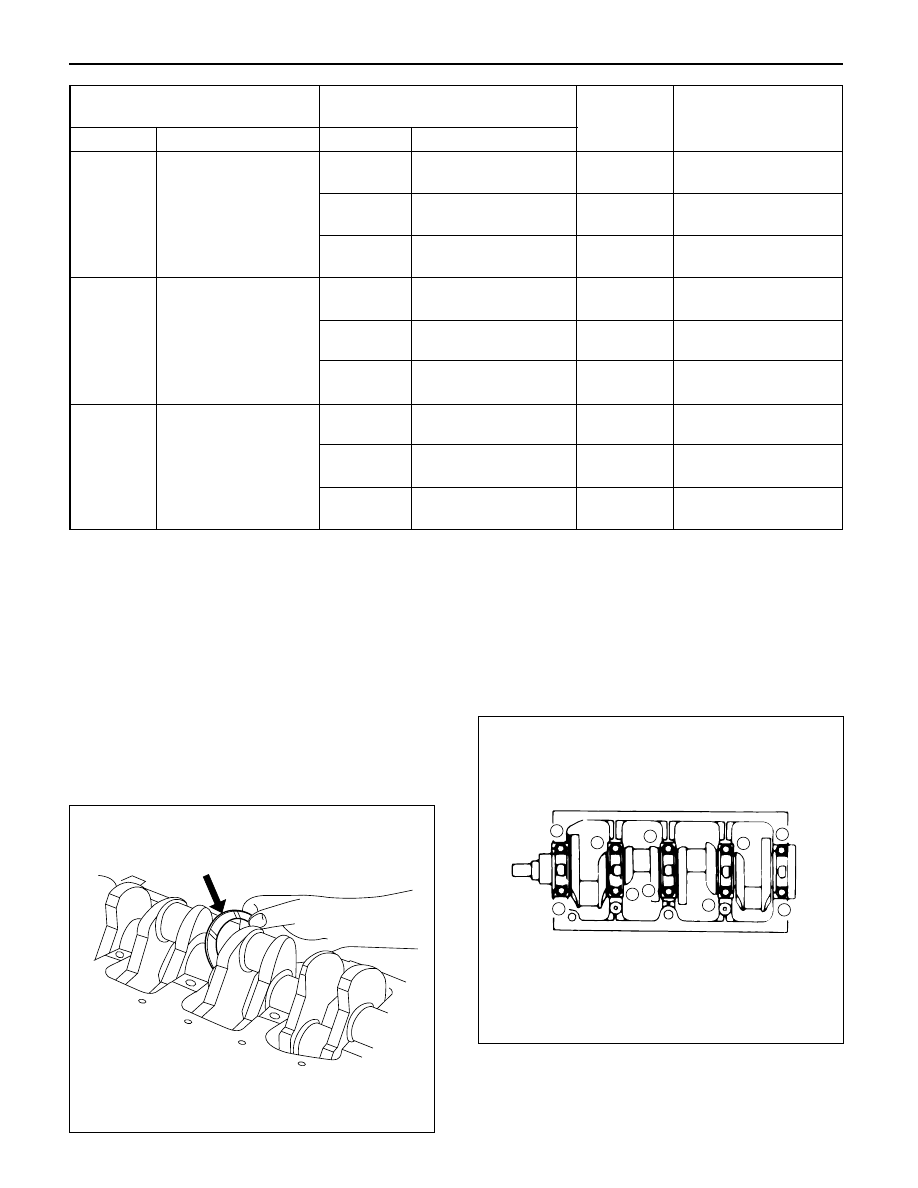
REASSEMBLY
1. Crankshaft
1) Install the main bearings to the cylinder body
and the main bearing caps.
2) Be sure that they are positioned correctly.
3) Apply new engine oil to the upper and lower
main bearing faces.
4) Carefully mount the crankshaft.
5) Apply engine oil to the thrust washer.
6) Assemble the thrust washer to the No. 3 bearing
journal. The oil grooves must face the
crankshaft.
7) Install the bearing caps with the bearing cap
head arrow mark facing the front of the engine.
8) Apply engine oil to the crankshaft bearing cap
bolts.
9) Tighten the crankshaft bearing cap bolts to the
specified torque a little at a time in the sequence
shown in the illustration.
Torque: 167 N·m (17.0 kg·m/123 lb ft)
NOTE: Check to see that the crankshaft turns smoothly
by rotating it manually.
012RW047
8
4
1
5
9
6
10
2
3
7
012RW027
6A – 80 ENGINE MECHANICAL
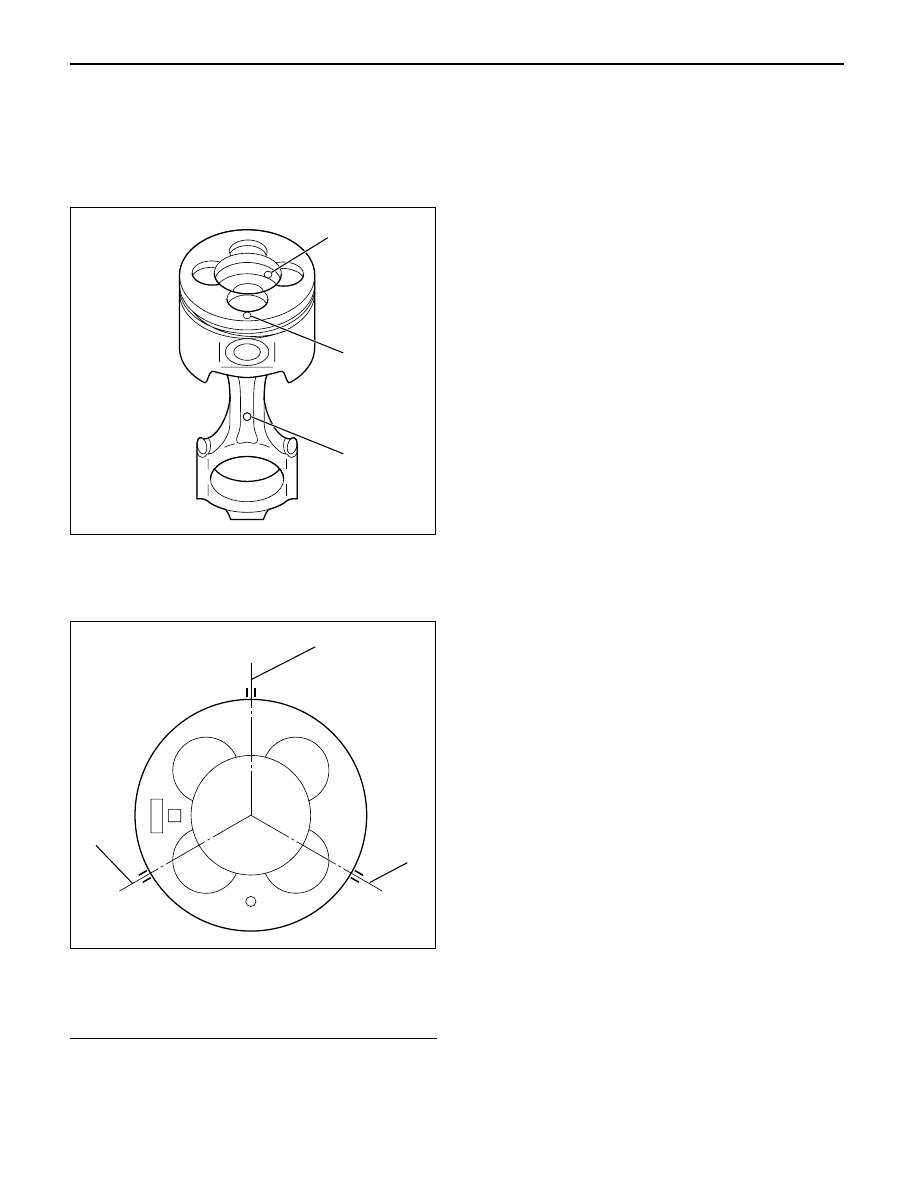
3. Piston and Connecting Rod Assembly
1) Apply engine oil to the cylinder bores, the
connecting rod bearings and the crankshaft pins
and each piston ring and piston.
2) Align the front mark (2) of piston and front mark
(3) of connecting rod then assemble them.
3) The N mark of the piston ring is faced toward the
top, check to see that the piston ring end gap is
correctly positioned.
Legend
(1) 1st piston ring end gap
(2) 2nd piston ring end gap
(3) Oil ring end gap
4) Insert the piston/connecting rod assemblies into
each cylinder with the piston ring compressor.
The front marks must be facing the front of the
engine.
Piston Ring Compressor: 5-8840-9018-0
5) Match the numbered caps with the numbers on
the connecting rods. Align the punched marks
on the connecting rods and caps.
6) Apply engine oil to the threads and seating faces
of the nuts.
7) Tighten the cap nuts in 2 steps, using angular
tightening method as shown in the following
specifications.
1st step: 29 N·m (3.0 kg·m/22 lb ft)
2nd step: 45°– 60°
After tightening the cap nuts, check to see that
the crankshaft rotates smoothly
4. Piston Cooling Oil Pipe
If the piston cooling oil pipe is forcibly assembled,
the end of the oil jet may bend. It could make it
impossible to supply oil to the piston cooling holes,
which will sometimes cause piston seizure.
Sufficient care should be taken to pipe assembly
work.
1) Tighten the bolt and oil jet plug to the specified
torque.
Torque:
M6: 8 N·m (0.8 kg·m/6 lb ft)
M8: 20 N·m (2.0 kg·m/14.5 lb ft)
Oiling Jet Plug: 30 N·m (3.1 kg·m/22 lb ft)
5. Crank case
1) Refer to “Crank case” in this manual.
6. Apply liquid gasket (TB-1207C or equivalent) to
retainer then install it to rear end of cylinder block
within 5 minutes.
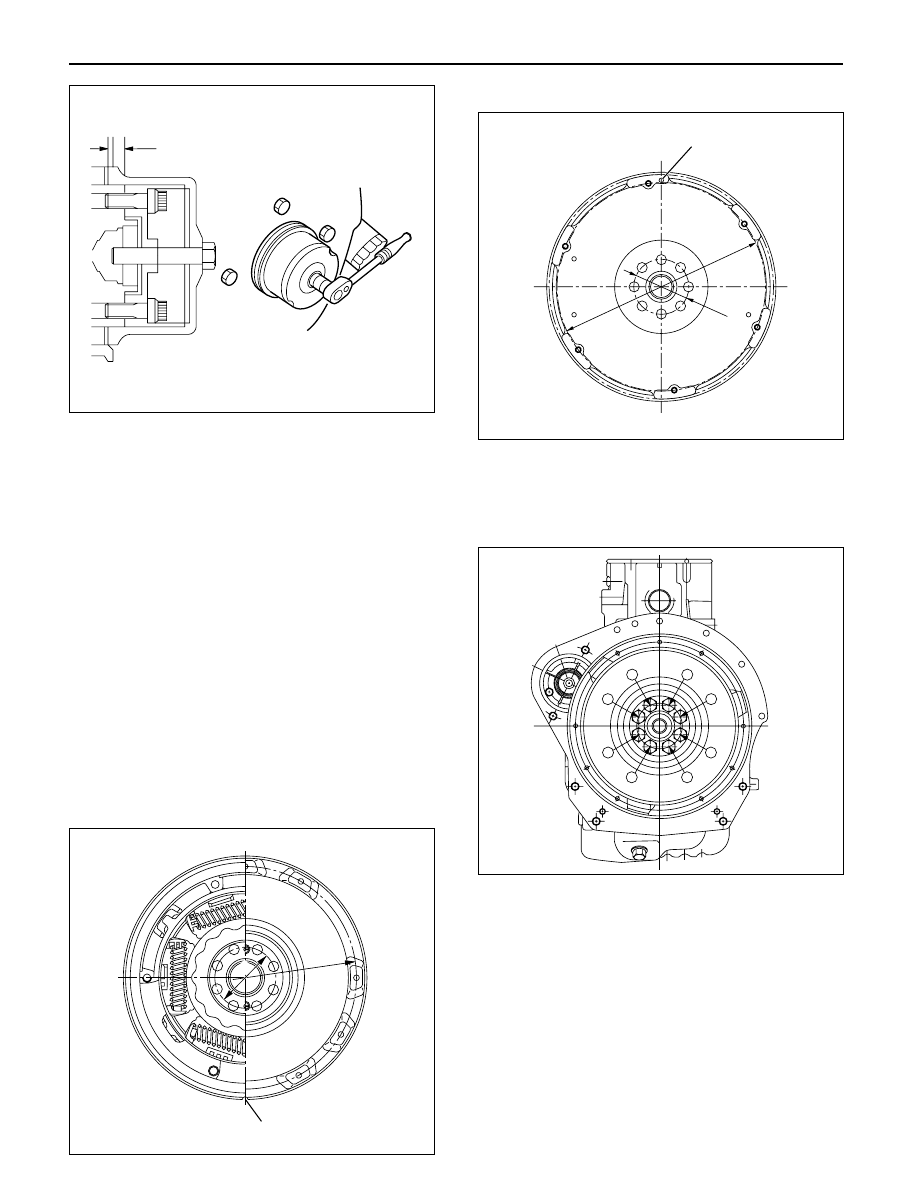
7. Crankshaft Rear Oil Seal
1) Tighten the adapter to the crankshaft rear and
section with 2 bolts.
2) Insert the oil seal into the peripheral section of
the adapter.
3) Insert the sleeve into the adapter and tighten it
with a bolt (M12 x 1.75L = 70) until the adapter
hits the sleeve.
4) Remove the adapter and the sleeve.
5) Check the dimension of the oil seal setting from
rear end of crankshaft.
Standard Dimension = 12.5 ± 0.3 mm
Oil Seal Installer: 5-8840-2359-0
2
3
1
015RW051
3
1
2
015RW083
ENGINE MECHANICAL 6A – 81
8. Cylinder Block Rear Plate (A/T)
Align the rear plate with the cylinder block dowel
pins.
Tighten the rear plate to the specified torque.
Torque: 97 N·m (9.9 kg·m/72 lb ft)
9. Flywheel housing (M/T)
Align the flywheel housing with the cylinder block
dowel pins.
Tighten the bolt to the specified torque.
Torque: 97 N·m (9.9 kg·m/72 lb ft)
10. Flywheel
1) Thoroughly clean and remove the oil from the
threads of crankshaft and flywheel fixing
surface.
2) Mount the flywheel on the crankshaft and then
install the washer.
3) Align the timing mark, cut out on the flywheel is
at lowest position for M/T
model and
identification hole on the boss is highest position
for A/T model when cylinder No. 1 is at the TDC.
For M/T Model
For A/T model
4) Tighten the flywheel bolts in 2 steps using
angular tightening method.
Torque: 1st step 60 N·m (6.1 kg·m/44 lb ft)
Torque: 2nd step 60° – 90°
11. Timing Gear Case
1) Cut away the gasket protruding between the
cylinder block and the crank case fitting surfaces
(as shown in the illustration).
12.5 + 0.3
–
012RW067
Timing mark
278
74
015RW121
Timing mark
74
φ
304
015RW120
7
5
1
3
8
6
2
4
201RW021
Нет комментариевНе стесняйтесь поделиться с нами вашим ценным мнением.
Текст