Opel Frontera UBS. Service manual — part 107
DIFFERENTIAL (FRONT)
4A1–14
7. Record the pinion depth code on the head of the
drive pinion.
The number indicates a necessary change in the
pinion mounting distance. A plus number indi-
cates the need for a greater mounting distance
(which can be achieved by decreasing the shim
thickness). A minus number indicates the need
for a smaller mounting distance (which can be
achieved by increasing the shim thickness). If ex-
amination reveals pinion depth code “0”, the pin-
ion is “nominal”.
425RS023
4A1–15
DIFFERENTIAL (FRONT)
8. Select the shim using the chart;
Pinion marking
+10
+8
+6
+4
+2
0
–2
–4
–6
–8
–10
Dial indicator
reading
(Inches)
mm
(Inches)
mm
(Inches)
mm
(Inches)
mm
(Inches)
mm
(Inches)
mm
(Inches)
mm
(Inches)
mm
(Inches)
mm
(Inches)
mm
(Inches)
mm
(Inches)
0.081
2.18
(0.0858)
0.082
2.18
(0.0858)
2.20
(0.0866)
0.083
2.18
(0.0858)
2.20
(0.0866)
2.23
(0.0882)
0.084
2.18
(0.0858)
2.20
(0.0866)
2.24
(0.0882)
2.26
(0.0890)
0.085
2.18
(0.0858)
2.20
(0.0866)
2.24
(0.0882)
2.26
(0.0890)
2.28
(0.0898)
0.086
2.18
(0.0858)
2.20
(0.0866)
2.24
(0.0882)
2.26
(0.0890)
2.28
(0.0898)
2.32
(0.0914)
0.087
2.18
(0.0858)
2.20
(0.0866)
2.24
(0.0882)
2.26
(0.0890)
2.28
(0.0898)
2.32
(0.0914)
2.34
(0.0921)
0.088
2.18
(0.0858)
2.20
(0.0866)
2.24
(0.0882)
2.26
(0.0890)
2.28
(0.0898)
2.32
(0.0914)
2.34
(0.0921)
2.36
(0.0929)
0.089
2.18
(0.0858)
2.20
(0.0866)
2.24
(0.0882)
2.26
(0.0890)
2.28
(0.0898)
2.32
(0.0914)
2.34
(0.0921)
2.36
(0.0929)
2.38
(0.0937)
0.090
2.18
(0.0858)
2.20
(0.0866)
2.24
(0.0882)
2.26
(0.0890)
2.28
(0.0898)
2.32
(0.0914)
2.34
(0.0921)
2.36
(0.0929)
2.38
(0.0937)
2.42
(0.0953)
0.091
2.18
(0.0858)
2.20
(0.0866)
2.24
(0.0882)
2.26
(0.0890)
2.28
(0.0898)
2.32
(0.0914)
2.34
(0.0921)
2.36
(0.0929)
2.38
(0.0937)
2.42
(0.0953)
2.44
(0.0961)
0.092
2.20
(0.0866)
2.24
(0.0882)
2.26
(0.0890)
2.28
(0.0898)
2.32
(0.0914)
2.34
(0.0921)
2.36
(0.0929)
2.38
(0.0937)
2.42
(0.0953)
2.44
(0.0961)
2.46
(0.0969)
0.093
2.24
(0.0882)
2.26
(0.0890)
2.28
(0.0898)
2.32
(0.0914)
2.34
(0.0921)
2.36
(0.0929)
2.38
(0.0937)
2.42
(0.0953)
2.44
(0.0961)
2.46
(0.0969)
2.48
(0.0977)
0.094
2.26
(0.0890)
2.28
(0.0898)
2.32
(0.0914)
2.34
(0.0921)
2.36
(0.0929)
2.38
(0.0937)
2.42
(0.0953)
2.44
(0.0961)
2.46
(0.0969)
2.48
(0.0977)
2.52
(0.0992)
0.095
2.28
(0.0898)
2.32
(0.0914)
2.34
(0.0921)
2.36
(0.0929)
2.38
(0.0937)
2.42
(0.0953)
2.44
(0.0961)
2.46
(0.0969)
2.48
(0.0977)
2.52
(0.0992)
2.54
(0.1000)
0.096
2.32
(0.0914)
2.34
(0.0921)
2.36
(0.0929)
2.38
(0.0937)
2.42
(0.0953)
2.44
(0.0961)
2.46
(0.0969)
2.48
(0.0977)
2.52
(0.0992)
2.54
(0.1000)
2.56
(0.1008)
0.097
2.34
(0.0921)
2.36
(0.0929)
2.38
(0.0937)
2.42
(0.0953)
2.44
(0.0961)
2.46
(0.0969)
2.48
(0.0977)
2.52
(0.0992)
2.54
(0.1000)
2.56
(0.1008)
0.098
2.36
(0.0929)
2.38
(0.0937)
2.42
(0.0953)
2.44
(0.0961)
2.46
(0.0969)
2.48
(0.0977)
2.52
(0.0992)
2.54
(0.1000)
2.56
(0.1008)
0.099
2.38
(0.0937)
2.42
(0.0953)
2.44
(0.0961)
2.46
(0.0969)
2.48
(0.0977)
2.52
(0.0992)
2.54
(0.1000)
2.56
(0.1008)
0
2.42
(0.0953)
2.44
(0.0961)
2.46
(0.0969)
2.48
(0.0977)
2.52
(0.0992)
2.54
(0.1000)
2.56
(0.1008)
0.001
2.44
(0.0961)
2.46
(0.0969)
2.48
(0.0977)
2.52
(0.0992)
2.54
(0.1000)
2.56
(0.1008)
0.002
2.46
(0.0969)
2.48
(0.0977)
2.52
(0.0992)
2.54
(0.1000)
2.56
(0.1008)
0.003
2.48
(0.0977)
2.52
(0.0992)
2.54
(0.1000)
2.56
(0.1008)
0.004
2.52
(0.0992)
2.54
(0.1000)
2.56
(0.1008)
0.005
2.54
(0.1000)
2.56
(0.1008)
0.006
2.56
(0.1008)
NOTE: When ordering shims, find the part number in the
parts catalog by using the thickness of shims listed in the
above table.
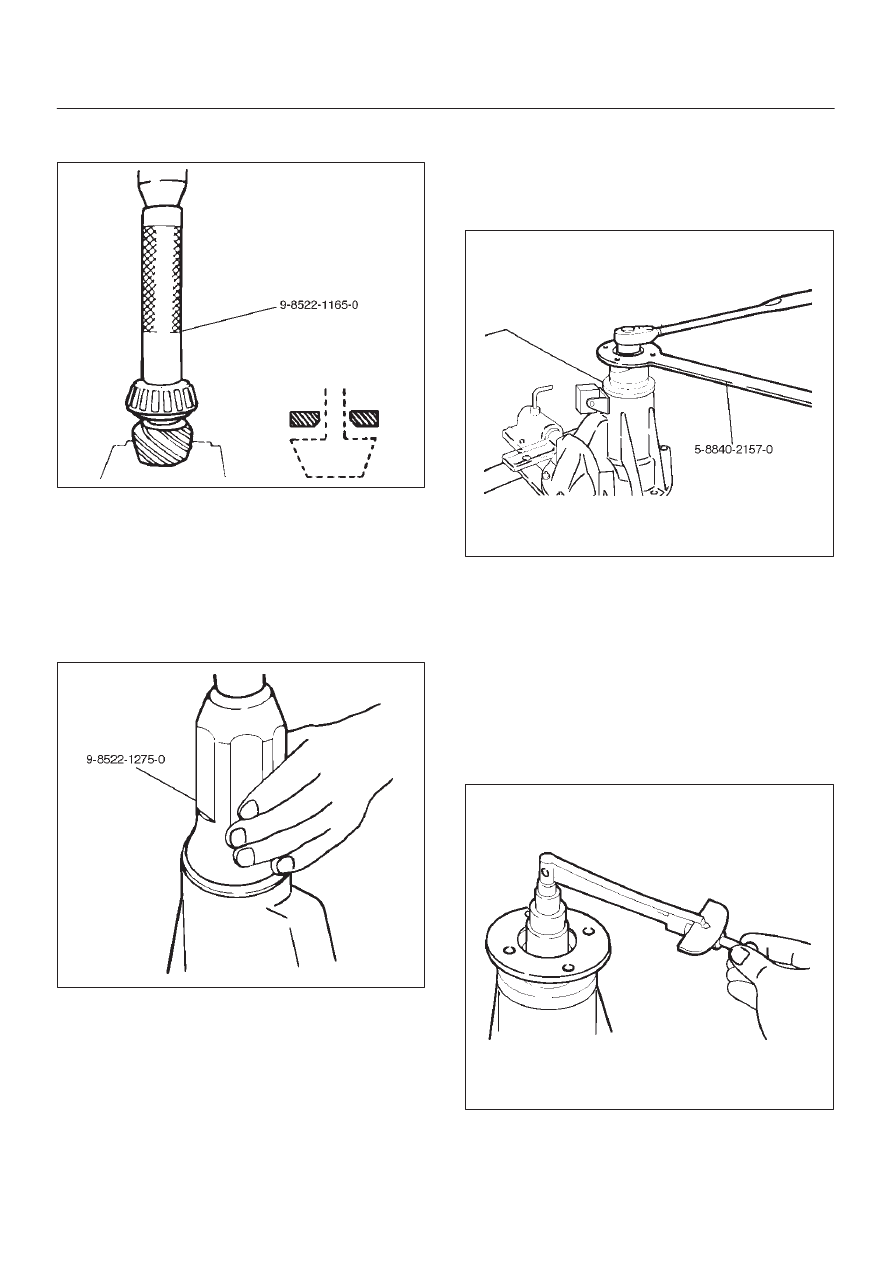
4. Place the shim on the drive pinion, with the chamfered
side turned towards the pinion head then install the
inner bearing onto the pinion using an installer
9–8522–1165–0 and a press.
DIFFERENTIAL (FRONT)
4A1–16
NOTE: Do not apply pressure to the roller cage and apply
pressure only to the inner race.
425RW048
5. Discard the used collapsible spacer and install a new
one.
6. Install pinion gear.
7. Install outer bearing.
8. Use oil seal installer 9–8522–1275–0 to install a new
oil seal that has been soaked in rear axle lubricant.
NOTE: Take care to use a front differential oil seal, NOT
the rear differential oil seal.
415RW024
9. Install dust cover.
10. Install flange.
11. Install flange nut.
1. Apply lubricant to the pinion threads.
2. Tighten the nut to the specified torque using the
pinion flange holder 5–8840–2157–0.
Torque: 177–275N·m (18–28kg·m/130–203 lb ft)
NOTE: Discard used flange nut and install new one and
do not over tighten the flange nut.
425RW047
3. Adjust pinion bearing preload.
a. Measure the bearing preload by using a torque
meter. Note the scale reading required to
rotate the flange.
b. Continue tightening flange nut until the
specified starting torque is obtained.
Starting torque:
New bear-
ing 0.7–1.1 N·m(0.065–0.115kg·m/5.64–9.98 lb in)
Used bear-
ing 0.4–0.5N·m(0.033–0.057kg·m/2.86–4.94 Ib in)
425RS027
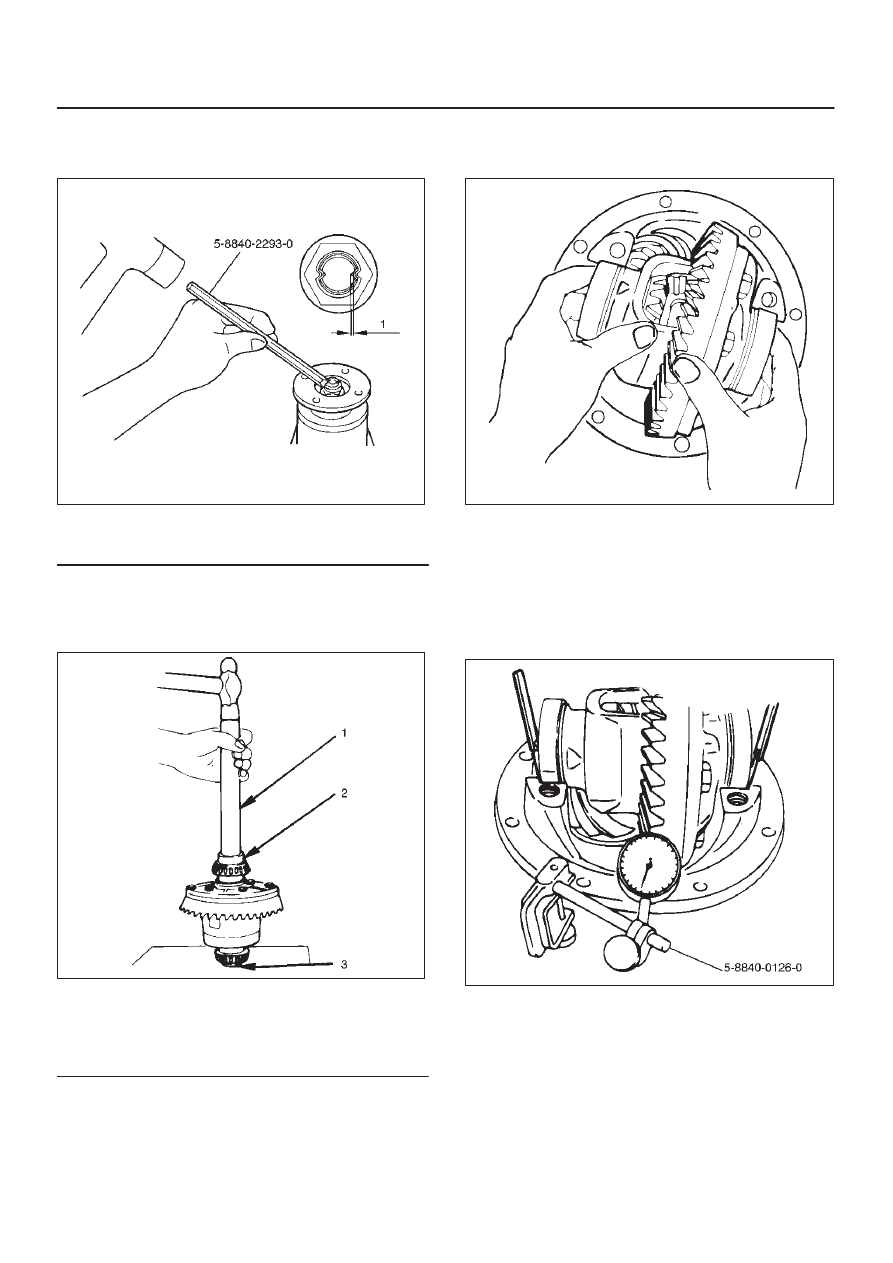
4. Using punch 5-8840-2293-0, stake the flange nut
at two points.
4A1–17
DIFFERENTIAL (FRONT)
NOTE: When staking, be sure to turn the nut to insure
that there is no change in bearing preload. Make sure of
preload again as instructed in 3).
415RW019
Legend
(1) 1.3mm or less
12. Install adjust shim.
1. Attach the side bearing to the differential
assembly without shims. Support the opposite
side using a pilot to prevent bearing damage.
425RS029
Legend
(1) Drive handle:5–8840–0007–0
(2) Installer:9–8522–1164–0
(3) Pilot:9–8521–1743–0
2. Insert the differential cage assembly with bearing
outer races into the side bearing bores of the
carrier.
425RS030
3. Using two sets of feeler gauges, insert a feeler
stock of sufficient thickness between each
bearing outer race and the carrier to remove all
end play. Make certain the feeler stock is pushed
to the bottom of the bearing bores.
Mount the dial indicator 5–8840–0126–0 on the
carrier so that the indicator stem is at right angles
to a tooth on the ring gear.
425RW049
Нет комментариевНе стесняйтесь поделиться с нами вашим ценным мнением.
Текст