Opel Frontera UBS. Service manual — part 2406
6A – 98 ENGINE MECHANICAL
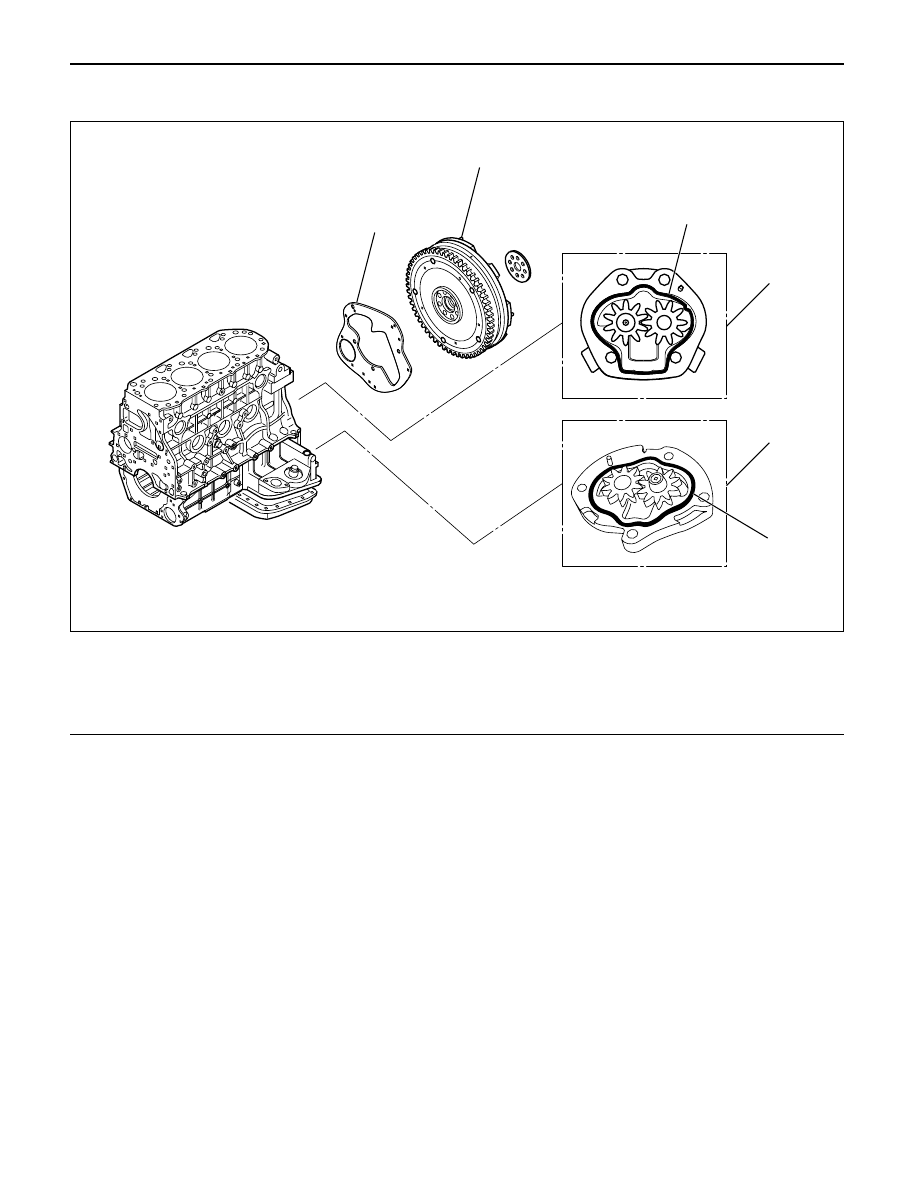
OIL PUMP ASSEMBLY
2
1
5
6
3
4
012RW097
Legend
(1)
Flywheel
(2)
Rear Plate (A/T)
(3)
First Oil Pump Assembly
(4)
Second Oil Pump Assembly
(5)
O-Ring (For first oil pump)
(6)
O-Ring (For second oil pump)
REMOVAL
1. Disconnect battery ground cable
2. Lift up car
3. Drain engine oil
NOTE: Install drain plug with new gasket.
4. Flywheel
5. Rear Plate (A/T) or Flywheel Housing (M/T)
6. First Oil Pump Assembly and Second Oil Pump
Assembly
1) Remove oil pump assembly from cylinder block
and crankcase.
INSTALLATION
1. First oil pump assembly
1) Set O-ring to oil pump.
2) Install oil pump drive gear to the rear end of the
balance shaft RH.
3) Apply engine oil to pump gear, install pump gear
to rear end of cylinder block with specified
torque.
Torque: 20 N·m (2.0 kg·m/14 lb ft)
2. Second oil pump assembly
1) Set O-ring to oil pump.
2) Install oil pump drive gear to the rear end of the
balance shaft LH.
3) Apply engine oil to pump gear, install pump gear
to rear end of crank case with specified torque.
Torque: 20 N·m (2.0 kg·m/14 lb ft)
3. Install rear plate (A/T) or flywheel housing (M/T)
Torque: 97 N·m (9.9 kg·m/72 lb ft)
4. Install flywheel
1) Apply engine oil to bolt and tighten with angular
tightening method.
1st step:
59 N·m (6.0 kg·m/43 lb ft)
2nd step:
60° to 90°
3rd step:
60° to 90°
ENGINE MECHANICAL 6A – 99
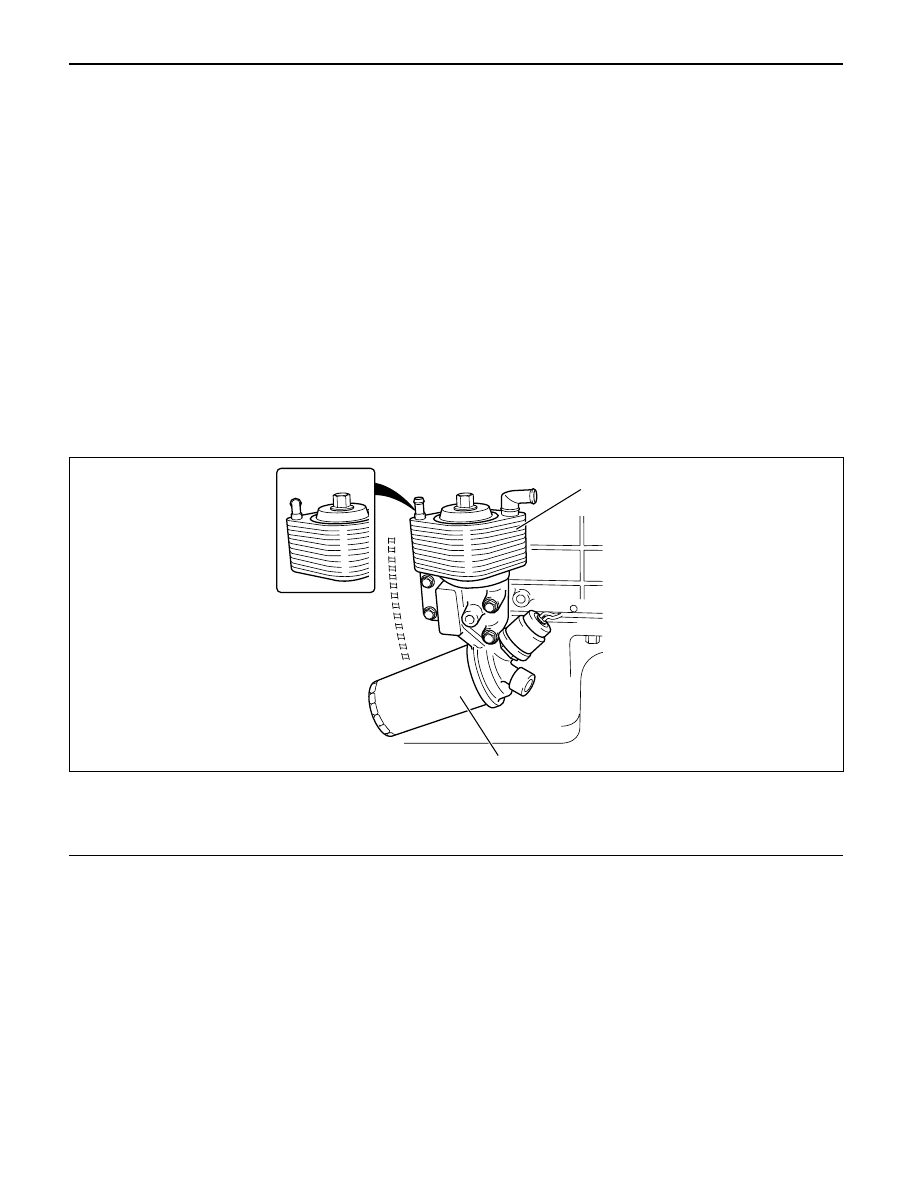
OIL COOLER
For Europe
1
2
050R200001
Legend
(1)
Oil Cooler Assembly
(2)
Oil Filter Cartridge
OIL FILTER CARTRIDGE
REMOVAL
1. Place a receptacle beneath the oil filter to contain
the drained oil.
2. Remove the oil filter cartridge using filter wrench.
Filter wrench : 5-8840-0203-0
INSTALLATION
1, Lightly apply oil to the O-ring of oil filter cartridge.
2. Turn the new oil filter cartridge by hand until the
sealing face is fitted against the O-ring.
3. Use the filter wrench to turn the oil filter an
additional one and 1/8 turns.
4. Start the engine and check for oil leakage from oil
filter.
6A – 100 ENGINE MECHANICAL
REMOVAL
1. Disconnect battery ground cable
2. Drain engine coolant
3. Remove front exhaust pipe
4. Remove heat protector
5. Remove exhaust valve assembly
6. Oil cooler assembly
1) Remove water hoses from inlet and outlet pipe.
2) Put rag beneath side of oil cooler to prevent oil
leaking.
3) Remove fixing bolts and oil cooler assembly.
INSTALLATION
1. Oil Cooler
1) Tighten oil cooler fixing bolt to the specified
torque and connect water hose.
Torque: 29 N·m (3.0 kg·m/22 lb ft)
2. Exh. Valve Assembly
1) Install exhaust valve assembly with gasket and
tighten fixing bolts to the specified torque.
Torque: 57 N·m (5.8 kg·m/42 lb ft)
3. Heat Protector
4. Front Exhaust Pipe
1) Install front exhaust pipe and tighten fixing bolts
to the specified torque.
Exh. Valve Side: 67 N·m (6.8 kg·m/49 lb ft)
Intermediate Pipe Side: 43 N·m (4.4 kg·m/32 lb ft)
5. Fill engine coolant.
6. Connect battery ground cable.
7. Start engine and check for oil and water leakage
carefully.
ENGINE COOLING 6B – 1
ENGINE COOLING
CONTENTS
General Description . . . . . . . . . . . . . . . . . .
6B–2
On-Vehicle Service . . . . . . . . . . . . . . . . . . .
6B–6
Water Pump . . . . . . . . . . . . . . . . . . . . . .
6B–6
Thermostat . . . . . . . . . . . . . . . . . . . . . . .
6B–7
Radiator . . . . . . . . . . . . . . . . . . . . . . . . .
6B–9
Drive Belt Adjustment . . . . . . . . . . . . . . .
6B–11
Нет комментариевНе стесняйтесь поделиться с нами вашим ценным мнением.
Текст