Opel Zafira (2017 year). Instruction — part 16
246
Vehicle care
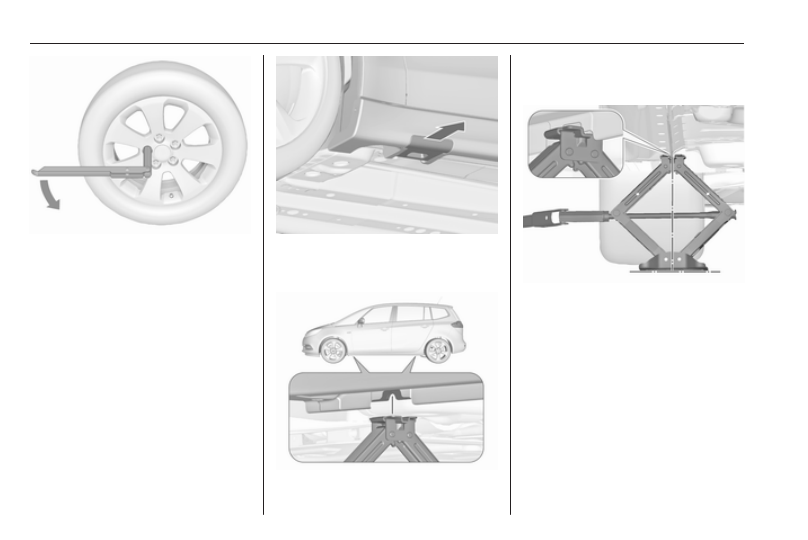
2. Fold out the wheel wrench and
install ensuring that it locates
securely and loosen each wheel
nut by half a turn.
The wheels might be protected by
locking wheel nuts. To loosen
these specific nuts first attach the
adapter onto the head of the nut
before installing the wheel
wrench. The adapter is located in
the glovebox.
3. Some versions may have covered
the vehicle jacking point. Pull out
the cover sideways.
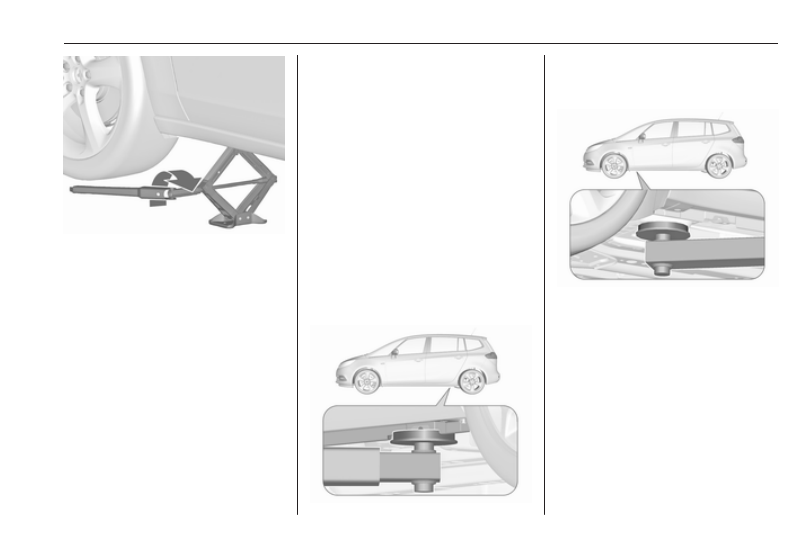
4. Ensure the jack is correctly
positioned under the relevant
vehicle jacking point.
5. Set the jack to the necessary
height. Position it directly below
the jacking point in a manner that
prevents it from slipping.
-------------------------------------------------------------------------------------------------------------------------------------------------------------
Vehicle care
247
Attach wheel wrench and with the
jack correctly aligned rotate wheel
wrench until wheel is clear of the
ground.
6. Unscrew the wheel nuts.
7. Change the wheel. Spare wheel
8. Screw on the wheel nuts.
9. Lower the vehicle and remove
jack.
10. Install the wheel wrench ensuring
that it locates securely and tighten
each nut in a crosswise
sequence. Tightening torque is
140 Nm.
11. Align the valve hole in the wheel
cover with the tyre valve before
installing.
Install wheel nut caps.
12. Install vehicle jacking point cover.
13. Stow the replaced wheel 3 247,
the vehicle tools 3 235 and the
adapter for the locking wheel nuts
14. Check the tyre pressure of the
installed tyre and the wheel nut
torque as soon as possible.
Have the defective tyre renewed or
repaired as soon as possible.
Jacking position for lifting platform
Rear arm position of the lifting
platform centrically under the recess
of the sill.
Front arm position of the lifting
platform at the underbody.
Spare wheel
Some vehicles are equipped with a
tyre repair kit instead of a spare wheel
If mounting a spare wheel which is
different from the other wheels, this
wheel might be classified as a
temporary spare wheel and the
corresponding speed limits apply,
-------------------------------------------------------------------------------------------------------------------------------------------------------------
248
Vehicle care
even though no label indicates this.
Seek the assistance of a workshop to
check the applicable speed limit.
The spare wheel has a steel rim.
Caution
The use of a spare wheel that is
smaller than the other wheels or in
combination with winter tyres
could affect driveability. Have the
defective tyre replaced as soon as
possible.
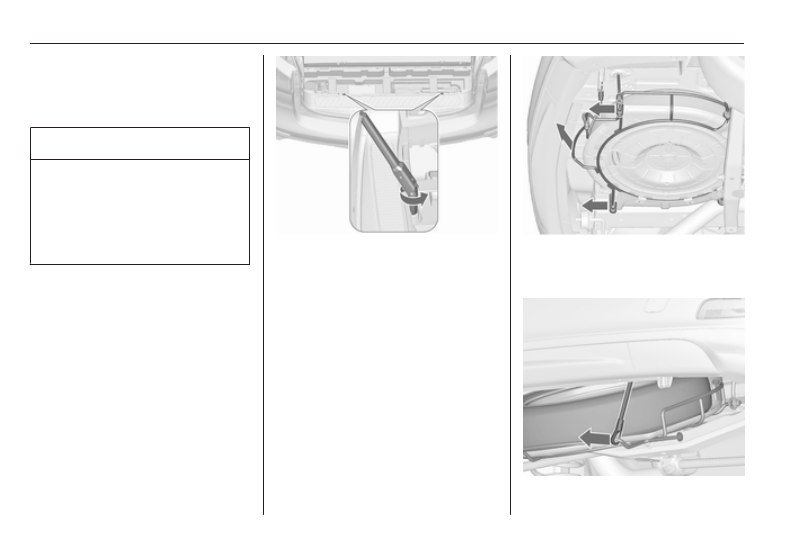
The spare wheel is located in a holder
beneath the vehicle floor.
1. Open the storage in the load
compartment 3 235.
2. Remove both caps above the
hexagon bolts.
3. Fit the wheel wrench on one
hexagon bolt and turn it
anticlockwise until a resistance is
noticeable.
4. Proceed with the other hexagon
bolt in the same way.
5. Lift the spare wheel holder and
unhook both catches.
6. Lower the spare wheel holder.
7. Detach the safety cable.
-------------------------------------------------------------------------------------------------------------------------------------------------------------
Vehicle care
249
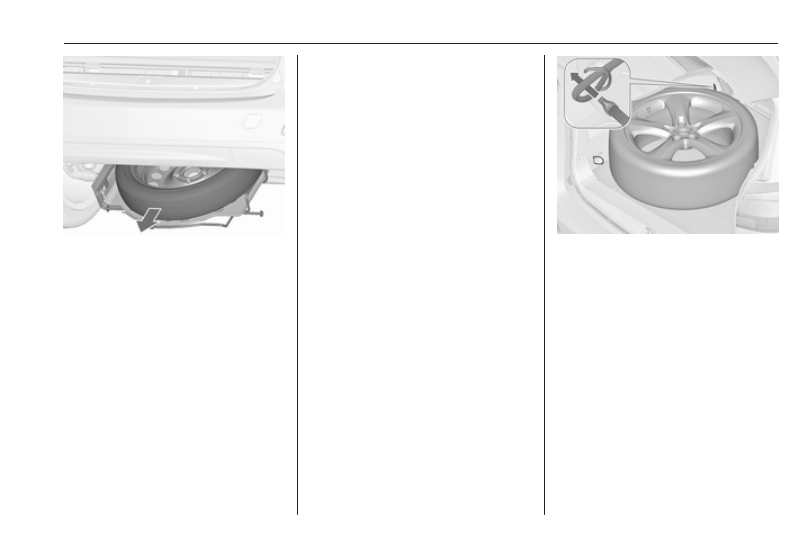
8. Lower holder all the way and
remove spare wheel.
9. Change the wheel.
The damaged wheel must be
secured in the load compartment,
see below.
10. Lift the empty spare wheel holder
and insert the safety cable.
11. Lift the spare wheel holder further
and engage in both catches. The
open sides of the catches must
point in the direction of travel.
12. Close the empty spare wheel
holder by turning both hexagon
bolts clockwise using the wheel
wrench.
13. Fit the caps above both hexagon
bolts.
14. Stow wheel wrench and the jack
in the storage in front of the
tailgate.
15. Close the storage compartment
cover.
When stowing the spare wheel in the
spare wheel holder, note that the
wheel is positioned with the tyre valve
above the recess of the wheel holder.
Stowing a damaged full size
wheel in the load compartment
The spare wheel holder is not
designed for other tyre sizes than the
spare wheel.
A damaged wheel wider than the
spare wheel must be stowed in the
load compartment and secured with a
strap. Vehicle tools 3 235.
The seats of the third row must be
1. Position the wheel close to the left
sidewall of the load compartment.
2. Place the loop end of the strap
through the front lashing eye on
the left side.
3. Place the hook end of the strap
through the loop and pull it until
the strap is fastened securely to
the lashing eye.
-------------------------------------------------------------------------------------------------------------------------------------------------------------

250
Vehicle care
4. Insert the strap through the
spokes of the wheel as shown in
the illustration.
5. Mount the hook to the rear left
lashing eye.
6. Tighten the strap and secure it
using the buckle.
9 Danger
Always drive with folded up and
engaged rear seat backrests when
stowing a damaged full size wheel
in the load compartment.
9 Warning
Storing a jack, a wheel or other
equipment in the load
compartment could cause injury if
they are not fixed properly. During
a sudden stop or a collision, loose
equipment could strike someone.
Always store jack and tools in the
respective storage compartments
and secure them by fixing.
Damaged wheel placed in the load
compartment must always be
secured with the strap.
Temporary spare wheel
Caution
The use of a spare wheel that is
smaller than the other wheels or in
combination with winter tyres
could affect driveability. Have the
defective tyre replaced as soon as
possible.
Only mount one temporary spare
wheel. Do not drive faster than
80 km/h. Take curves slowly. Do not
use for a long period of time.
If your vehicle gets a flat tyre on the
rear while towing another vehicle,
mount the temporary spare wheel at
the front and the full tyre at the rear.
Tyre chains 3 242.
Spare wheel with directional tyre
If possible, fit directional tyres such
that they roll in the direction of travel.
The rolling direction is indicated by a
symbol (e.g. an arrow) on the
sidewall.
The following applies to tyres fitted
opposing the rolling direction:
● Driveability may be affected.
Have the defective tyre renewed
or repaired as soon as possible
and fit it instead of the spare
wheel.
● Drive particularly carefully on wet
and snow-covered road
surfaces.
-------------------------------------------------------------------------------------------------------------------------------------------------------------
Vehicle care
251
Jump starting
Do not start with quick charger.
A vehicle with a discharged battery
can be started using jump leads and
the battery of another vehicle.
Do not start with quick charger.
9 Warning
Be extremely careful when starting
with jump leads. Any deviation
from the following instructions can
lead to injuries or damage caused
by battery explosion or damage to
the electrical systems of both
vehicles.
9 Warning
Avoid contact of the battery with
eyes, skin, fabrics and painted
surfaces. The fluid contains
sulphuric acid which can cause
injuries and damage in the event
of direct contact.
● Never expose the vehicle battery
to naked flames or sparks.
● A discharged vehicle battery can
already freeze at a temperature
of 0 °C. Defrost the frozen vehicle
battery before connecting jump
leads.
● Wear eye protection and
protective clothing when
handling a battery.
● Use a booster vehicle battery
with the same voltage (12 Volt).
Its capacity (Ah) must not be
much less than that of the
discharged vehicle battery.
● Use jump leads with insulated
terminals and a cross section of
at least 16 mm
2
(25 mm
2
for
diesel engines).
● Do not disconnect the discharged
vehicle battery from the vehicle.
● Switch off all unnecessary
electrical consumers.
● Do not lean over the battery
during jump starting.
● Do not allow the terminals of one
lead to touch those of the other
lead.
● The vehicles must not come into
contact with each other during
the jump starting process.
● Apply the parking brake,
transmission in neutral,
automatic transmission in P.
● Open the positive terminal
protection cap of your vehicle in
the engine compartment and of
the booster vehicle battery.
-------------------------------------------------------------------------------------------------------------------------------------------------------------
252
Vehicle care
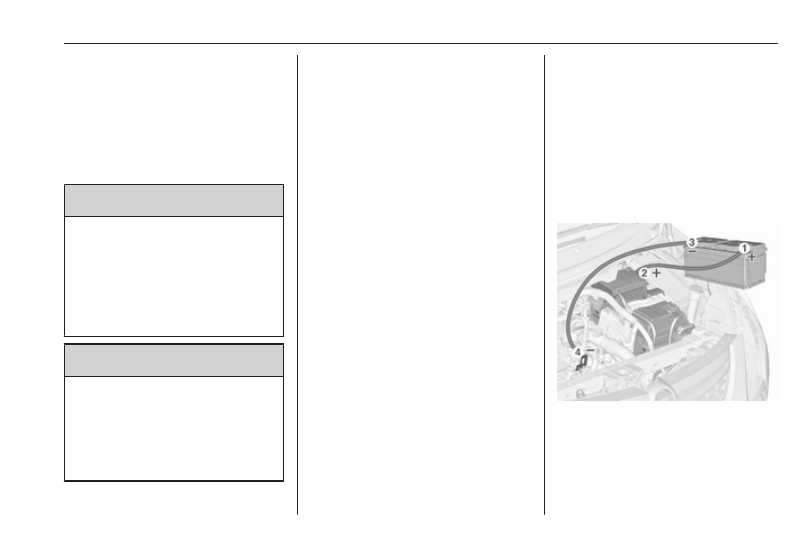
Lead connection order:
1. Connect the red lead to the
positive terminal of the booster
battery.
2. Connect the other end of the red
lead to the positive terminal of the
discharged battery.
3. Connect the black lead to the
negative terminal of the booster
battery.
4. Connect the other end of the black
lead to a vehicle grounding point
of your vehicle in the engine
compartment.
Route the leads so that they cannot
catch on rotating parts in the engine
compartment.
To start the engine:
1. Start the engine of the vehicle
providing the jump.
2. After five minutes, start the other
engine. Start attempts should be
made for no longer than
15 seconds at an interval of one
minute.
3. Allow both engines to idle for
approx. three minutes with the
leads connected.
4. Switch on electrical consumers
(e.g. headlights, heated rear
window) of the vehicle receiving
the jump start.
5. Reverse above sequence exactly
when removing leads.
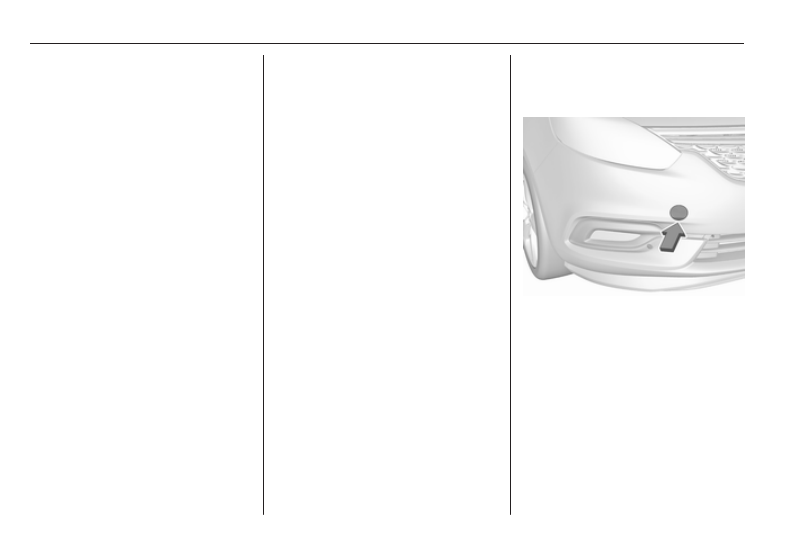
Towing
Towing the vehicle
Disengage cap at bottom and remove
downwards.
The towing eye is stowed with the
vehicle tools 3 235.
-------------------------------------------------------------------------------------------------------------------------------------------------------------
Vehicle care
253
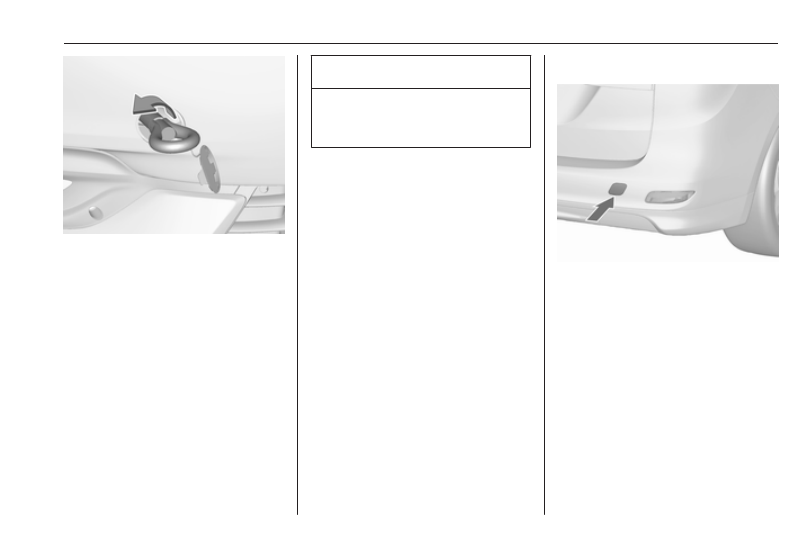
Screw in the towing eye as far as it will
go until it stops in a horizontal
position.
Attach a tow rope – or better still a tow
rod – to the towing eye.
The towing eye must only be used for
towing and not for recovering the
vehicle.
Switch on ignition to release steering
wheel lock and to permit operation of
brake lights, horn and windscreen
wiper.
Transmission in neutral.
Caution
Drive slowly. Do not drive jerkily.
Excessive tractive force can
damage the vehicle.
When the engine is not running,
considerably more force is needed to
brake and steer.
To prevent the entry of exhaust gases
from the towing vehicle, switch on the
air recirculation and close the
windows.
Vehicles with automatic transmission:
The vehicle must be towed facing
forwards, not faster than 80 km/h nor
further than 100 km. In all other cases
and when the transmission is
defective, the front axle must be
raised off the ground.
Seek the assistance of a workshop.
After towing, unscrew the towing eye.
Insert cap at the bottom and close.
Towing another vehicle
Insert a screwdriver in the slot at the
lower edge of the cap. Release the
cap by carefully moving the
screwdriver downwards. To prevent
damage it is recommended to place a
cloth between the screwdriver and
the frame.
The towing eye is stowed with the
vehicle tools 3 235.
-------------------------------------------------------------------------------------------------------------------------------------------------------------
254
Vehicle care
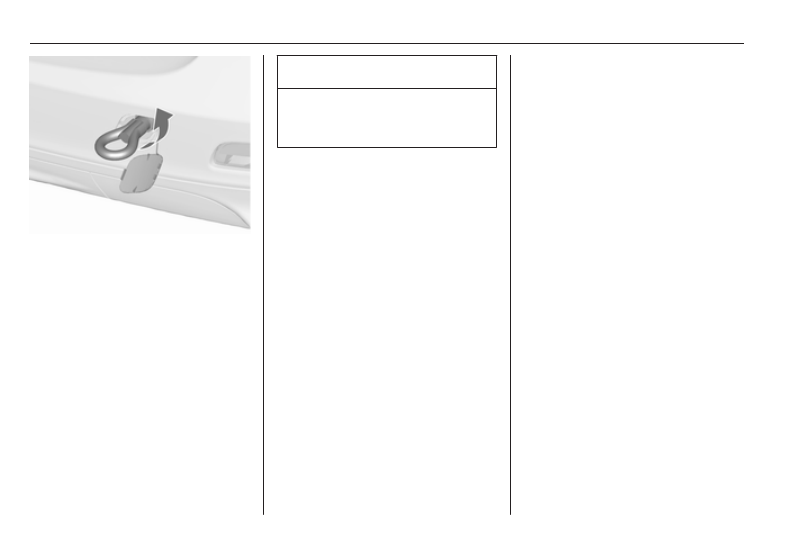
Screw in the towing eye as far as it will
go until it stops in a horizontal
position.
The lashing eye at the rear
underneath the vehicle must never be
used as a towing eye.
Attach a tow rope – or even better a
tow bar – to the towing eye.
The towing eye must only be used for
towing and not for recovering a
vehicle.
Caution
Drive slowly. Do not drive jerkily.
Excessive tractive force can
damage the vehicle.
After towing, unscrew the towing eye.
Insert cap at the bottom and engage.
Appearance care
Exterior care
Locks
The locks are lubricated at the factory
using a high quality lock cylinder
grease. Use de-icing agent only when
absolutely necessary, as this has a
degreasing effect and impairs lock
function. After using a de-icing agent,
have the locks regreased by a
workshop.
Washing
The paintwork of your vehicle is
exposed to environmental influences.
Wash and wax your vehicle regularly.
When using automatic vehicle
washes, select a programme that
includes waxing.
Bird droppings, dead insects, resin,
pollen and the like should be cleaned
off immediately, as they contain
aggressive constituents which can
cause paint damage.
-------------------------------------------------------------------------------------------------------------------------------------------------------------
Vehicle care
255
If using a vehicle wash, comply with
the vehicle wash manufacturer's
instructions. The windscreen wiper
and rear window wiper must be
switched off. Remove antenna and
external accessories such as roof
racks etc.
If you wash your vehicle by hand,
make sure that the insides of the
wheel housings are also thoroughly
rinsed out.
Clean edges and folds on opened
doors and the bonnet as well as the
areas they cover.
Clean bright metal mouldings with a
cleaning solution approved for
aluminium to avoid damages.
Caution
Always use a cleaning agent with
a pH value of four to nine.
Do not use cleaning agents on hot
surfaces.
Do not clean the engine compartment
with a steam-jet or high-pressure jet
cleaner.
Thoroughly rinse and leather-off the
vehicle. Rinse leather frequently. Use
separate leathers for painted and
glass surfaces: remnants of wax on
the windows will impair vision.
Have the door hinges of all doors
greased by a workshop.
Do not use hard objects to remove
spots of tar. Use tar removal spray on
painted surfaces.
Exterior lights
Headlight and other light covers are
made of plastic. Do not use any
abrasive or caustic agents, do not use
an ice scraper, and do not clean them
dry.
Polishing and waxing
Wax the vehicle regularly (at the
latest when water no longer beads).
Otherwise, the paintwork will dry out.
Polishing is necessary only if the paint
has become dull or if solid deposits
have become attached to it.
Paintwork polish with silicone forms a
protective film, making waxing
unnecessary.
Plastic body parts must not be treated
with wax or polishing agents.
Windows and windscreen wiper
blades
Use a soft lint-free cloth or chamois
leather together with window cleaner
and insect remover.
When cleaning the rear window from
inside, always wipe in parallel to the
heating element to prevent damage.
For mechanical removal of ice, use a
sharp-edged ice scraper. Press the
scraper firmly against the glass so
that no dirt can get under it and
scratch the glass.
Remove dirt residues from smearing
wiper blades by using a soft cloth and
window cleaner. Also make sure to
remove any residues such as wax,
insect residues and similar from the
window.
Ice residues, pollution and continuous
wiping on dry windows will damage or
even destroy the wiper blades.
-------------------------------------------------------------------------------------------------------------------------------------------------------------
256
Vehicle care
Glass panel
Never clean with solvents or abrasive
agents, fuels, aggressive media
(e.g. paint cleaner, acetone-
containing solutions etc.), acidic or
highly alkaline media or abrasive
pads.
Wheels and tyres
Do not use high-pressure jet
cleaners.
Clean rims with a pH-neutral wheel
cleaner.
Rims are painted and can be treated
with the same agents as the body.
Paintwork damage
Rectify minor paintwork damage with
a touch-up pen before rust forms.
Have more extensive damage or rust
areas repaired by a workshop.
Underbody
Some areas of the vehicle underbody
have a PVC undercoating while other
critical areas have a durable
protective wax coating.
After the underbody is washed, check
the underbody and have it waxed if
necessary.
Bitumen/rubber materials could
damage the PVC coating. Have
underbody work carried out by a
workshop.
Before and after winter, wash the
underbody and have the protective
wax coating checked.
Liquid gas system
9 Danger
Liquid gas is heavier than air and
can collect in sink points.
Take care when performing work
at the underbody in a pit.
For painting work and when using a
drying booth at a temperature above
60 °C, the liquid gas tank must be
removed.
Do not make any modifications to the
liquid gas system.
Towing equipment
Do not clean the coupling ball bar with
a steam-jet or high-pressure jet
cleaner.
Rear carrier system
Clean the rear carrier system with a
steam-jet or high-pressure jet cleaner
at least once a year.
Operate the rear carrier system
periodically if not in regular use, in
particular during winter.
Air shutter
Clean the shutter system in the front
bumper to maintain correct
functionality.
Interior care
Interior and upholstery
Only clean the vehicle interior,
including the instrument panel fascia
and panelling, with a dry cloth or
interior cleaner.
-------------------------------------------------------------------------------------------------------------------------------------------------------------
Vehicle care
257
Clean the leather upholstery with
clear water and a soft cloth. In case of
heavy soiling, use leather care.
The instrument cluster and the
displays should only be cleaned using
a soft damp cloth. If necessary use a
weak soap solution.
Clean fabric upholstery with a
vacuum cleaner and brush. Remove
stains with an upholstery cleaner.
Clothing fabrics may not be
colourfast. This could cause visible
discolourations, especially on light-
coloured upholstery. Removable
stains and discolourations should be
cleaned as soon as possible.
Clean seat belts with lukewarm water
or interior cleaner.
Caution
Close Velcro fasteners as open
Velcro fasteners on clothing could
damage seat upholstery.
The same applies to clothing with
sharp-edged objects, like zips or
belts or studded jeans.
Plastic and rubber parts
Plastic and rubber parts can be
cleaned with the same cleaner as
used to clean the body. Use interior
cleaner if necessary. Do not use any
other agent. Avoid solvents and petrol
in particular. Do not use high-
pressure jet cleaners.
-------------------------------------------------------------------------------------------------------------------------------------------------------------
258
Service and maintenance
Service and
maintenance
General information . . . . ... 258
Service information . . . . .. 258
Recommended fluids, lubricants
and parts . . . . . . . . . 259
Recommended fluids and
lubricants . . . . . . . . 259
General information
Service information
In order to ensure economical and
safe vehicle operation and to
maintain the value of your vehicle, it
is of vital importance that all
maintenance work is carried out at the
proper intervals as specified.
The detailed, up-to-date service
schedule for your vehicle is available
at the workshop.
Service display 3 107.
European service intervals
Maintenance of your vehicle is
required every 30,000 km or after
1 year, whichever occurs first, unless
otherwise indicated in the service
display.
A shorter service interval can be valid
for severe driving behaviour, e.g. for
taxis and police vehicles.
The European service intervals are
valid for the following countries:
Andorra, Austria, Belgium, Bosnia-
Herzegovina, Bulgaria, Croatia,
Cyprus, Czech Republic, Denmark,
Estonia, Finland, France, Germany,
Greece, Greenland, Hungary,
Iceland, Ireland, Italy, Latvia,
Liechtenstein, Lithuania,
Luxembourg, Macedonia, Malta,
Monaco, Montenegro, Netherlands,
Norway, Poland, Portugal, Romania,
San Marino, Serbia, Slovakia,
Slovenia, Spain, Sweden,
Switzerland, United Kingdom.
Service display 3 107.
International service intervals
Maintenance of your vehicle is
required every 15,000 km or after
1 year, whichever occurs first, unless
otherwise indicated in the service
display.
Severe operating conditions exist if
one or more of the following
circumstances occur frequently: Cold
starting, stop and go operation, trailer
operation, mountain driving, driving
on poor and sandy road surfaces,
increased air pollution, presence of
airborne sand and high dust content,
-------------------------------------------------------------------------------------------------------------------------------------------------------------
Service and maintenance
259
driving at high altitude and large
variations of temperature. Under
these severe operating conditions,
certain service work may be required
more frequently than the regular
service interval.
The international service intervals are
valid for the countries which are not
listed in the European service
intervals.
Service display 3 107.
Confirmations
Confirmation of service is recorded in
the Service and Warranty Booklet.
The date and mileage is completed
with the stamp and signature of the
servicing workshop.
Make sure that the Service and
Warranty Booklet is completed
correctly as continuous proof of
service is essential if any warranty or
goodwill claims are to be met, and is
also a benefit when selling the
vehicle.
Service interval with remaining
engine oil life duration
The service interval is based on
several parameters depending on
usage.
The service display lets you know
when to change the engine oil.
Service display 3 107.
Recommended fluids,
lubricants and parts
Recommended fluids and
lubricants
Only use products that meet the
recommended specifications.
9 Warning
Operating materials are
hazardous and could be
poisonous. Handle with care. Pay
attention to information given on
the containers.
Engine oil
Engine oil is identified by its quality
and its viscosity. Quality is more
important than viscosity when
selecting which engine oil to use. The
oil quality ensures e.g. engine
cleanliness, wear protection and oil
ageing control, whereas viscosity
grade gives information on the oil's
thickness over a temperature range.
-------------------------------------------------------------------------------------------------------------------------------------------------------------
260
Service and maintenance
Dexos is the newest engine oil quality
that provides optimum protection for
gasoline and diesel engines. If it is
unavailable, engine oils of other listed
qualities have to be used.
Recommendations for gasoline
engines are also valid for
Compressed Natural Gas (CNG),
Liquified Petroleum Gas (LPG) and
Ethanol (E85) fuelled engines.
Select the appropriate engine oil
based on its quality and on the
minimum ambient temperature
Topping up engine oil
Engine oils of different manufacturers
and brands can be mixed as long as
they comply with the required engine
oil quality and viscosity.
Use of engine oil with only
ACEA A1/B1 or only A5/B5 quality is
prohibited, since it can cause long-
term engine damage under certain
operating conditions.
Select the appropriate engine oil
based on its quality and on the
minimum ambient temperature
264.
Additional engine oil additives
The use of additional engine oil
additives could cause damage and
invalidate the warranty.
Engine oil viscosity grades
The SAE viscosity grade gives
information of the thickness of the oil.
Multigrade oil is indicated by two
figures, e.g. SAE 5W-30. The first
figure, followed by a W, indicates the
low temperature viscosity and the
second figure the high temperature
viscosity.
Select the appropriate viscosity grade
depending on the minimum ambient
temperature 3 264.
All of the recommended viscosity
grades are suitable for high ambient
temperatures.
Coolant and antifreeze
Use only organic acid type-long life
coolant (LLC) antifreeze approved for
the vehicle. Consult a workshop.
The system is factory filled with
coolant designed for excellent
corrosion protection and frost
protection down to approx. -28 °C. In
northern countries with very low
temperatures the factory filled coolant
provides frost protection down to
approx. -37 °C. This concentration
should be maintained all year round.
The use of additional coolant
additives that intend to give additional
corrosion protection or seal against
minor leaks can cause function
problems. Liability for consequences
resulting from the use of additional
coolant additives will be rejected.
Brake and clutch fluid
Over time, brake fluid absorbs
moisture which will reduce braking
effectiveness. The brake fluid should
therefore be replaced at the specified
interval.
Washer fluid
Use only washer fluid approved for
the vehicle to prevent damage of
wiper blades, paintwork, plastic and
rubber parts. Consult a workshop.
-------------------------------------------------------------------------------------------------------------------------------------------------------------
Service and maintenance
261
AdBlue
Only use AdBlue to reduce the
nitrogen oxides in the exhaust
emission 3 159.
-------------------------------------------------------------------------------------------------------------------------------------------------------------
Нет комментариевНе стесняйтесь поделиться с нами вашим ценным мнением.
Текст