Opel Zafira (2017 year). Instruction — part 3
38
Seats, restraints
Front seats
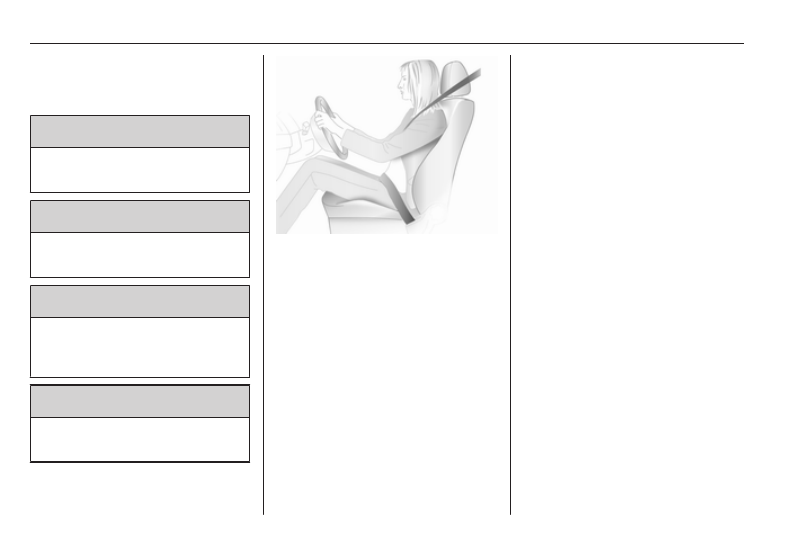
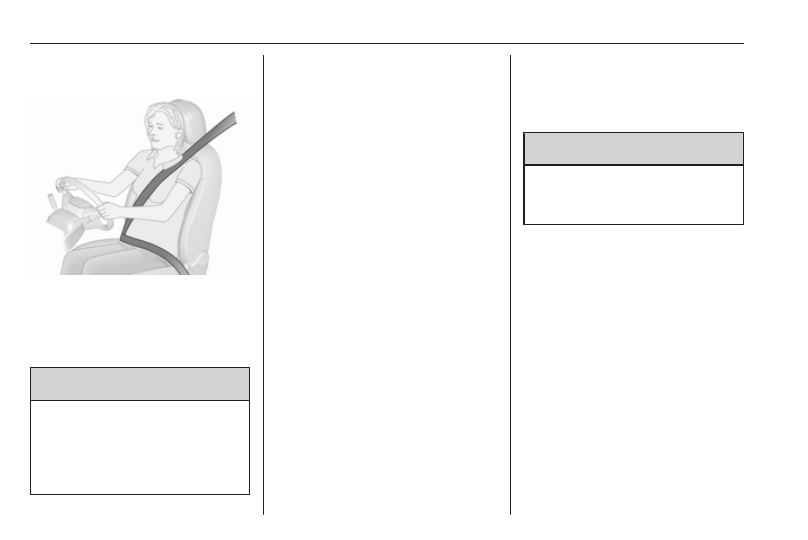
Seat position
9 Warning
Only drive with the seat correctly
adjusted.
9 Warning
Never adjust seats while driving as
they could move uncontrollably.
9 Danger
Do not sit nearer than 25 cm from
the steering wheel, to permit safe
airbag deployment.
9 Warning
Never store any objects under the
seats.
● Sit with buttocks as far back
against the backrest as possible.
Adjust the distance between the
seat and the pedals so that legs
are slightly angled when pressing
the pedals. Slide the front
passenger seat as far back as
possible.
● Set seat height high enough to
have a clear field of vision on all
sides and of all display
instruments. There should be at
least one hand of clearance
between head and the roof
frame. Your thighs should rest
lightly on the seat without
pressing into it.
● Sit with shoulders as far back
against the backrest as possible.
Set the backrest rake so that it is
possible to easily reach the
steering wheel with arms slightly
bent. Maintain contact between
shoulders and the backrest when
turning the steering wheel. Do
not angle the backrest too far
back. We recommend a
maximum rake of approx. 25°.
● Adjust seat and steering wheel in
a way that the wrist rests on top
of the steering wheel while the
arm is fully extended and
shoulders are on the backrest.
● Adjust the steering wheel 3 97.
● Adjust the head restraint 3 36.
● Adjust the height of the seat belt
● Adjust the thigh support so that
there is a space approx. two
fingers wide between the edge of
the seat and the hollow of the
knee.
● Adjust the lumbar support so that
it supports the natural shape of
the spine.
-------------------------------------------------------------------------------------------------------------------------------------------------------------
Seats, restraints
39
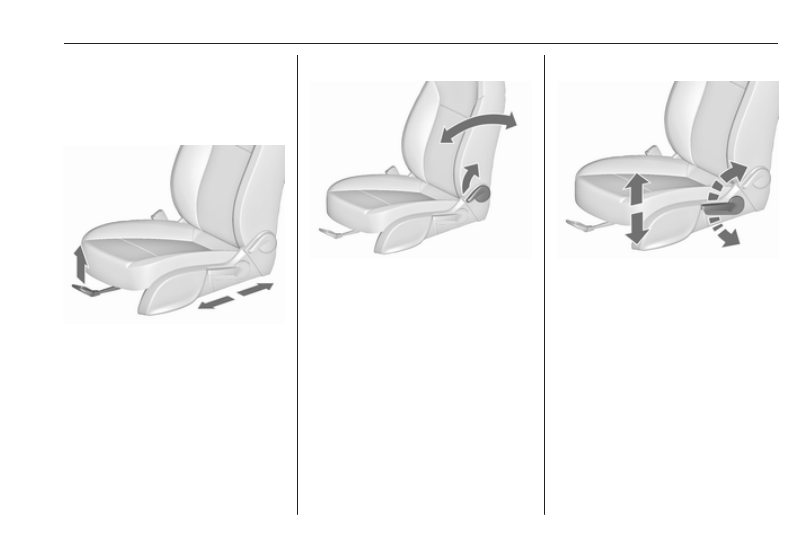
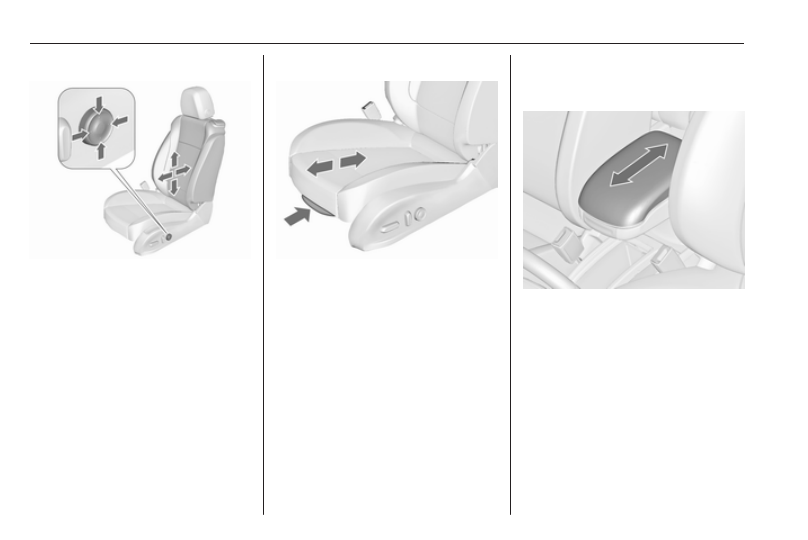
Instruction seat adjustment
Drive only with engaged seats and
backrests.
Longitudinal adjustment
Pull handle, slide seat, release
handle. Try to move the seat back and
forth to ensure that the seat is locked
in place.
Backrest inclination
Pull lever, adjust inclination and
release lever. Allow the backrest to
engage audibly.
Seat height
Lever pumping motion
up
: seat higher
down : seat lower
-------------------------------------------------------------------------------------------------------------------------------------------------------------
40
Seats, restraints
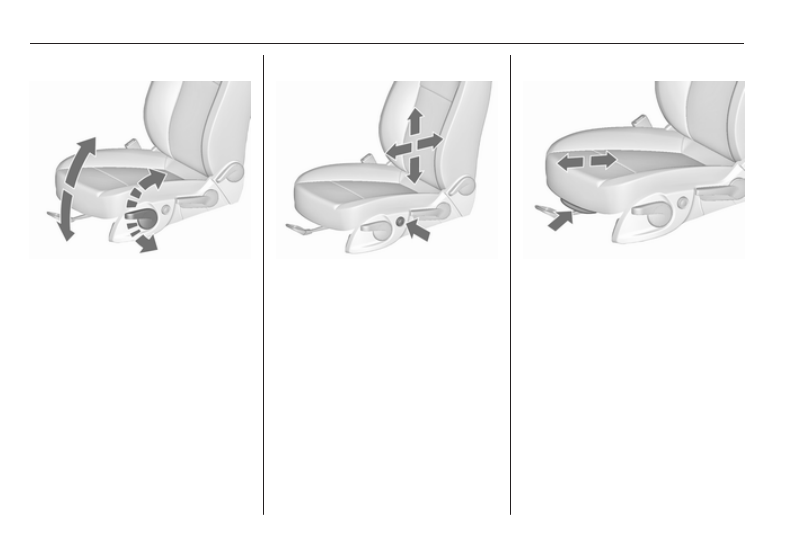
Seat inclination
Lever pumping motion
up
: front end higher
down : front end lower
Lumbar support
Adjust lumbar support using the four-
way switch to suit personal
requirements.
Moving support up and down: push
switch up or down.
Increasing and decreasing support:
push switch forwards or backwards.
Adjustable thigh support
Pull the lever and slide the thigh
support.
-------------------------------------------------------------------------------------------------------------------------------------------------------------
Seats, restraints
41
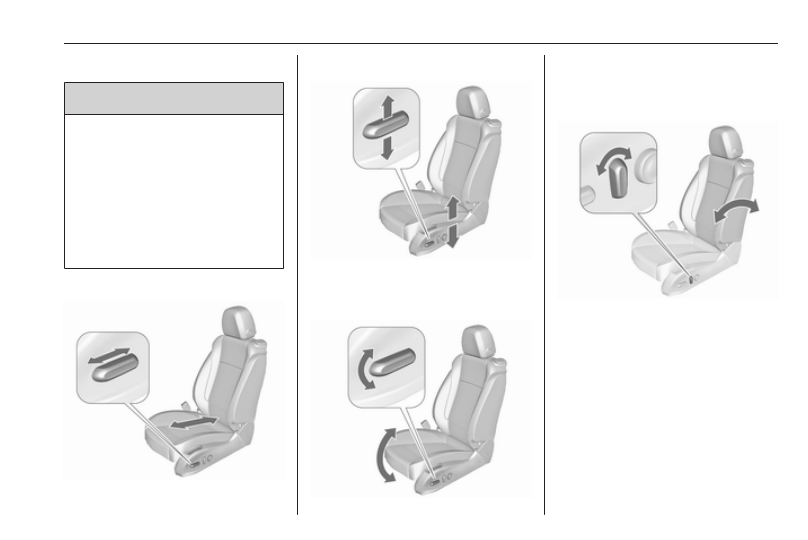
Power seat adjustment
9 Warning
Care must be taken when
operating the power seats. There
is a risk of injury, particularly for
children. Objects could become
trapped.
Keep a close watch on the seats
when adjusting them. Vehicle
passengers should be informed
accordingly.
Longitudinal adjustment
Move switch forwards/backwards.
Seat height
Move switch upwards/downwards.
Seat inclination
Move front of switch upwards/
downwards.
Backrest inclination
Turn switch forwards/backwards.
-------------------------------------------------------------------------------------------------------------------------------------------------------------
42
Seats, restraints
Lumbar support
Adjust lumbar support using the four-
way switch to suit personal
requirements.
Moving support up and down: push
switch up or down.
Increasing and decreasing support:
push switch forwards or backwards.
Adjustable thigh support
Pull the lever and slide the thigh
support.
Overload
If the seat setting is electrically
overloaded, the power supply is
automatically cut-off for a short time.
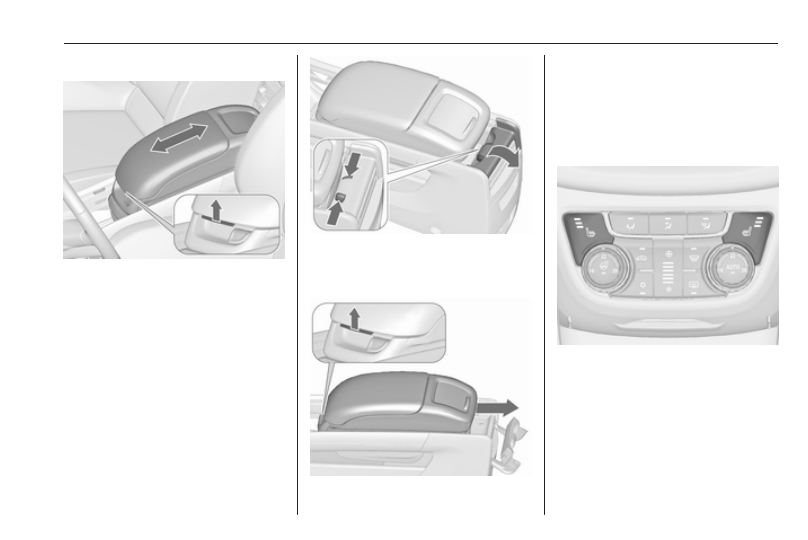
Armrest
Base armrest
The armrest can be slid forwards.
-------------------------------------------------------------------------------------------------------------------------------------------------------------
Seats, restraints
43
FlexConsole armrest
The armrest can be moved in a centre
console. Pull the handle to slide the
armrest.
There are two storages, a storage
drawer and a movable cupholder in
the armrest console.
Armrest storage 3 69.
Removing the armrest
Flex console armrest can be
removed.
Press fastenings inward and fold
down locking mechanism at the rear
end of the armrest.
Pull the handle in front of the armrest
and slide armrest rearwards out of the
console.
Installation in reverse order.
Heating
Adjust heating to the desired setting
by pressing ß for the respective seat
one or more times. The control
indicator in the button indicates the
setting.
Prolonged use of the highest setting
for people with sensitive skin is not
recommended.
-------------------------------------------------------------------------------------------------------------------------------------------------------------
44
Seats, restraints
Seat heating is operational when
engine is running and during an
Autostop.
Stop-start system 3 154.
Rear seats
Second row seats
9 Warning
When seats or backrests of
second and third seat row are
being adjusted or folded, keep
hands and feet away from the
moving area.
Never store objects under the
seats.
Never adjust seats while driving as
they could move uncontrollably.
Drive only with engaged seats and
backrests.
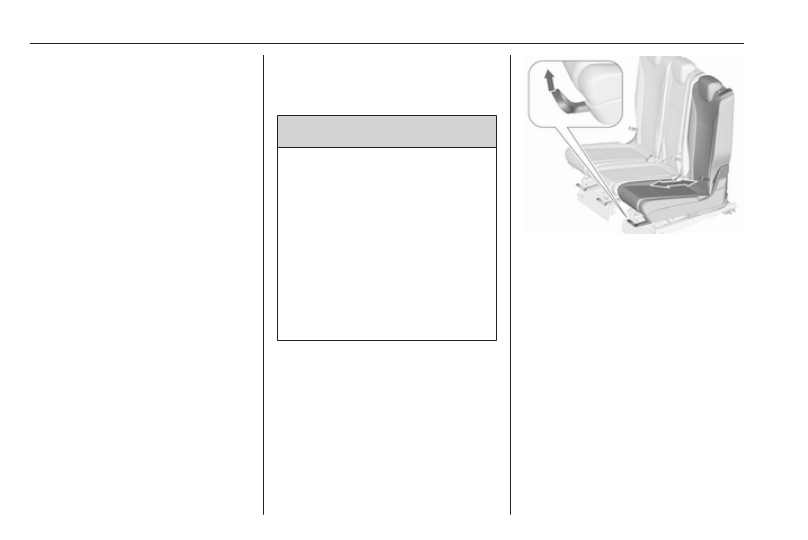
Base seats
Seat positioning
Each seat of the second seat row can
be individually moved forward or
backward.
Pull handle, slide seat, release
handle and allow seat to engage.
The seats can be engaged in
intermediate positions.
Seat backrests
The backrest inclination of each seat
can be individually adjusted in three
positions.
-------------------------------------------------------------------------------------------------------------------------------------------------------------
Seats, restraints
45
Pull the loop, adjust inclination,
release strap and allow backrest to
engage.
9 Warning
Use vertical position of the
backrest only for increased
luggage volume and not as
seating position.
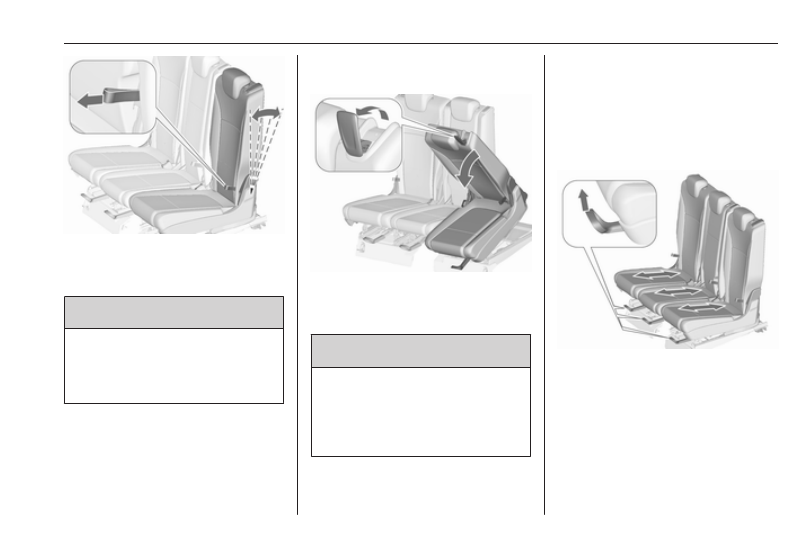
Load compartment, folding down the
Easy entry function
To permit an easy entrance to the
seats of the third row, the outer seats
of the second row can be tilted.
Pull release lever, fold backrest and
move the seat to the front.
Folding back easy entry
First move seat to desired position
and then raise backrest.
9 Warning
When folding up, ensure that the
seat is securely locked in position
before driving. Failure to do so
may result in personal injury in the
event of hard braking or a collision.
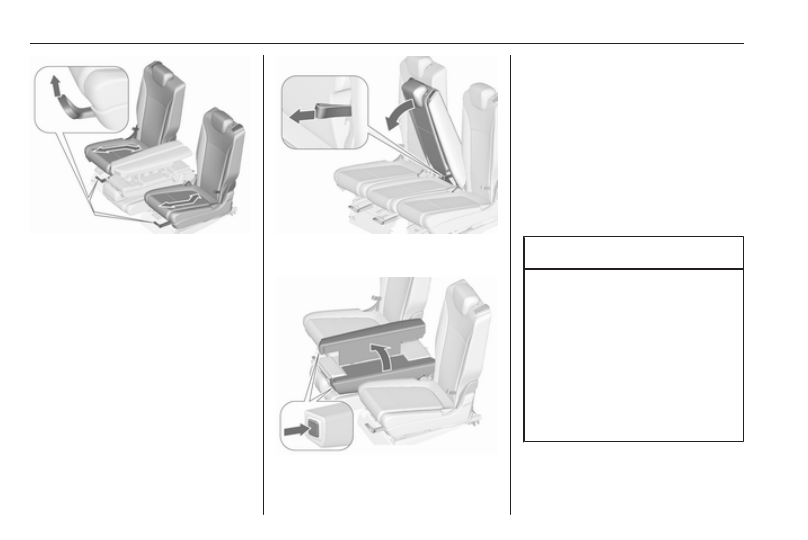
Lounge seats
Two types of use are possible:
Normal seats, all three seats are
usable and individually adjustable.
Lounge seats, only outer seats are
usable but with most comfortable
adjustment.
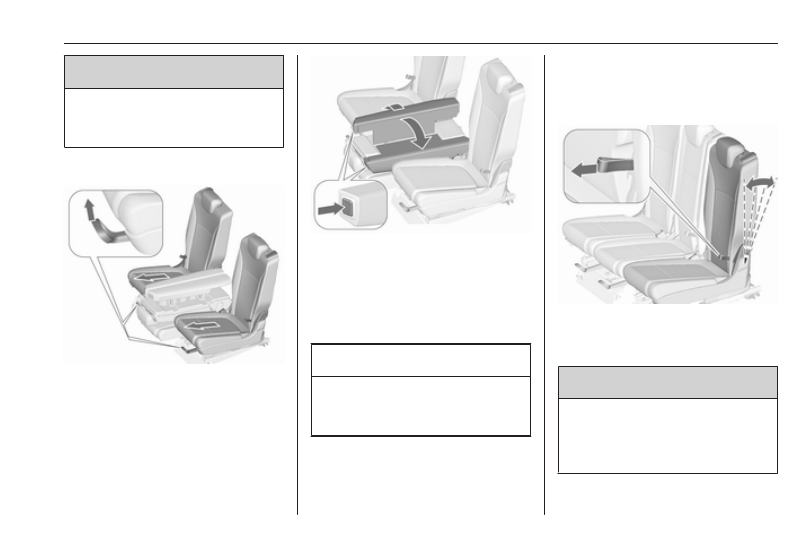
Seat positioning
In normal position, the three seats of
the second seat row can be
individually moved in longitudinal
direction.
Pull handle under the seat, slide seat,
release handle and allow seat to
engage.
-------------------------------------------------------------------------------------------------------------------------------------------------------------
46
Seats, restraints
In lounge position, the outer seats are
additionally movable in transverse
direction when the centre seat
backrest is folded to an armrest.
The seats can be engaged in
intermediate positions.
Change from normal seat position to
lounge seat position
● Push down head restraint of
centre seat by pressing the catch
● Fold down the centre backrest by
pulling the loop.
● Push the left and right buttons
near the centre head restraint
and fold in the outer backrest
parts, to be used as an armrest.
Engage backrest parts in armrest
position.
● Pull the handle under each outer
seat and slide seats backwards.
In the rear area the seats move in
transverse direction. Allow seat
to engage.
This is the most comfortable
seating position for the outer
seats.
Caution
With seats in lounge position:
● Do not use easy entry function
● Do not fold down backrests of
the outer seats.
● Do not fold up centre backrest.
● Do not fold up or down the
This would damage the seats.
-------------------------------------------------------------------------------------------------------------------------------------------------------------
Seats, restraints
47
9 Warning
Move seats only to lounge position
if seats in the third row are not
occupied.
Change from lounge seat position to
normal seat position
● Pull the handle under each outer
seat and slide seats to forward
position.
● Push the left and right buttons
near the centre head restraint
and fold back both armrest parts
to the centre backrest.
● Fold up centre backrest. Adjust
position by pulling the strap.
Caution
Before folding up the centre seat
backrest make sure that the
armrest parts are folded down.
Ensure that all positions are engaged
correctly.
Seat backrests
The backrest inclination can be
individually adjusted to three
positions.
Pull the loop, adjust inclination,
release strap and allow backrest to
engage.
9 Warning
Use vertical position of the
backrest only for increased
luggage volume and not as
seating position.
Load compartment, folding down the
-------------------------------------------------------------------------------------------------------------------------------------------------------------
48
Seats, restraints
Easy entry function
To permit an easy entrance to the
seats of the third row, the outer seats
of the second row can be tilted.
Pull release lever, fold backrest and
move the seat towards the front.
Caution
With seats in lounge position:
● Do not use easy entry function.
● Do not pull strap to adjust
backrest inclination.
This would damage the seats.
Folding back easy entry
First move seat to desired position
and then raise backrest.
9 Warning
When folding up, ensure that the
seat is securely locked in position
before driving. Failure to do so
may result in personal injury in the
event of heavy braking or collision.
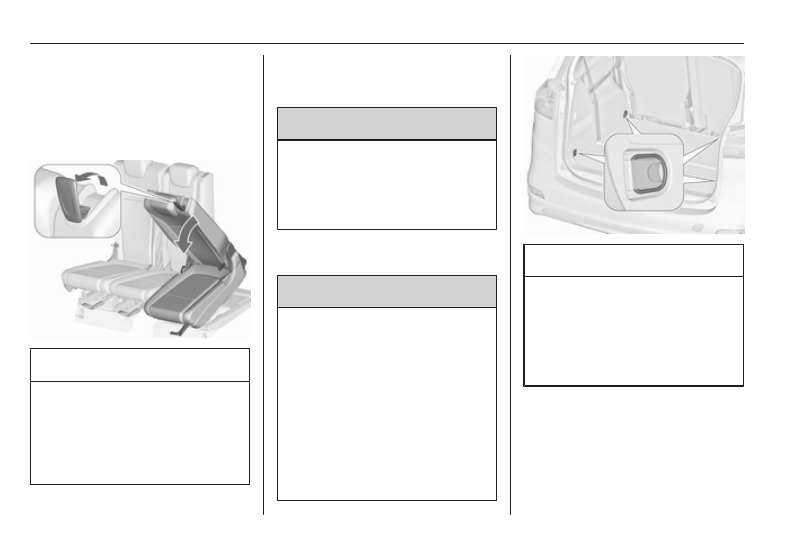
Third row seats
9 Warning
When seats or backrests of
second and third seat row are
being adjusted or folded, keep
hands and feet away from the
moving area.
Never store objects under the
seats.
Never adjust seats while driving as
they could move uncontrollably.
Drive only with engaged seats and
backrests.
Caution
Before setting up or folding down
seats, all components must be
removed from the side rails and
from the lashing eyes.
Lashing eyes must be in stored
position.
The seats in the third row can be
folded down to the vehicle floor if they
are not required, or for increasing the
size of the load compartment.
The seats in the third row can only be
used if the second seat row is not in
the lounge position.
-------------------------------------------------------------------------------------------------------------------------------------------------------------
Seats, restraints
49
Setting up the seats
● Fold in interior protection mat
compartment cover 3 81.
● Insert the latch plate of the seat
belt on each side into the pocket
that is mounted at the belt.
● Pull up the seat by the upper
loop, fold out and allow seat to
engage in upright position.
Folding down the seats in the
vehicle floor
● Push down head restraint by
● Insert the latch plate of the seat
belt on each side into the pocket
that is mounted at the belt.
● Pull the lower loop,
simultaneously swing the
backrest forwards until the seat is
lowered into the vehicle floor.
● Install the interior protection mat
cover 3 81.
-------------------------------------------------------------------------------------------------------------------------------------------------------------
50
Seats, restraints
Seat belts
The seat belts are locked during
heavy acceleration or deceleration of
the vehicle, holding the occupants in
the seat position. Therefore the risk of
injury is considerably reduced.
9 Warning
Fasten seat belt before each trip.
In the event of an accident, people
not wearing seat belts endanger
their fellow occupants and
themselves.
Seat belts are designed to be used by
only one person at a time. Child
restraint system 3 60.
Periodically check all parts of the belt
system for damage, soiling and
proper functionality.
Have damaged components
replaced. After an accident, have the
belts and triggered belt pretensioners
replaced by a workshop.
Note
Make sure that the belts are not
damaged by shoes or sharp-edged
objects or trapped. Prevent dirt from
getting into the belt retractors.
Seat belt reminder
Each seat is equipped with a seat belt
reminder, indicated for front seats by
control indicator X in the tachometer
111, or for rear seats by symbols
X
or > in the Driver Information
Centre 3 117.
Belt force limiters
On the front seats, stress on the body
is reduced by the gradual release of
the belt during a collision.
Belt pretensioners
In the event of a head-on or rear-end
collision of a certain severity, the front
seat belts are tightened.
9 Warning
Incorrect handling (e.g. removal or
fitting of belts) can trigger the belt
pretensioners.
Deployment of the belt pretensioners
is indicated by continuous illumination
of control indicator v 3 111.
Triggered belt pretensioners must be
replaced by a workshop. Belt
pretensioners can only be triggered
once.
Note
Do not affix or install accessories or
other objects that may interfere with
the operation of the belt
pretensioners. Do not make any
modifications to belt pretensioner
components as this will invalidate
the vehicle type approval.
-------------------------------------------------------------------------------------------------------------------------------------------------------------
Seats, restraints
51
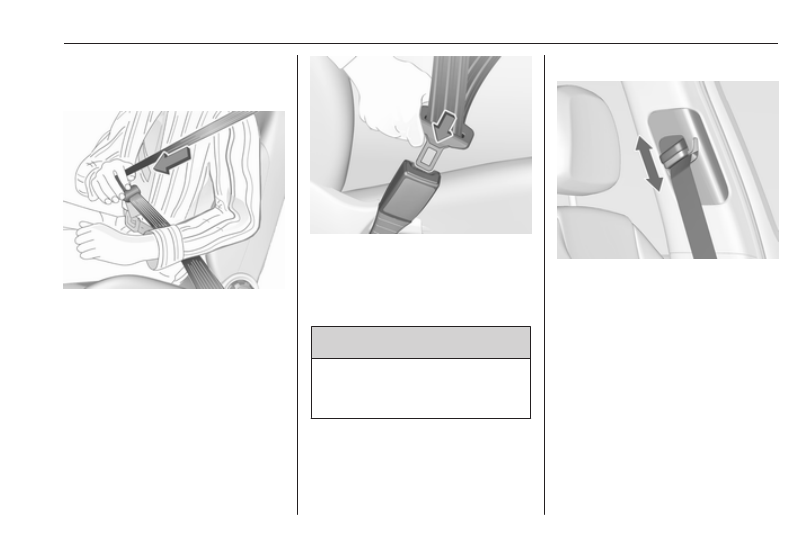
Three-point seat belt
Fasten
Withdraw the belt from the retractor,
guide it untwisted across the body
and insert the latch plate into the
buckle. Tighten the lap belt regularly
whilst driving by pulling the shoulder
belt.
Loose or bulky clothing prevents the
belt from fitting snugly. Do not place
objects such as handbags or mobile
phones between the belt and your
body.
9 Warning
The belt must not rest against hard
or fragile objects in the pockets of
your clothing.
Seat belt reminder X, > 3 111,
Height adjustment
1. Pull belt out slightly.
2. Shift the height adjuster upwards
or press button to disengage and
push the height adjuster
downwards.
-------------------------------------------------------------------------------------------------------------------------------------------------------------
52
Seats, restraints
Adjust the height so that the belt lies
across the shoulder. It must not lie
across the throat or upper arm.
Do not adjust while driving.
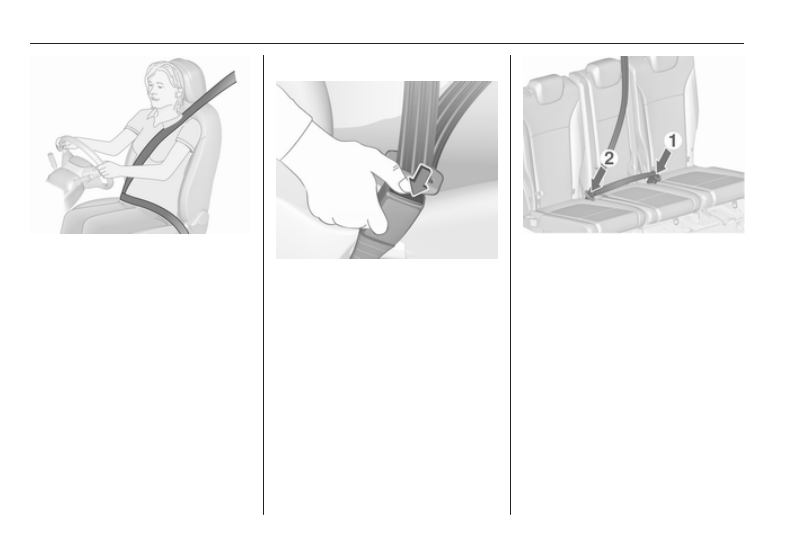
Unfasten
To release belt, press red button on
belt buckle.
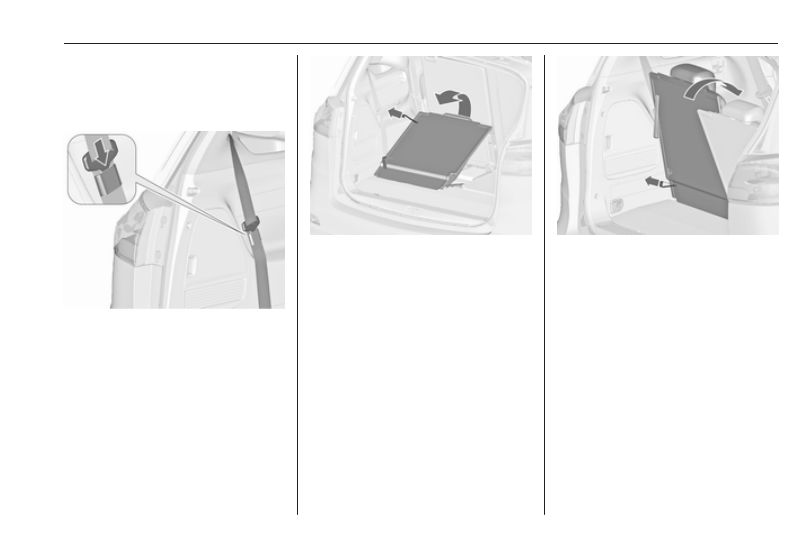
Centre seat belt of the second
seat row
The centre seat is equipped with a
particular three-point seat belt.
Pull latch plates with the belt out of
belt holder in the roof.
Remove lower latch plate from
retainer and click it into left-hand
buckle (1) at the centre seat. Guide
the upper latch plate with the belt over
the lap area and the shoulder (do not
twist) and click into right-hand buckle
(2) at centre seat.
To unfasten the seat belt, first press
the button on the right-hand buckle
(2) and remove upper latch plate.
Then press the button on the left-
hand buckle (1) and remove lower
latch plate. The seat belt retracts
automatically.
-------------------------------------------------------------------------------------------------------------------------------------------------------------
Seats, restraints
53
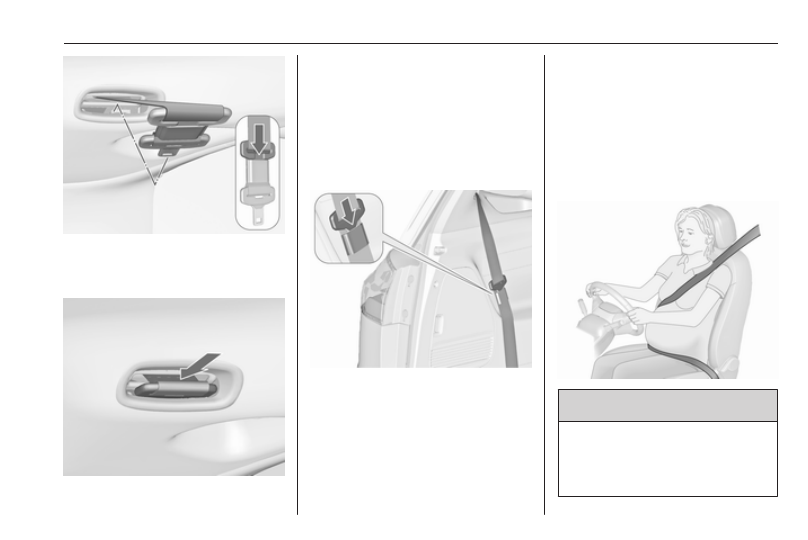
Push the top latch plate into the
retainer. Fold over locked together
latch plates against the seat belt.
Insert in the seat belt holder in the roof
with the lower latch plate pointing
forward.
Seat belts on the third seat row
The seat belts on the third seat row
are equipped with three point seat
belts.
When seat belts are not used or when
folding the seats, insert the latch plate
of the seat belt on each side into the
pocket that is mounted at the belt.
If the centre seat of the second seat
row is occupied and the seat belt is
fastened, only persons with a body
height up to max. 150 cm are allowed
to use the left seat of the third seat
row.
There is a warning label on the rear
side of the centre belt, when it is
pulled out, to inform the passenger on
the left seat of the third seat row.
Using seat belts while pregnant
9 Warning
The lap belt must be positioned as
low as possible across the pelvis
to prevent pressure on the
abdomen.
-------------------------------------------------------------------------------------------------------------------------------------------------------------
Нет комментариевНе стесняйтесь поделиться с нами вашим ценным мнением.
Текст