Opel Zafira (2017 year). Instruction — part 9
134
Lighting
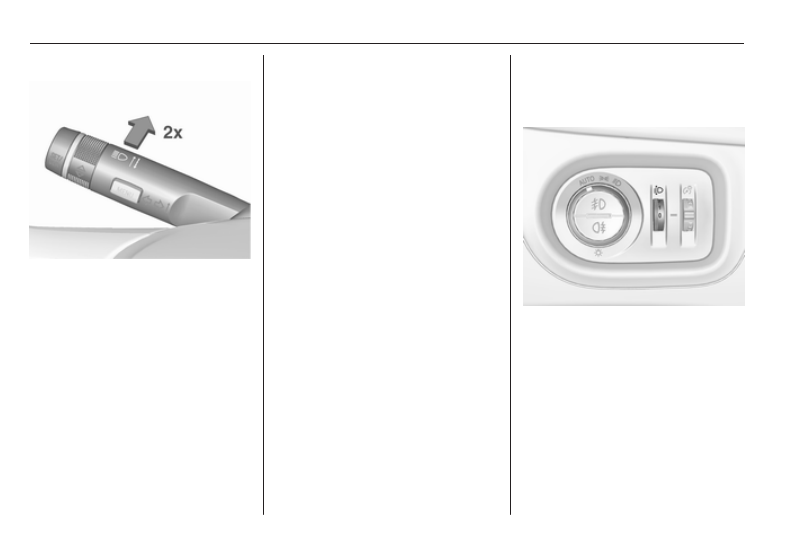
Activation
The high beam assist is activated by
pushing the indicator lever twice with
a speed above 40 km/h.
The green control indicator f
illuminates continuously when the
assist is activated, the blue one 7
illuminates when high beam is on.
Control indicator f 3 116.
Deactivation
Push indicator lever once. It is also
deactivated when front fog lights are
switched on.
If a headlight flash is activated when
the high beam is on, the high beam
assist will be deactivated.
If a headlight flash is activated when
the high beam is off, the high beam
assist will remain activated.
The latest setting of the high beam
assist will remain after the ignition is
switched on again.
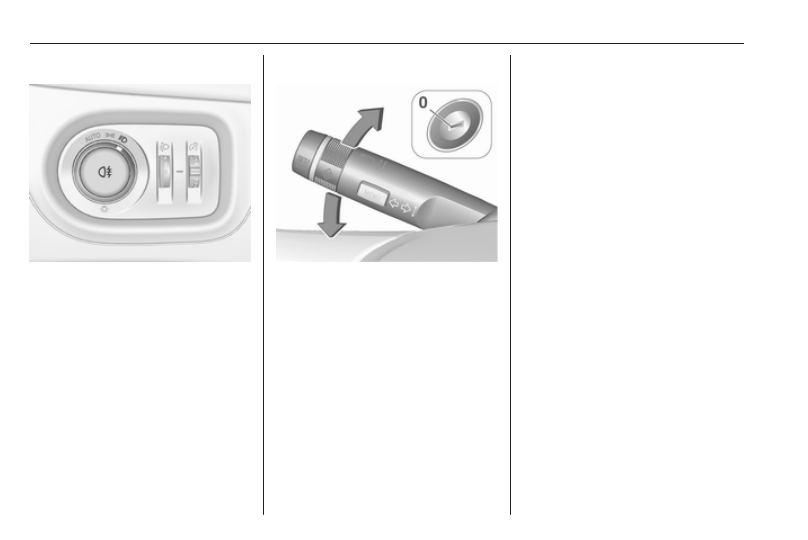
Headlight flash
To activate the headlight flash, pull
lever.
Pulling lever deactivates high beam.
LED headlights 3 136.
Headlight range adjustment
Instruction headlight range
adjustment
To adapt headlight range to the
vehicle load to prevent dazzling: turn
thumb wheel ? to required position.
0 : front seats occupied
1 : all seats occupied
2 : all seats occupied and load
compartment laden
3 : driver's seat occupied and load
compartment laden
Dynamic automatic headlight
-------------------------------------------------------------------------------------------------------------------------------------------------------------
Lighting
135
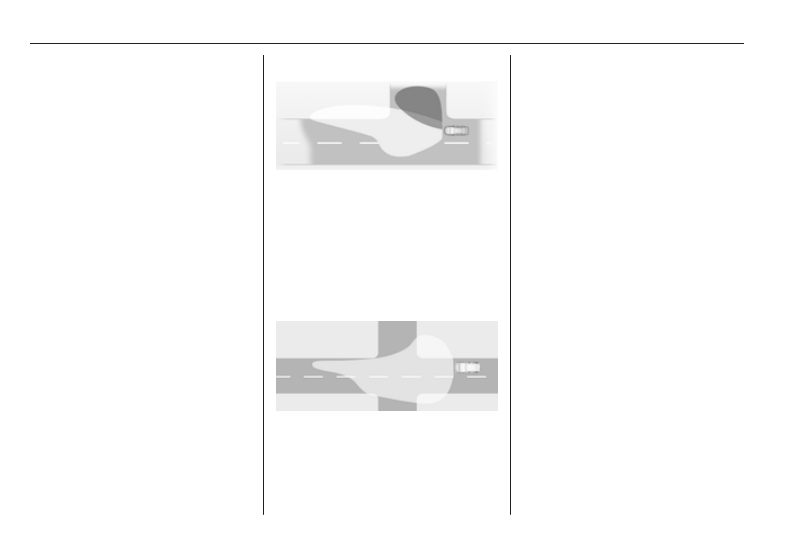
Headlights when driving
abroad
The asymmetrical headlight beam
extends visibility at the edge of the
road at the passenger side.
However, when driving in countries
where traffic drives on the opposite
side of the road, adjust the headlights
to prevent dazzling of oncoming
traffic.
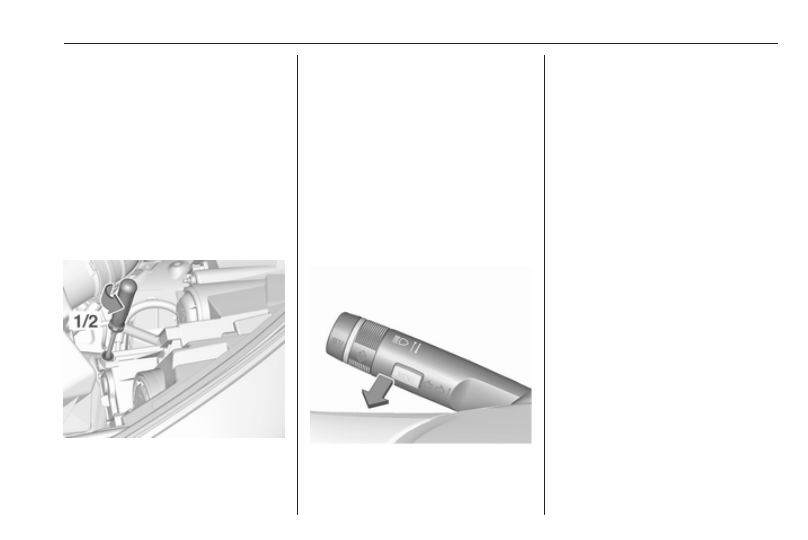
Vehicles with halogen headlight
There is a white adjuster element on
the rear of each headlight housing.
Turn adjuster element on each
headlight housing
1
/
2
turn with a
size six hexagon key anticlockwise to
set to right-hand traffic mode. To
adjust, insert the key in the guide as
shown in the illustration. Alternatively,
a Phillips head screwdriver
size three can be used for setting.
To reset to left-hand traffic mode, turn
adjuster elements on both headlight
housings
1
/
2
turn clockwise.
Vehicles with LED headlight
1. Key in ignition switch.
2. Pull turn signal lever and hold
(headlight flash).
3. Switch on ignition.
4. After approx. five seconds the
control indicator f starts flashing
and an acoustic signal sounds.
Control indicator f 3 116.
Every time the ignition is switched on,
f
flashes as a reminder for approx.
four seconds.
For deactivation, operate the same
procedure as described above. f will
not flash when function is
deactivated.
Daytime running lights
Daytime running light increases
visibility of the vehicle during daylight.
They are switched on automatically
when the engine is running.
The system switches between
daytime running lights and headlights
automatically, depending on the
lighting conditions. Automatic light
control 3 133.
-------------------------------------------------------------------------------------------------------------------------------------------------------------
136
Lighting
LED headlights
LED lighting system includes:
● LED headlights for low and high
beam
● cornering lights
● town light
● high beam assist
● reverse parking function
● eco mode
● dynamic automatic headlight
levelling
LED headlights for low and
highbeam
LED headlights for low and high beam
ensure better visibility under all
conditions.
Operation is the same as for halogen
headlights.
Light switch 3 132, high beam 3 133,
headlight flash 3 134, headlights
when driving abroad 3 135.
Automatic light control 3 133.
Cornering lights
On tight bends or when turning off,
depending on the steering angle or
the indicator light signal, an additional
left or right reflector is switched on
which illuminates the road in the
direction of travel. It is activated up to
a speed of 70 km/h.
Town light
Activated automatically at a speed up
to approx. 55 km/h. In situations with
exterior ambient light both cornering
lights are switched on with reduced
intensity. The light is wide and
symmetrical.
High beam assist
Reverse parking function
To assist driver's orientation when
parking, both corner lights and
reversing light illuminate when
headlights are on and reverse gear is
engaged. They remain illuminated for
a short time after disengaging reverse
gear or until driving faster than
7 km/h in a forward gear.
Eco mode
If the vehicle stops, e. g. due to traffic
lights, an energy saving mode for
headlights is activated.
Dynamic automatic headlight
levelling
To prevent oncoming traffic from
being dazzled, headlight levelling is
automatically adjusted based on
vehicle inclination information.
Headlights when driving abroad
-------------------------------------------------------------------------------------------------------------------------------------------------------------
Lighting
137
Fault in LED headlight system
When the system detects a failure in
the LED headlight system, f
illuminates and a warning is displayed
in the Driver Information Centre.
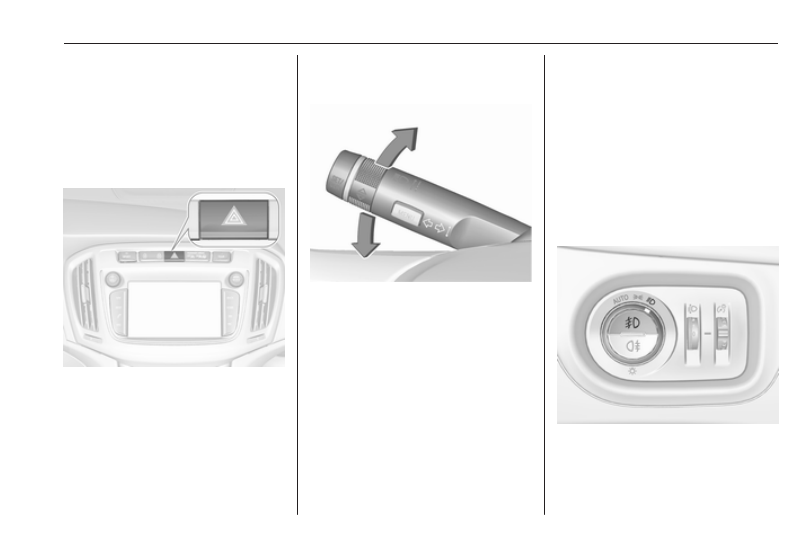
Hazard warning flashers
Operated by pressing ¨.
In the event of an accident with airbag
deployment the hazard warning
flashers are activated automatically.
Turn and lane-change
signals
lever up
: right turn signal
lever down : left turn signal
If the lever is moved past the
resistance point, the turn signal is
switched on constantly. When the
steering wheel moves back, the turn
signal is automatically deactivated.
For three flashes, e.g. when changing
lanes, press the lever until resistance
is felt and then release.
When a trailer is connected, turn
signal flashes six times when
pressing the lever until resistance is
felt and then releasing.
Move the lever to the resistance point
and hold for longer indication.
Switch the turn signal off instructionly by
moving the lever to its original
position.
Front fog lights
Operated by pressing >.
Light switch in position AUTO:
switching on front fog lights will switch
headlights on automatically.
-------------------------------------------------------------------------------------------------------------------------------------------------------------
138
Lighting
Rear fog light
Operated by pressing r.
Light switch in position AUTO:
switching on rear fog light will switch
headlights on automatically.
Light switch in position 8: rear fog
light can only be switched on with
front fog lights.
The vehicle rear fog light is
deactivated when towing a trailer or a
plug is connected with the socket, e.
g. when a bicycle carrier is used.
Parking lights
When the vehicle is parked, the
parking lights on one side can be
activated:
1. Switch off ignition.
2. Move turn signal lever all the way
up (right parking lights) or down
(left parking lights).
Confirmed by a signal and the
corresponding turn signal control
indicator.
Reversing lights
The reversing light comes on when
the ignition is on and reverse gear is
selected.
Misted light covers
The inside of the light housing may
mist up briefly in poor, wet and cold
weather conditions, in heavy rain or
after washing. The mist disappears
quickly by itself; to help switch on the
headlights.
-------------------------------------------------------------------------------------------------------------------------------------------------------------
Lighting
139
Interior lighting
Instrument panel
illumination control
Brightness of the following lights can
be adjusted when the exterior lights
are on:
● instrument panel illumination
● Info-Display
● illuminated switches and
operation elements
Turn thumb wheel A and hold until
the desired brightness is obtained.
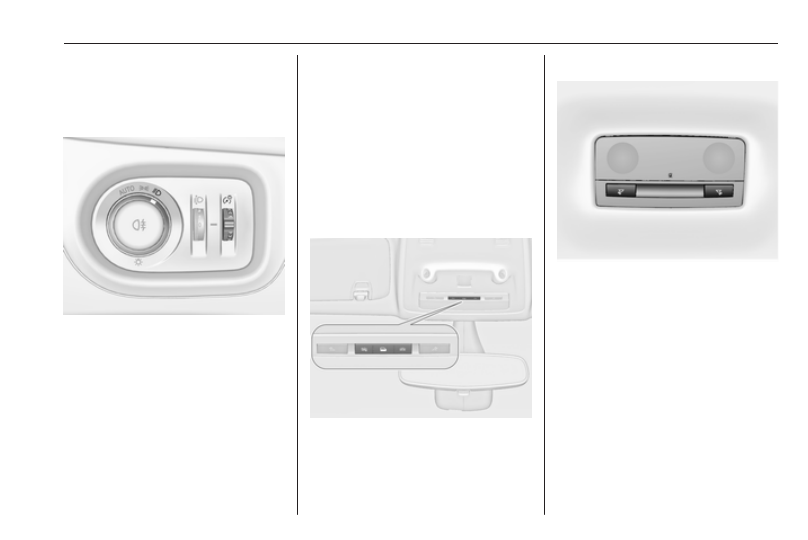
Interior lights
During entry and exit of the vehicle,
the front and rear courtesy lights
automatically switch on and then off
after a delay.
Note
In the event of an accident with
airbag deployment the courtesy
lights are turned on automatically.
Front courtesy light
Operate rocker switch:
w
: automatic switching on
and off
press u : on
press v : off
Rear courtesy lights
Illuminate in conjunction with the front
courtesy light depending on rocker
switch position.
-------------------------------------------------------------------------------------------------------------------------------------------------------------
140
Lighting
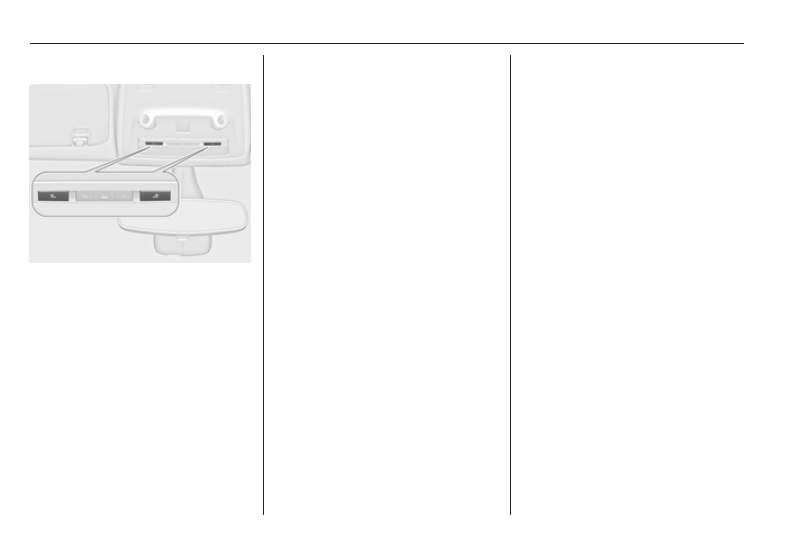
Reading lights
Operated by pressing s and t in
front and rear courtesy lights.
Sunvisor lights
Illuminates when the cover is opened.
Lighting features
Centre console lighting
Spotlight incorporated in the interior
lighting comes on when headlights
are switched on.
Entry lighting
Welcome lighting
Headlights, tail lights, number plate
lights, instrument panel light, interior
lights and the light pipes in doors and
FlexConsole are switched on for a
short time by unlocking the vehicle
with the radio remote control. This
function works only in the dark and
facilitates locating the vehicle.
The lighting switches off immediately
when the ignition key is turned to
position 1 3 151.
Activation or deactivation of this
function can be changed in the
Settings menu in the Info-Display.
Vehicle personalisation 3 125.
The settings can be saved for the key
The following lights will additionally
switch on when the driver's door is
opened:
● illumination of some switches
● Driver Information Centre
● door pocket lights
Exit lighting
The following lights switch on if the
key is removed from the ignition
switch:
● interior lights
● instrument panel light (only when
it is dark)
● light tubes in doors
● number plate lights (puddle
lights)
They will switch off automatically after
a delay and will be activated again if
the driver's door is opened.
Path lighting
Headlights, tail lights and number
plate lights illuminate the surrounding
area for an adjustable time after
leaving the vehicle.
-------------------------------------------------------------------------------------------------------------------------------------------------------------
Lighting
141
Activating
1. Switch off ignition.
2. Remove ignition key.
3. Open driver's door.
4. Pull turn signal lever.
5. Close driver's door.
If the driver's door is not closed, the
lights switch off after two minutes.
Exit lighting is switched off
immediately if the turn signal lever is
pulled while the driver's door is open.
Activation, deactivation and duration
of this function can be changed in the
Settings menu in the Info-Display.
Vehicle personalisation 3 125.
The settings can be saved for the key
Battery discharge protection
To prevent discharge of the vehicle
battery when the ignition is switched
off, some interior lights are switched
off automatically after some time.
-------------------------------------------------------------------------------------------------------------------------------------------------------------
142
Climate control
Climate control
Climate control systems . . . . 142
Heating and ventilation system 142
Air conditioning system . . ... 143
Electronic climate control
system . . . . . . . . . 144
Auxiliary heater . . . . . . 148
Air vents . . . . . . . . . . 148
Adjustable air vents . . . . . 148
Fixed air vents . . . . . . . 149
Maintenance . . . . . . . .. 149
Air intake . . . . . . . . . 149
Pollen filter . . . . . . . ... 149
Air conditioning regular
operation . . . . . . . . 149
Service . . . . . . . . . 149
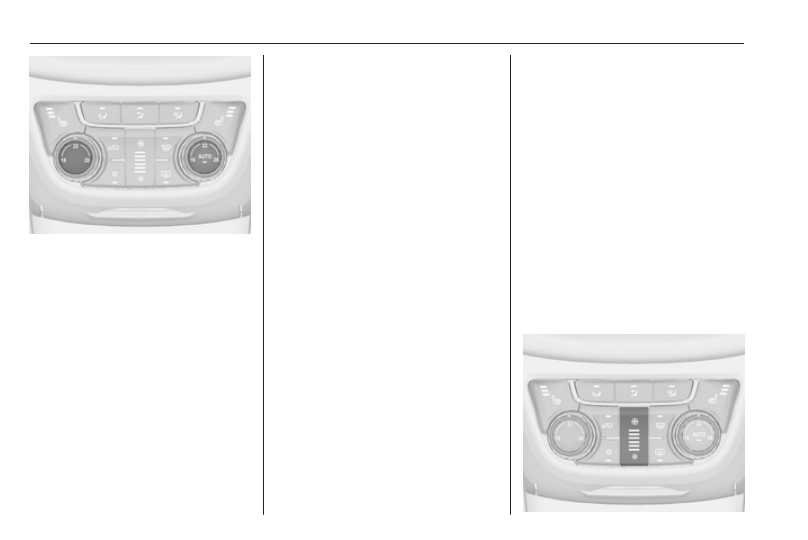
Climate control systems
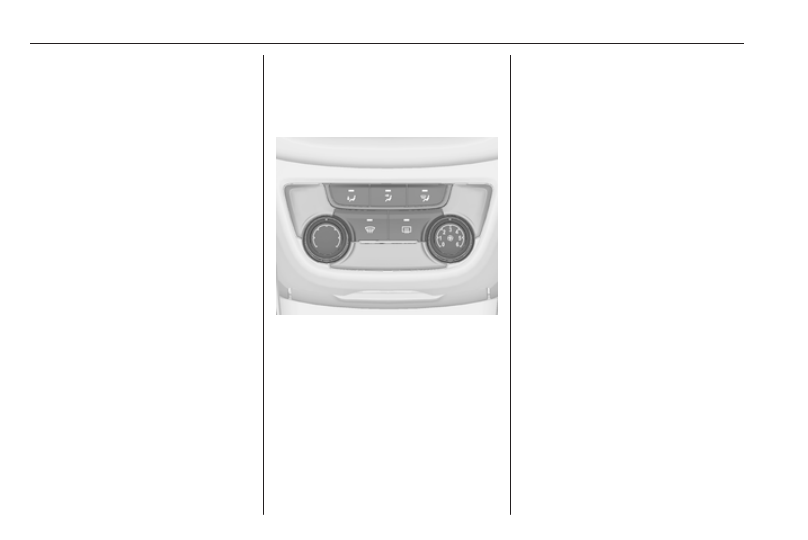
Heating and ventilation
system
Controls for:
● temperature
● air distribution
● fan speed
● demisting and defrosting
Heated rear window Ü 3 33.
Temperature
red : warm
blue : cold
Heating will not be fully effective until
the engine has reached normal
operating temperature.
Air distribution
l
: to windscreen and front door
windows
M
: to head area via adjustable air
vents
K
: to foot well and windscreen
All combinations are possible.
Fan speed
Adjust the air flow by switching the fan
to the desired speed.
Demisting and defrosting
● Press V: fan automatically
switches to higher speed, the air
distribution is directed towards
the windscreen.
● Set temperature control to
warmest level.
● Switch on heated rear window Ü.
● Open side air vents as required
and direct them towards the door
windows.
-------------------------------------------------------------------------------------------------------------------------------------------------------------
Climate control
143
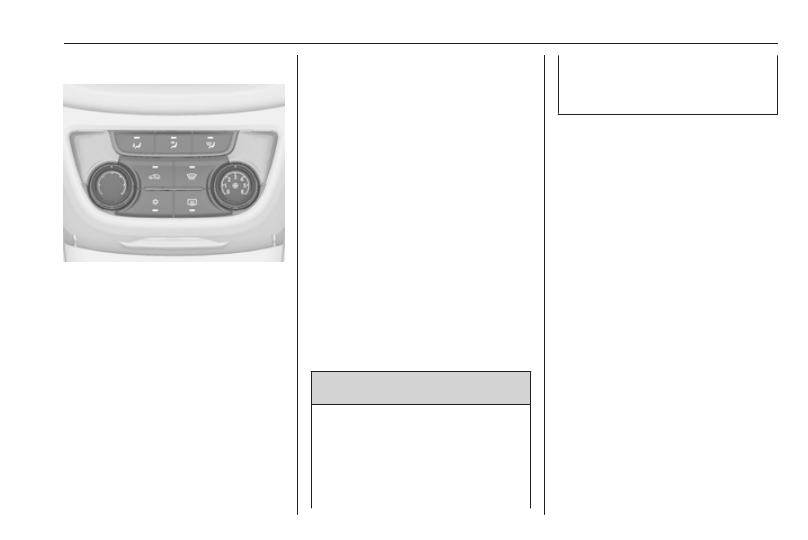
Air conditioning system
In addition to the heating and
ventilation system, the air
conditioning system has controls for:
n
: cooling
4
: air recirculation
Heated seats ß 3 43, Heated
steering wheel * 3 97.
Cooling n
Press n to switch on cooling. The
LED in the button illuminates to
indicate activation. Cooling is only
functional when the engine is running
and climate control fan is switched on.
Press n again to switch off cooling.
The air conditioning system cools and
dehumidifies (dries) as soon as the
outside temperature is slightly above
the freezing point. Therefore
condensation may form and drip from
under the vehicle.
If no cooling or drying is required,
switch off the cooling system for fuel
saving reasons. Activated cooling
may inhibit autostops.
Stop-start system 3 154.
Air recirculation system 4
Press 4 to activate air recirculation
mode. The LED in the button
illuminates to indicate activation.
Press 4 again to deactivate air
recirculation mode.
9 Warning
The exchange of fresh air is
reduced in air recirculation mode.
In operation without cooling the air
humidity increases, so the
windows may mist up from inside.
The quality of the passenger
compartment air deteriorates,
which may cause the vehicle
occupants to feel drowsy.
In warm and very humid ambient air
conditions, the windscreen may mist
up from outside when cold air is
directed towards it. If windscreen
mists up from outside, activate
windscreen wiper and deactivate l.
Maximum cooling
Briefly open the windows so that hot
air can disperse quickly.
● Switch on cooling n.
● Air recirculation system 4 on.
● Press air distribution switch M.
● Set temperature control to
coldest level.
● Set fan speed to highest level.
● Open all vents.
-------------------------------------------------------------------------------------------------------------------------------------------------------------
144
Climate control
Demisting and defrosting the
windows V
● Press V: fan automatically
switches to higher speed, the air
distribution is directed towards
the windscreen.
● Set temperature control to
warmest level.
● Switch on heated rear window Ü.
● Open side air vents as required
and direct them towards the door
windows.
Note
If V is pressed while the engine is
running, an Autostop will be inhibited
until V is pressed again.
If l is pressed with the fan switched
on and the engine running, an
Autostop will be inhibited until l is
pressed again or until the fan is
switched off.
If V is pressed while the engine is
in an Autostop, the engine will restart
automatically.
If l is pressed with the fan switched
on while the engine is in an
Autostop, the engine will restart
automatically.
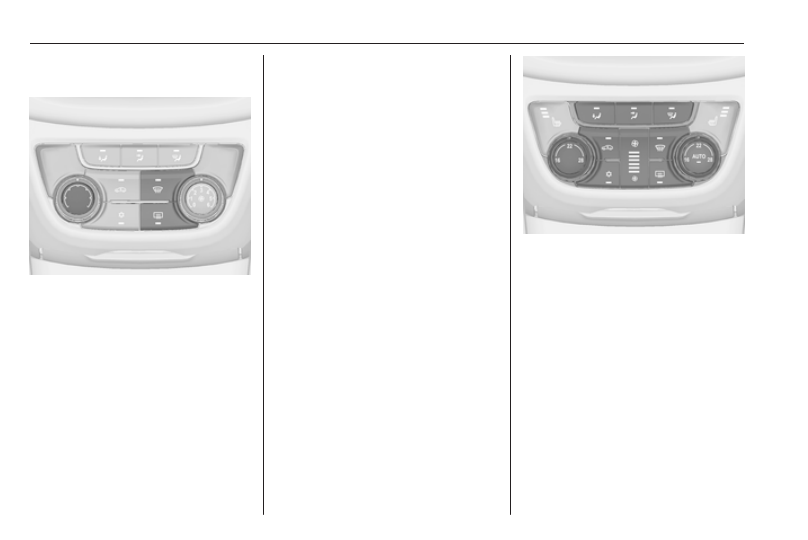
Electronic climate control
system
The dual zone climate control allows
different climatisation temperatures
for driver side and front passenger
side.
In automatic mode, temperature, fan
speed and air distribution are
regulated automatically.
Controls for:
● temperature on driver side
● air distribution
● fan speed
● temperature on front passenger
side
n
: cooling
AUTO : automatic mode
4
: instruction air recirculation
V
: demisting and defrosting
Heated rear window Ü 3 33, Heated
seats ß 3 43, Heated steering wheel
*
3 97.
-------------------------------------------------------------------------------------------------------------------------------------------------------------
Climate control
145
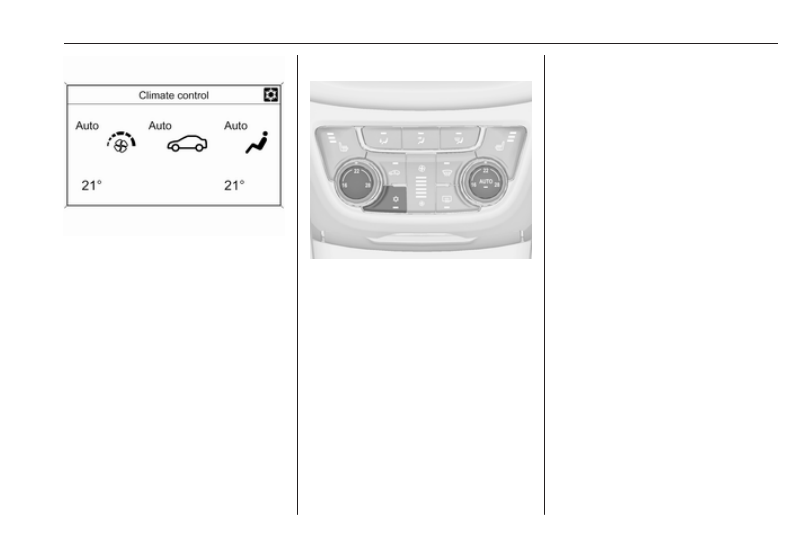
Climate control settings are shown on
the Info-Display. Setting
modifications are briefly popped-up,
superimposed over the currently
displayed menu.
The electronic climate control system
is only fully operational when the
engine is running.
Automatic mode AUTO
Basic setting for maximum comfort:
● Press AUTO. The LED in the
button illuminates to indicate
activation. The air distribution
and fan speed are regulated
automatically.
● Open all air vents to allow
optimised air distribution in
automatic mode.
● Press n to switch on optimal
cooling and demisting. The LED
in the button illuminates to
indicate activation.
● Set the preselected
temperatures for driver and front
passenger using the left and right
rotary knobs. Recommended
temperature is 22 °C.
The fan speed regulation in automatic
mode can be changed in the
Settings menu in the Info-Display.
Vehicle personalisation 3 125.
All air vents are actuated
automatically in automatic mode. The
air vents should therefore always be
open.
Temperature preselection
Temperatures can be set to a desired
value between 16 °C and 28 °C.
-------------------------------------------------------------------------------------------------------------------------------------------------------------
146
Climate control
If the minimum temperature Lo is set,
the climate control system runs at
maximum cooling, if cooling n is
switched on.
If the maximum temperature Hi is set,
the climate control system runs at
maximum heating.
Note
If n is switched on, reducing the set
cabin temperature can cause the
engine to restart from an Autostop or
inhibit an Autostop.
Stop-start system 3 154.
Demisting and defrosting the
windows V
● Press V. The LED in the button
illuminates to indicate activation.
● Temperature and air distribution
are set automatically and the fan
runs at high speed.
● Switch on heated rear window Ü.
● To return to previous mode:
press V. To return to automatic
mode: press AUTO.
Setting of automatic rear window
heating can be changed in the
Settings menu in the Info-Display.
Vehicle personalisation 3 125.
Note
If V is pressed while the engine is
running, an Autostop will be inhibited
until V is pressed again.
If l is pressed with the fan switched
on and the engine running, an
Autostop will be inhibited until l is
pressed again or until the fan is
switched off.
If V is pressed while the engine is
in an Autostop, the engine will restart
automatically.
If l is pressed with the fan switched
on while the engine is in an
Autostop, the engine will restart
automatically.
Instruction settings
Climate control system settings can
be changed by activating the buttons
and rotary knobs as follows.
Changing a setting will deactivate the
automatic mode.
Fan speed Z
-------------------------------------------------------------------------------------------------------------------------------------------------------------
Climate control
147
Press the lower button to decrease or
upper button to increase fan speed.
The fan speed is indicated by the
number of segments in the display.
Pressing and holding the lower
button: fan and cooling are switched
off.
Pressing and holding the upper
button: the fan runs at maximum
speed.
To return to automatic mode: Press
AUTO.
Air distribution l, M, K
Press appropriate button for desired
adjustment. The LED in the button
illuminates to indicate activation.
l
: to windscreen and front door
windows (air conditioning is
activated in the background to
help preventing windows from
fogging)
M
: to head area via adjustable air
vents
K
: to foot well and windscreen
All combinations are possible.
Return to automatic air distribution:
press AUTO.
Cooling n
Press n to switch on cooling.
Activation is indicated by the LED in
the button. Cooling is only functional
when the engine is running and
climate control fan is switched on.
Press n again to switch off cooling.
The air conditioning system cools and
dehumidifies (dries) when outside
temperature is above a specific level.
Therefore condensation may form
and drip from under the vehicle.
If no cooling or drying is required,
switch off the cooling system for fuel
saving reasons. When the cooling
system is switched off, no engine
restart will be requested by the
climate control system during an
Autostop. Exception: defrost system
is activated and outside temperature
above 0 °C. Stop-start system
The display will indicate ACON when
cooling is activated or ACOFF when
the cooling is deactivated.
Activation or deactivation of cooling
operation after engine start can be
changed in the Settings menu in the
Info-Display. Vehicle personalisation
Air recirculation mode 4
Press 4 to activate air recirculation
mode. The LED in the button
illuminates to indicate activation.
Press 4 again to deactivate
recirculation mode.
9 Warning
The exchange of fresh air is
reduced in air recirculation mode.
In operation without cooling the air
humidity increases, so the
windows may mist up from inside.
The quality of the passenger
compartment air deteriorates,
which may cause the vehicle
occupants to feel drowsy.
In warm and very humid ambient air
conditions, the windscreen may mist
up from outside when cold air is
-------------------------------------------------------------------------------------------------------------------------------------------------------------
148
Climate control
directed towards it. If windscreen
mists up from outside, activate
windscreen wiper and deactivate l.
Basic settings
Some settings can be changed in the
Settings menu in the Info-Display.
Vehicle personalisation 3 125.
Auxiliary heater
Air heater
Quickheat is an electric auxiliary air
heater which automatically warms up
the passenger compartment more
quickly.
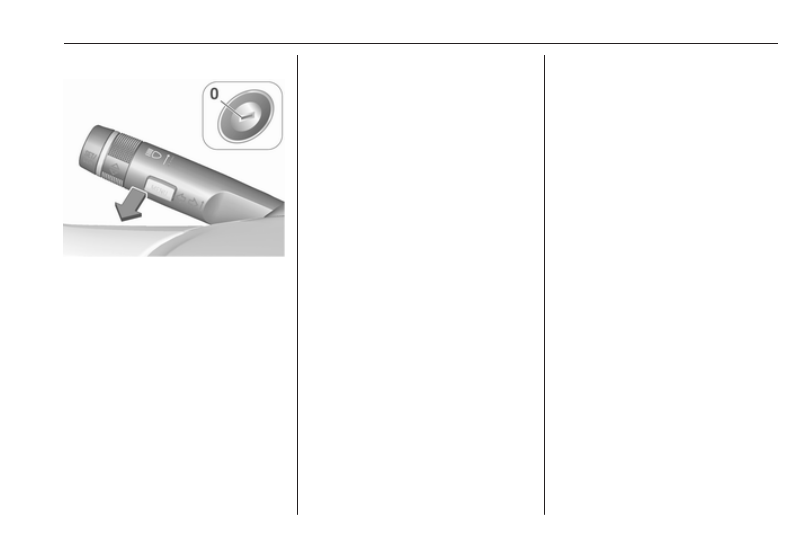
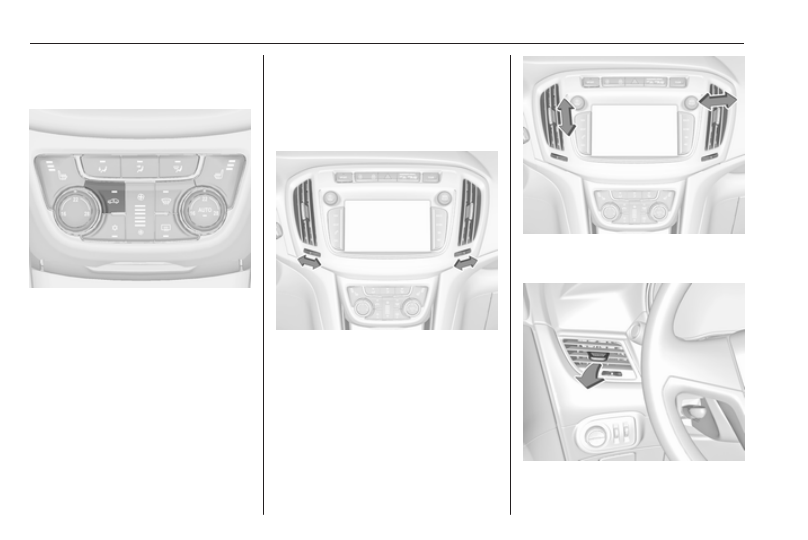
Air vents
Adjustable air vents
At least one air vent must be open
while the cooling is on.
To open the vent, turn the adjuster
wheel to B. Adjust the air amount at the
vent outlet by turning the adjuster
wheel.
Direct the flow of air by tilting and
swivelling the slats.
To close the vent, turn the adjuster
wheel to 7.
-------------------------------------------------------------------------------------------------------------------------------------------------------------
Climate control
149
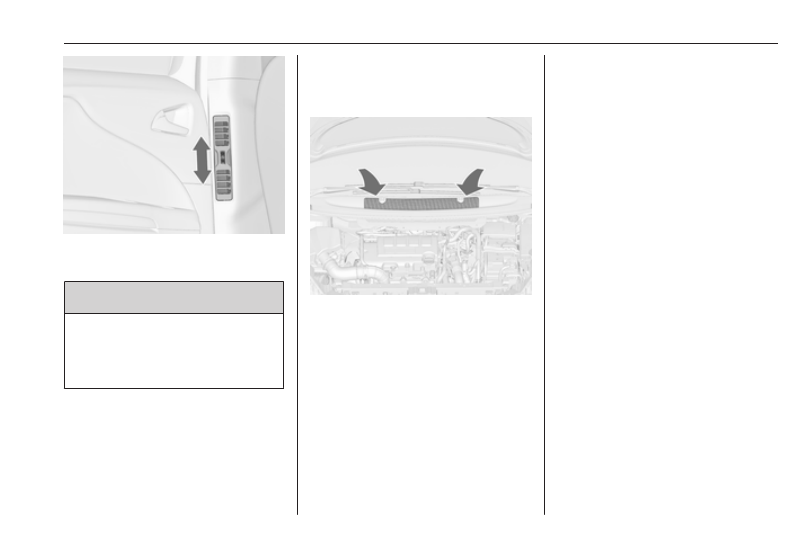
Air vents for rear passenger are left
and right side behind the front seats.
9 Warning
Do not attach any objects to the
slats of the air vents. Risk of
damage and injury in case of an
accident.
Fixed air vents
Additional air vents are located
beneath the windscreen and door
windows and in the foot wells.
Maintenance
Air intake
The air intake in front of the
windscreen in the engine
compartment must be kept clear to
allow air intake. Remove any leaves,
dirt or snow.
Pollen filter
The pollen filter cleans dust, soot,
pollen and spores from the air
entering the vehicle through the air
intake.
Air conditioning regular
operation
In order to ensure continuously
efficient performance, cooling must
be operated for a few minutes once a
month, irrespective of the weather
and time of year. Operation with
cooling is not possible when the
outside temperature is too low.
Service
For optimal cooling performance, it is
recommended to annually check the
climate control system, starting
three years after initial vehicle
registration, including:
● functionality and pressure test
● heating functionality
● leakage check
● check of drive belts
● cleaning of condenser and
evaporator drainage
● performance check
Note
Refrigerant R-134a contains
fluorinated greenhouse gases.
-------------------------------------------------------------------------------------------------------------------------------------------------------------
Нет комментариевНе стесняйтесь поделиться с нами вашим ценным мнением.
Текст